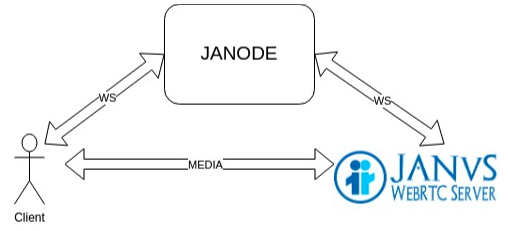
Janode is a Node.js adapter for the open source Janus WebRTC server. It enables users to develop an intermediary API between a Janus server and the client, providing a way to manage connections from the backend rather than the front end. This reduces the security and performance issues that arise from running the operations on the client side and exposing the Janus server directly to the client.
Let’s take a look at some of the specific advantages to using Janode and then run some sample code to see it in action.
Why Use Janode?
The biggest advantage of using Janode is that it provides a secure connection and less tightly coupled, better structured, and modern code where the operations are completed on the back end. The classical janus.js file is generally tightly coupled with the front-end code. This makes the code complex and hard to maintain and causes performance issues. Keeping the architecture separated and keeping the pieces simple is considered good practice.
From a security perspective, janus.js performs all the heavy lifting on the front-end and leaves the Janus API exposed. In production grade software, this is not a good practice. For example, if the admin client can reach and call the create room kind of API directly to Janus, you rely on Janus’ secret and password mechanism.
With an intermediary API in between, you can customize the protection of the server. For example, you can use JWT tokens for client-API interactions, restrict some API to client more efficiently, or limit reaching the server from outside the API.
A Summary of Advantages of Using Janode as the API Server
- Less tightly coupled code when compared with janus.js on the front end
- A more secure approach for using a media server
- Allows developers to have a customizable API. You can add extra params, make merge operations, set defaults etc. with the customized API.
- It can act as a signaling server. Further complex applications may require much more customization on the signaling server, which Janode is also helpful.
- Minimal dependencies to run
- Modern javascript code with node.js support (ES6, event emitters, destructuring, module ready, await/async)
- Stateless
- Mimic Janus architecture, use the same plugin structure
- Clean, readable, understandable architecture and code
Getting Started with Janode
To get started with Janode, you first need to deploy a Janus server and let Janode act as an API for the server. For deploying a Janus server, we recommend reading a previous blog post of ours, Deploying a Hardened Janus Gateway.
For the purposes of this demo, we are using a Docker image and a docker-compose command to run Janus locally. If you don’t have Docker and docker-compose installed you can follow instructions here and here respectively to install these tools.
Running the echoTest Implementation Demo
Next, we will run the echoTest implementation demo built with Janode. To do so, open a terminal window and — provided that you have the git cli tool installed (if not you can install it from here) — pull the Janode source code from github:
git clone https://github.com/meetecho/janode.git && cd janode
Then, in the same terminal window, install the dependencies using npm and then navigate into example/echotest and install dependencies once again.
npm installcd examples/echotestnpm install
At this point, you’ll need to configure the connection to the Janus server. To do so, locate a file under examples/echotest/src directory called config.template.js, and update it according to your Janus configuration and name it config.js.
//examples/echotest/src/config.js
export default {
   janode: {
     address: [{
       url: 'ws://localhost:8198/',
       apisecret: 'secret'
     }],
     // seconds between retries after a connection setup error
     retry_time_secs: 10
   },
   web: {
     port: 4443,
     bind: '0.0.0.0',
     key: undefined,
     cert: undefined
   }
 };
In this example, Janus is running on Docker locally and mapped the port 8198 to Janus’ 8188 websocket default port and the config file is such. The docker file is pulled from this repo, which the configuration only works on Linux OS:
cd Janusdocker-compose up -d # note option -d to start it in detached mode
And now we just need to run the example. To do so, inside the echotest folder run npm start
The demo connects to a Janus server first through the Janode implementation. Then implements some websocket messages to let the client send some commands. The commands are redirected to the Janus if it is legit via Janode’s methods.
It also acts as a signaling server, for example the trickle commands are as follows:
//examples/echotest/src/index.js
   // trickle candidate from the client
   socket.on('trickle', async (evtdata = {}) => {
     Logger.info(`${LOG_NS} ${remote} trickle received`);
     const { _id, data: trickledata = {} } = evtdata;

     if (!checkSessions(janodeSession, echoHandle, socket, evtdata)) return;

     echoHandle.trickle(trickledata.candidate).catch(({ message }) => replyError(socket, message, trickledata, _id));
   });

   // trickle complete signal from the client
   socket.on('trickle-complete', async (evtdata = {}) => {
     Logger.info(`${LOG_NS} ${remote} trickle-complete received`);
     const { _id, data: trickledata = {} } = evtdata;

     if (!checkSessions(janodeSession, echoHandle, socket, evtdata)) return;

     echoHandle.trickleComplete().catch(({ message }) => replyError(socket, message, trickledata, _id));
   });
Here, the express server created on the demo gets a trickle request from the front end client with the trickle data payload. The API then redirects the request to the Janus server via echoHandle.trickle() method. EchoHandle is initialized like so:
//examples/echotest/src/index.js
     try {
       echoHandle = await janodeSession.attach(EchoTestPlugin);
       Logger.info(`${LOG_NS} ${remote} echotest handle ${echoHandle.id} attached`);
And the events are implemented as follows:
//examples/echotest/src/index.js
// custom echoHandle events
       echoHandle.on(EchoTestPlugin.EVENT.ECHOTEST_RESULT, evtdata => {
         Logger.info(`${LOG_NS} ${echoHandle.name} echotest handle result event: ${JSON.stringify(evtdata)}`);
         replyEvent(socket, 'result', evtdata.result);
         Logger.info(`${LOG_NS} ${remote} result event sent`);
       });

       // generic echoHandle events
       echoHandle.on(Janode.EVENT.HANDLE_WEBRTCUP, () => Logger.info(`${LOG_NS} ${echoHandle.name} webrtcup event`));
       echoHandle.on(Janode.EVENT.HANDLE_MEDIA, evtdata => Logger.info(`${LOG_NS} ${echoHandle.name} media event ${JSON.stringify(evtdata)}`));
       echoHandle.on(Janode.EVENT.HANDLE_SLOWLINK, evtdata => Logger.info(`${LOG_NS} ${echoHandle.name} slowlink event ${JSON.stringify(evtdata)}`));
       echoHandle.on(Janode.EVENT.HANDLE_HANGUP, evtdata => Logger.info(`${LOG_NS} ${echoHandle.name} hangup event ${JSON.stringify(evtdata)}`));
       echoHandle.on(Janode.EVENT.HANDLE_DETACHED, () => Logger.info(`${LOG_NS} ${echoHandle.name} detached event`));
       echoHandle.on(Janode.EVENT.HANDLE_TRICKLE, evtdata => Logger.info(`${LOG_NS} ${echoHandle.name} trickle event ${JSON.stringify(evtdata)}`));
And from the front-end, just get the candidates from onIceCandidate of PeerConnection, then send it to the API for communication with Janus.
And that’s it. Now you have seen Janode in action with this example implementation of echoTest plugin. You can find the source code here.
Conclusion
Having an intermediary API between the front-end and your Janus server is important. Janode enables you to secure and customize your application for better performance. However, it is still a lot to digest and needs to be carefully architected to avoid problems.
If you are looking for a customized WebRTC application or need help securing or scaling Janus, contact our expert team today!


