If you’ve searched for a solution to scaling your WebRTC application, then more than likely you’ve been pointed towards Janus. Janus is a great, lightweight piece of software that allows you to scale video conferencing quickly. Janus also provides a plethora of security features that your team can take advantage of, but can be challenging to properly configure.
Where Janus can start to show it’s not-so-user-friendly side is when you dig into the details of connecting clients, setting up TURN servers, or using any of the other extensible features. While Janus documentation isn’t very easy to decipher to a newer user of the platform, it’s still a powerful tool that can be leveraged to overcharge your WebRTC infrastructure.
In this post we’ll go over some of the more difficult to understand aspects of Janus security and what our team at WebRTC.ventures have learned through our experience to give you a clearer insight on some best practices for hardening a Janus gateway to security attacks.
While this post falls mainly in the scope of securing a Janus instance, we’ll briefly touch on the initial setup of Janus to get you started. There are two main ways to build your Janus gateway. The first is building from the source found in one of the releases on the official github page. Documentation on the readme provides steps to installing the dependencies and build tools, but this can require a bit of legwork. The preferred solution might be to spin up one of the many community-maintained Janus docker images you can find on the official Janus site. You can determine which image best suits your needs. Just remember to mount the configuration files we’ll go over in the next sections to apply what we discuss.
Basic TLS Configuration
The first step these days to securing any web server or gateway is ensuring that the client and server can establish a tunneled connection. Janus is no different. We recommend setting up a reverse proxy with NGINX to sit in front of your Janus gateway. In this example, we’ll use Let’s Encrypt on Ubuntu 20.04 and set up a free TLS certificate.
First, make sure that the domain name you intend to use is pointing to your server and that both port 80 and 443 are accessible to the open internet. Make sure to shut down any services already running on those ports before continuing.
For purposes of brevity, we’ll be using the certbot docker container. If you can’t or don’t want to set up docker on your server, follow the instructions on using certbot natively.
Now we can begin by generating the certificates and saving them locally by running the certbot docker image with the following command:
docker run -p 80:80 -it --rm --name certbot
    -v "/path/to/cert:/etc/letsencrypt" \
    -v "/path/to/lock:/var/lib/letsencrypt" \
    certbot/certbot certonly -d your.domain.name --non-interactive \
    --agree-tos -m your@email.com --standalone
This will generate a fullchain1.pem and and privkey1.pem for your domain name. These are the cert and key files you will need respectively. If you copy these files, make sure to copy the files from the archive directory as the ones in live are symlinks and not the actual files.
Put these two files to a path you want them and make sure to set permissions of least privilege on them, preferably 0644 or stricter depending on your situation. They can then be referenced in an NGINX configuration file. We’ll save the following configuration to /etc/nginx.conf.d/default.conf.
server {
        listen 443 ssl;
        server_name <your.domain.name>;

        ssl_certificate /path/to/fullchain1.pem;
        ssl_certificate_key /path/to/privkey1.pem;

        location /janus {
                proxy_pass http://localhost:8088
                proxy_set_header X-Forwarded-For $remote_addr;
                proxy_set_header Host $http_host;
        }
}
This is assuming you are using the default configuration found in janus.transport.http.jcfg and that your Janus gateway is running on the same machine as the NGINX reverse proxy.
Once you reload NGINX, all connections will require TLS, keeping clients secured when setting up voice or video calls! Just make sure any ports other than 443 are blocked with either an external firewall or a firewall running on the server to force traffic through NGINX.
Janus Administration Options
This is a shorter section, as we will just discuss the options available to enable access to the admin dashboard. The admin dashboard can be a useful tool for monitoring your Janus gateway, but could be considered a security risk if leaving it open in production. Consider securing the admin dashboard by setting similar location block in your NGINX configuration as below to maintain HTTPS connections for the admin dashboard.
location /admin {
        proxy_pass http://localhost:7088;
        proxy_set_header X-Forwarded-For $remote_addr;
        proxy_set_header Host $http_host;
}
Further documentation on the admin dashboard can be found here.
Deploying and Securing CoTURN
TURN is an essential part of hosting a reliable WebRTC application. In order to provide for customers with non-traversable NAT configurations we need to allow them to connect through a backup relay server. Janus can establish a connection through TURN, but it’s not very clearly defined how that process works.
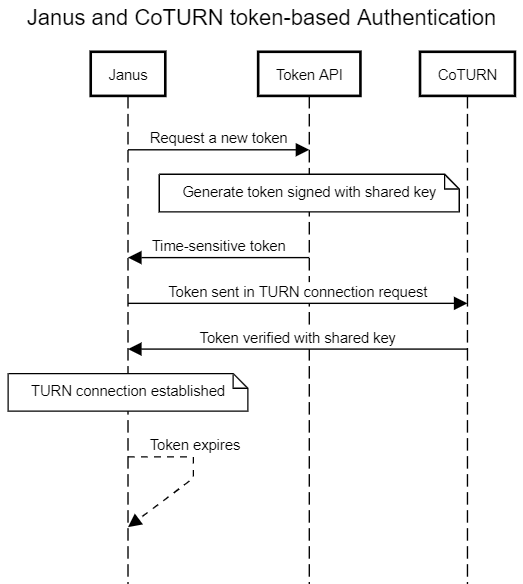
Janus and Janus clients can connect to CoTURN STUN/TURN servers with limited-time tokens so you don’t have to share a static user/password credential with the client. Using Janus with CoTURN ephemeral token authentication has a few requirements to get working properly.
- CoTURN does not allow the mixing of long-term static credentials and token-based authentication, meaning both the client and Janus need to be issued temporary token-based creds.
- Janus has configuration parameters that allow it to use token-based auth, but you will need to provide a REST API that generates these tokens with the shared secret key. See this RFC for details on how to implement it. (This REST API is NOT provided by CoTURN, the RFC is merely a guideline for implementing it yourself.)
Note in special cases where the Janus gateway is on a restrictive NAT, you will need both the Janus client and Janus to connect to the same TURN server to establish a connection. This edge case is covered in the instructions below but is not necessary for public-facing Janus deployments.
A sequence diagram that might make this process a little easier to visualize in context is shown below.
We’ll go over an example of setting up token-based ephemeral authentication for a CoTURN server and connecting Janus using that authentication method. Password-based static credentials are out of scope of this post as they are not as secure and in order to connect clients you have to expose plaintext passwords to them.
This section assumes that you’ve already set up a CoTURN server and we are updating an existing installation. Please see the github for instructions on setting one up if you haven’t already.
To enable token-based authentication on your CoTURN server, you’ll need to modify the turnserver.conf file with the following settings:
listening-port=3478
tls-listening-port=443
static-auth-secret=<your_secret_key>
server-name=<your_domain_name>
oauth
realm=<your_domain_name>
# NOTE: The reason we use the archive directory and not live here is because coturn has known issues with symlinks
cert=/desired/path/cert/archive/<your_domain_name>/fullchain1.pem
pkey=/desired/path/cert/archive/<your_domain_name>/privkey1.pem
The cert and private key used in this step can be the same we generated in the first section with Let’s Encrypt from before. The secret key can be set to whatever you want here and will be used to generate tokens for clients to connect with.
Now we can configure Janus to get generated tokens to authenticate to CoTURN by setting the following configuration in janus.jcfg:
turn_server = "myturnserver.com"
turn_port = 3478
turn_type = "udp"
turn_rest_api = "http://yourbackend.com/path/to/api"
turn_rest_api_key = "anyapikeyyoumayhaveset"
turn_rest_api_method = "GET"
turn_rest_api_timeout = 10
Remember, the REST API set here should follow the previously mentioned CoTURN RFC and will need to be written to return a token generated from the secret key shared with CoTURN we set earlier. This API endpoint can also be used to generate tokens for browser clients connecting to the same TURN server.
A quick example to replicate the functionality of this endpoint can be done using the openssl package on Ubuntu. By passing in a timestamp (expiration time) and the secret key we can generate a base64 token:
echo -n 1622564905 | openssl dgst -binary -sha1 -hmac <your_secret_key> | openssl base64Once setup, this configuration will allow Janus to automatically authenticate by grabbing a new token when needed!
Conclusion
There are a lot of hidden gems to hardening Janus. Once implemented, the combination of a TLS tunnel and ephemeral generated credentials will provide the best chance at dealing with potential attacks on your WebRTC infrastructure while still enabling high scalability with Janus as the backend.
If you are looking for more ways to scale and secure your WebRTC applications like this, contact us at WebRTC.ventures for a quote!