
Many CPaaS providers, like the Vonage Video API, have JavaScript libraries that allow application developers to build WebRTC video applications. These integrate with CPaaS infrastructure and leverage the WebRTC APIs in the browser. For typical applications, this behavior works well.
Some applications may require more advanced functionality, such as integrating video from devices that are not easily or impossible to acquire in a browser environment. This means that such libraries may be unable to be used with these types of devices. This is where native SDKs, such as OpenTok Linux SDK (part of the Vonage Video API), can be used.
The OpenTok Linux SDK provides C++ APIs that application developers can use to integrate with devices at the native level. Native libraries do require specific builds for the platform (OS + CPU) they are running in. The OpenTok Linux SDK requires a Linux environment, such as the Debian 12 (amd64) whose OS and architecture are fully supported. Other Linux platforms and CPU architectures are supported as well. Information about system requirements can be found in Vonage’s documentation.
Examples of this can be: integrating multiple cameras in a Raspberry Pi, or transcoding video from any encoding software, like RTMP from OBS for instance.
Another common use case would be creating a native SDK integration to provide application libraries for both iOS and Android applications, allowing just one place for the video calling integration logic to exist.
The OpenTok developers have provided a Github repo with a few different examples of how the OpenTok Linux SDK can be used. The examples there are very useful and provided the insight used for this article.
This article will look at a C++ application that connects to an OpenTok session and publish randomly generated audio and video signals to the session. The source code for this example application is available at Github.
Building and Running OpenTok Linux SDK
Since the SDK is built for Debian, we use a Docker container to build and run the source code.
Note: This project used the CLion IDE by JetBrains as the development environment. The CLion IDE has integration with Docker to use containers as a toolchain to build and run. This also integrates well with CMake. Other IDEs may offer similar integrations with tutorials on how to achieve this. This is not required as Docker can be used directly to shell into the container to build and run.
For this article, we will take a look at the Dockerfile used to create the build environment, the CMakeLists file used to configure the build and some source code to look at how to integrate the APIs.
The code will connect to an OpenTok Session and publish generated audio and video.
Development Dockerfile
The Development Dockerfile, is used to create the container image supporting the OpenTok Linux SDK. This Dockerfile is responsible for tasks like downloading dependencies and development tools to set up the build and runtime environment for the source code. The full docker file can be found here. This section will look at the key components for the Docker image.
Base Image
For the base image, we use ubuntu:20.04. This offers a familiar development environment and builds on the supported Debian 12 OS.
FROM ubuntu:20.04OpenTok SDK Dependency
The Dockerfile is made to let the libopentok library version be configurable with a default value.
ARG LIBOPENTOK_VERSION=2.26.0The file also installs useful build/development tools and sets the compiler to GCC 10 so the project can be compiled with C++ 20.
# OpenTok Linux SDK

RUN wget https://tokbox.com/downloads/libopentok_linux_llvm_x86_64-$LIBOPENTOK_VERSION && \
    tar xvf libopentok_linux_llvm_x86_64-$LIBOPENTOK_VERSION && \
    mv libopentok_linux_llvm_x86_64 /usr/local/src/

ENV LIBOPENTOK_PATH /usr/local/src/libopentok_linux_llvm_x86_64

# link libopentok.so into default location
RUN ln -s /usr/local/src/libopentok_linux_llvm_x86_64/lib/libopentok.so /lib/libopentok.so
The OpenTok SDK is installed as per the documentation here, and sets the LIBOPENTOK_PATH variable to link the shared object file into the default location for the build process.
The rest of the Dockerfile includes dependencies needed for GStreamer which will be used later.
Build & Run Image
To build the image run the following command:
docker build -t opentok_encoder_builder:latest -f Dockerfile.cpp-env .To run the image as a container:
docker run -it --rm --name=opentok_encoder_builder \
 --mount type=bind,source=${PWD},target=/src \
 opentok_encoder_builder:latest \
 bash
This command should be run in the directory that contains the source code. The docker command will mount this directory to the container under the /src path. The command will open up a bash shell to the container.
CMake Project Setup
The project configures the CMakeLists.txt file to compile with C++ 20, adds some extra dependencies, and configures libopentok (and any other dependencies). The CMakeLists.txt file can be found in the provided source code. This section highlights some key parts of the build file.
Environment Variables
Dotenv is used to load environment variables from a file named “.env”. Make sure to create this file and set the required fields (this is also outlined in the project’s README.md):
- API_KEY: OpenTok Project API Key
- SESSION_ID: Session ID for the OpenTok Session
- TOKEN: Token for OpenTok publisher
Project Dependencies
Let’s look at the CMake configuration for Dotenv integration. The CMakeLists file uses FetchContent to get the source code directly from dotenv’s github repository.
# dotenv

FetchContent_Declare(
        dotenv
        GIT_REPOSITORY https://github.com/laserpants/dotenv-cpp.git
        GIT_TAG master
)
FetchContent_MakeAvailable(dotenv)
The CMakeLists file will also copy over the local .env file into the CMake build output directory.
# Copy .env file for local config
configure_file(${CMAKE_SOURCE_DIR}/.env ${CMAKE_CURRENT_BINARY_DIR}/.env)
The following shows how libopentok is configured for the project. The $LIBOPENTOK_PATH variable is used with find_path to check for the header and binary files and sets them to CMake variables. The created variables are used to include and link to the project.
# OpenTok

if (DEFINED ENV{LIBOPENTOK_PATH})
    message(STATUS "Opentok Path $ENV{LIBOPENTOK_PATH}")
    find_path(LIBOPENTOK_HEADER opentok.h PATHS $ENV{LIBOPENTOK_PATH}/include NO_DEFAULT_PATH)
    find_library(LIBOPENTOK_LIBRARIES libopentok NAMES libopentok.so PATHS $ENV{LIBOPENTOK_PATH}/lib NO_DEFAULT_PATH)

    message(STATUS "Opentok header $ENV{LIBOPENTOK_HEADER}")
    message(STATUS "Opentok libs $ENV{LIBOPENTOK_LIBRARIES}")
endif ()
if (NOT LIBOPENTOK_LIBRARIES AND NOT LIBOPENTOK_HEADER)
    pkg_search_module(LIBOPENTOK REQUIRED libopentok)
else ()
    set(LIBOPENTOK_LIBRARY_DIRS $ENV{LIBOPENTOK_PATH}/lib)
    set(LIBOPENTOK_INCLUDE_DIRS $ENV{LIBOPENTOK_PATH}/include)
endif ()

include_directories(${CMAKE_SOURCE_DIR}/src ${LIBOPENTOK_INCLUDE_DIRS})
link_directories(${LIBOPENTOK_LIBRARY_DIRS})

...

target_link_libraries(opentok_encoder
        PRIVATE
        ${LIBOPENTOK_LIBRARIES}
        fmt::fmt
        dotenv
)
Using the SDK Libraries
This section will look at using the main APIs to connect to and publish to an OpenTok session. The project’s main.cpp file is available at the provided source code. Ensure at this point you are able to build the project in the docker container. Also ensure that any IDE being used can get the build symbols for the project.
Project Structure
The following is an object model diagram that depicts the integration of the application with the libopentok library.
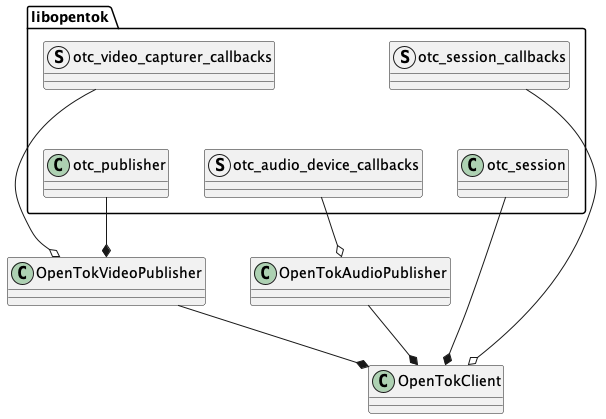
A few wrapper classes are implemented to make use of the APIs from libopentok. The following sections outline how the classes make use of the APIs to publish generated audio and video.
Initialization and Connection
The OpenTokClient class is responsible for initializing libopentok and managing the session. Here, the API key, OpenTok session ID, and publisher token are saved to be used later. The constructor calls otc_init to initialize the library. Many of the libopentok APIs return an otc_status which can be compared against OTC_SUCCESS to check for errors. If the libopentok fails to initialize then a run time error is thrown to stop program execution. The following shows the constructor for the OpenTokClient:
// src/main.cpp

OpenTokClient(
        std::string apiKey,
        std::string sessionId,
        std::string token)
        // Save variables for session connection and publishing
        : apiKey(std::move(apiKey)),
          sessionId(std::move(sessionId)),
          token(std::move(token)) {
    // Initialize libopentok
    if (otc_init(nullptr) != OTC_SUCCESS) {
        throw std::runtime_error("Could not init opentok library");
    }
}
With the library initialized, we will now look at managing the connection to the OpenTok session and publishing.
The following shows the startPublishing method which shows the main components of libopentok:
- Session initialization
- Publisher initialization
- Session connection
// src/main.cpp OpenTokClient

/**
 * Initializes the OpenTok Session and a publisher
 * Connects to the Session on initialization success
 */
bool startPublishing() {
    logger.debug(__FUNCTION__);
    if (!initializeSession()) {
        logger.error("{}: unable to initialize session", __FUNCTION__);
        return false;
    }
    if (!initializePublisher()) {
        logger.error("{}: unable to initialize publisher", __FUNCTION__);
        return false;
    }
    if (!connectSession()) {
        logger.error("{}: unable to connect session", __FUNCTION__);
        return false;
    }
    return true;
}
Session Initialization
The initializeSession function creates an otc_session using the otc_session_new API. This requires a otc_session_callbacks struct which contains function pointers to callback functions which are invoked for different lifecycle events for the session. This also takes in a user_data field which as a void *. This is the convention used by libopentok to provide references back into the application code.
The callback functions are set to static methods on the OpenTokClient class. By setting the user_data field to this, the static callback methods can get access to the OpenTokClass instance members, facilitating the integration of libopentok and the application code. We will see an example of this in the Session Connection section.
// src/main.cpp OpenTokClient

bool initializeSession() {

    ...

    // create callbacks with function pointers to class functions
    struct otc_session_callbacks sessionCallbacks{
        .on_connected = &on_session_connected,
        .on_disconnected = &on_session_disconnected,
        .on_error = &on_session_error,
        .user_data = this
    };
    // Create session with API Key, Session ID, and callbacks
    session = otc_session_new(
            apiKey.c_str(),
            sessionId.c_str(),
            &sessionCallbacks
    );

    ...
}
Audio Publisher
The OpenTokAudioPublisher initializes audio settings for the published audio streams by setting the callback functions for otc_audio_device_callbacks (note that without doing this, libopentok will attempt to use the default audio device on the system, the implementation for this application shows how a custom audio device can be configured).
The initialize method for the OpenTokAudioPublisher calls otc_set_audio_device with the otc_audio_device_callbacks to integrate the custom audio:
// src/main.cpp OpenTokAudioPublisher

bool initialize() {

    ...

    // Create callbacks with function pointers to class functions
    struct otc_audio_device_callbacks audioDeviceCallbacks = {
        .destroy_capturer = &audio_device_destroy_capturer,
        .start_capturer = &audio_device_start_capturer,
        .get_capture_settings = &audio_device_get_capture_settings,
        .user_data = this,
    };
    // Set callbacks to configure custom audio device
    if (otc_set_audio_device(&audioDeviceCallbacks) != OTC_SUCCESS) {
        logger.error("{}: Error setting audio device", __FUNCTION__);
        return false;
    }

    ...

}
The audio_device_start_capturer callback is invoked when libopentok is ready for the audio device to start capturing audio:
// src/main.cpp OpenTokAudioPublisher

static otc_bool audio_device_start_capturer(
        const otc_audio_device *audio_device,
        void *user_data
) {
    // Get pointer to this by casting user_data
    auto _this = static_cast<OpenTokAudioPublisher *>(user_data);
    if (_this == nullptr) {
        return OTC_FALSE;
    }

    _this->logger.debug(__FUNCTION__);
    // Set exit thread flag to false before we create the thread
    _this->exitAudioCapturerThread = false;

    // Create worker thread with the start function
    if (otk_thread_create(
            &(_this->audioCapturerThread),
            &capturer_thread_start_function,
            user_data
    ) != 0) {
        return OTC_FALSE;
    }

    return OTC_TRUE;
}
This is where using a worker thread to create audio data is created.
The opentok-linux-sdk-samples repo shows some example utility classes, such as the otk_thread.h class, that are used to create threads to run with libopentok and publish audio and video. These utility classes are used in this application as well.
The following code is also from the opentok-linux-sdk-examples repo. Once the buffer with the waveform is created, it is sent to be published by OpenTok using otc_audio_device_write_capture_data. This runs on a loop until the exitAudioCapturerThread member on OpenTokAudioPublisher is set.
Using otk_thread_create, a thread is created which will run the capturer_thread_start_function. In this function, audio is generated by creating a wave in a buffer:
// src/main.cpp OpenTokAudioPublisher

static otk_thread_func_return_type capturer_thread_start_function(void *arg) {
    ...
    // Create a buffer and a time variable for audio data generation
    int16_t samples[480];
    static double time = 0;
    // Set isPublishing to true now that audio will start being generated
    _this->isPublishing_ = true;
    // Poll on the exit flag
    while (!_this->exitAudioCapturerThread.load()) {
        // Generate audio waves into buffer
        for (int i = 0; i < 480; i++) {
            double val = (INT16_MAX * 0.75) * cos(2.0 * M_PI * 4.0 * time / 10.0);
            samples[i] = (int16_t) val;
            time += 10.0 / 480.0;
        }
        // Write audio buffer to publisher
        otc_audio_device_write_capture_data(samples, 480);
        // Sleep to achieve desired audio rate
        usleep(10 * 1000);
    }
    ...
}
Video Publisher
Similarly to the OpenTokAudioPublisher, the OpenTokVideoPublisher creates a struct with callbacks to initialize the video publishing. The difference for this instance is that otc_publisher_new is used to create a otc_publisher, which is from libopentok and used for the video integration:
// src/main.cpp OpenTokVideoPublisher

bool initialize() {
    // Create callbacks with function pointers to class functions
    // for the custom video device
    struct otc_video_capturer_callbacks videoCapturerCallbacks = {
            .init = &video_capturer_init,
            .destroy = &video_capturer_destroy,
            .start = &video_capturer_start,
            .get_capture_settings = &get_video_capturer_capture_settings,
            .user_data = this
    };
    // Create callbacks with function pointers to class functions
    // for publisher callbacks
    struct otc_publisher_callbacks publisherCallbacks = {
            .on_stream_created = &on_publisher_stream_created,
            .on_stream_destroyed = &on_publisher_stream_destroyed,
            .on_error = &on_publisher_error,
            .user_data = this
    };
    // Create publisher with callback objects
    publisher = otc_publisher_new("opentok-encoder-demo", &videoCapturerCallbacks, &publisherCallbacks);
    if (publisher == nullptr) {
        logger.error("OpenTokPublisher: Could not create otc publisher");
        return false;
    }
    return true;
}
Similar to audio, video_capturer_start is called when libopentok is ready for the video capture to be started. Here, a thread is created that runs the capturer_thread_start_function:
// src/main.cpp OpenTokVideoPublisher

static otc_bool video_capturer_start(const otc_video_capturer *capturer, void *user_data) {

    ...
    // Create video publisher worker thread
    if (otk_thread_create(&(_this->videoCapturerThread), &capturer_thread_start_function, _this) != 0) {
        _this->logger.error("Error creating otk thread");
        return OTC_FALSE;
    }

    ...
}
In capturer_thread_start_function, video frames are generated by using a buffer and randomly choosing a color by performing a logical and with 0xFF to produce a grey hex color, with ARGB color scheme (again from the opentok-linux-sdk-examples repo):
// src/main.cpp OpenTokVideoPublisher

/**
 * This function executes on the otk thread created during video capture startup
 * On the otk thread, the program will run a loop to generate rendered frames. The frames are provided to the
 * OpenTok video publisher. The loop will sleep for a duration to achieve the desired frame rate.
 */
static otk_thread_func_return_type capturer_thread_start_function(void *user_data) {

    ...
    // Create a buffer based on the width and height of the video
    // each pixel will use 4 bytes
    auto buffer = (uint8_t *) malloc(
        sizeof(uint8_t)
        * OpenTokVideoPublisher::width
        * OpenTokVideoPublisher::height * 4);
    // Check the exit flag
    while (!_this->exitVideoCapturerThread.load()) {
        // Generate video frame data into buffer
        memset(buffer,
            // Randomly select a hue of gray to be written to the frame
            generate_random_integer() & 0xFF,
            OpenTokVideoPublisher::width
            * OpenTokVideoPublisher::height * 4);
        // Create a video frame for the OpenTok publisher from the buffer
        auto otcFrame = otc_video_frame_new(
            OTC_VIDEO_FRAME_FORMAT_ARGB32,
            OpenTokVideoPublisher::width,
            OpenTokVideoPublisher::height,
            buffer);
        // Write the video frame to the OpenTok video publisher
        if (otc_video_capturer_provide_frame(
                _this->videoCapturer, 0, otcFrame
             ) != OTC_SUCCESS) {
            _this->logger.error("Unable to provide frame");
        }
        if (otcFrame != nullptr) {
            otc_video_frame_delete(otcFrame);
        }
        // Sleep to achieve desired frame rate
        usleep(1000 / OpenTokVideoPublisher::fps * 1000);
    }

    ...
}
The loop sleeps for enough time to achieve the desired frame rate.
Session Connection
Now that the session and the publishers are initialized, the session can be connected. Back in OpenTokClient#startPublishing, connectSession is called next.
All connectSession does is invoke otc_session_connect:
// src/main.cpp OpenTokClient

bool connectSession() {
    if (session == nullptr) {
        logger.error("{}: Could not create opentok session", __FUNCTION__);
        return false;
    }
    // Establish connection to OpenTok session
    if (otc_session_connect(session, token.c_str()) != OTC_SUCCESS) {
        logger.error("{}: could not connect session", __FUNCTION__);
        return false;
    }
    return true;
}
This starts the connection process for libopentok to the OpenTok session. From here the callbacks set up in OpenTokClient#initializeSession are invoked.
Upon successful session connection, the on_session_connected callback function is invoked:
// src/main.cpp OpenTokClient

static void on_session_connected(otc_session *session, void *user_data) {
    auto _this = static_cast<OpenTokClient *>(user_data);
    _this->logger.debug(__FUNCTION__);
    // Set session connection status flag
    _this->isConnected_ = true;

    if (session == nullptr) {
        _this->logger.error("{}: session is null", __FUNCTION__);
        return;
    }
    if (_this->videoPublisher == nullptr) {
        _this->logger.error("{}: publisher is null",
        __FUNCTION__);
        return;
    }
    // Start audio and video publishing to session
    if (!_this->videoPublisher->publishToSession(session)) {
        _this->logger.error("{}: could not publish to session",
        __FUNCTION__);
        return;
    }

    _this->logger.debug("{}: session successfully connected",
        __FUNCTION__);
}
This chains into a call to the OpenTokVideoPublisher to start publishing video to the session. OpenTokVideoPublisher#publishToSession then simply calls otc_session_publish:
// src/main.cpp OpenTokVideoPublisher
bool publishToSession(otc_session *session) {
    if (!publisher) {
        logger.error("{}: publisher is null", __FUNCTION__);
        return false;
    }
    // Publish video to session
    if (otc_session_publish(session, publisher) != OTC_SUCCESS) {
        logger.error("{}: could not publish to session", __FUNCTION__);
        return false;
    }
    return true;
}
From here, the publisher callbacks will be invoked and the worker threads will start producing video frames and audio data to libopentok to be published. Subscribe to the session in an application that can join the video call to see the video stream coming from our custom encoder:

Summary
This article shows the key components to integrate a C++ application with libopentok. From here, it would be good to explore the details of sending audio and video to be published. The APIs libopentok provide are at a very low level, where raw bits for audio and video are sent to the APIs.
This is where the raw or uncompressed video format details are very important, and libopentok provides different APIs to generate Video Frames from different formats, eg:
- otc_video_frame_new_I420: Creates a new video frame with I420 format.
- otc_video_frame_new_MJPEG: Creates a new video frame with MJPEG format.
- otc_video_frame_new_from_planes: Creates a new video frame with a given format from its planes.
These allow for different devices or video/audio sources to be used without having to transcode too much, providing a more optimal integration.
It’s no exaggeration to say that no one can claim longer-standing experience with the Vonage Video API than our team at WebRTC.ventures. Leverage our expertise as the original Vonage Video partner by contacting us today!


