Real-time video calls have become the backbone of how we work, learn, and connect. And when users connect, they expect seamless, high-quality communication. Yet many factors can affect call quality – from internet connectivity to device settings to network configurations. While these issues often originate outside the application itself, they significantly impact the user experience. Pre-call testing helps identify potential problems before a call begins, enabling proactive solutions and clearer expectations.
In this post, we’ll explore the implementation of pre-call testing – examining its importance, key components, and practical integration using three popular Communication Platform as a Service (CPaaS) providers: Vonage, Daily, and Agora.
Why Pre-Call Tests are Important
When users experience issues during a call, they often blame the application, even if the root cause comes from an out of control factor such as a poor internet connection, a faulty media device or network restrictions.
Pre-call tests can help prevent frustration and dissatisfaction. By checking the user’s internet connection, camera, microphone, and firewall access, you can proactively address potential problems and offer solutions, such as switching to a phone call if the internet connection is weak.
While a pre-call test page can’t guarantee a flawless WebRTC session, they help manage user expectations and equip support teams with the necessary tools to diagnose application issues effectively.
Anatomy of Pre-Call Tests
A typical pre-call test involves several key components:
- Connectivity/Networking Check: This checks the strength and stability of the user’s internet connection, and it also verifies if the user can reach the media servers.
- Device Selection: This allows the user to choose and test their preferred camera and microphone from the available options.
- Audio and Video Preview: This shows the user a preview of their video and provides a visual indicator that their microphone is working.
- Feedback and Troubleshooting: This provides the user with feedback on the results of the tests and offers solutions or troubleshooting tips if any issues are detected.
How to Implement Pre-Call Tests
A pre-call test page usually lives as a separate page, one where your users can test the functionality of their media devices and catch any potential network and connectivity issues that might appear during the call.
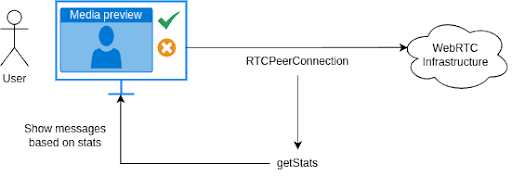
A common approach is to set up this page as a waiting room before joining the actual session. During this stage, the application establishes an RTCPeerConnection, which enables the user to send and receive media data to and from the remote WebRTC infrastructure. It’s important to note that this connection should be separate from the one used for communication with other users.
From this connection, the application leverages the metrics and statistics available in the getStats API to programmatically assess network conditions, check media device availability, and display appropriate messages in the user interface based on the results.
Some CPaaS providers implement dedicated APIs in their SDKs to assist application developers with this task. Let’s explore how to implement pre-call tests using three CPaaS solutions.
Vonage
Vonage provides the opentok-network-test-js module for implementing pre-call tests. Using this module is a matter of installing the package, and then importing the NetworkTest object which contains the testConnectivity and testQuality methods. These are the ones that provide the information about their network status to the users. Both methods require the ID of a dedicated routed session.
# installing opentok-network-test-js module using npm
npm install opentok-network-test-js
The testConnectivity method checks whether a client can connect to Vonage servers and returns a Promise that resolves with the test results. If the connection is successful, the success property in the results object is true, and no further action is needed.
If any connectivity test fails, the failedTests array in the response provides details about the failure, including the type (api, messaging, media, or logging) and an associated error object. Developers can use this information to diagnose connection issues, such as invalid credentials, network restrictions, or media device access problems, and take appropriate actions to resolve them.
The testQuality() function assesses the quality of a WebRTC publisher’s connection by analyzing video and audio performance metrics. It measures bitrate, packet loss, and MOS (Mean Opinion Score) to determine if audio and video are supported.
This function also provides recommendations for video resolution and frame rate, or suggests audio-only publishing if necessary. It returns a Promise with a results object detailing network conditions, including packet loss ratios and quality limitations due to CPU or bandwidth constraints. An optional updateCallback function provides real-time test statistics at one-second intervals.
// importing NetworkTest using ES6 syntax
import NetworkTest, { ErrorNames } from 'opentok-network-test-js';

// configure test session using your Vonage API Key, session ID and token
const otNetworkTest = new NetworkTest(OT, {
  apiKey: 'your-api-key',
  sessionId: 'your-session-id',
  token: 'your-token'
});

// execute connectivity and quality tests
otNetworkTest.testConnectivity().then((results) => {
  console.log('OpenTok connectivity test results', results);
})

orNetworkTest.testQuality(function updateCallback(stats) {
  console.log('real-time, 1s interval testQuality stats', stats);
}).then((stats) => {
  console.log('testQuality results', results);
})
Daily Precall Test
Daily has also APIs specifically designed for testing calls quality and network connectivity. These APIs are available in the following instance methods from the call object:
- testConnectionQuality (deprecated in favor of testCallQuality below)
- testCallQuality
- testPeerToPeerCallQuality
- testNetworkConnectivity
- testWebsocketConnectivity
For example, adding the ability to test call quality in a Daily based application it’s a matter of initializing Daily’s call object, then calling either preAuth or startCamera methods (per the docs, this might not be required in the future), and finally triggering the test with testCallQuality instance method.
As a result, you get a Promise that resolves to an object containing a result field (string) indicating the overall connection quality (“good”, “warning”, “bad”, “failed”, or “aborted”), a secondsElapsed field (number) indicating the duration of the test, a data field (object) containing detailed statistics, and an id field (string) identifying the test session.
Based on the results, you can display appropriate messages to the user on the pre-call test page. For instance:
- “good”: Display a message like “Your internet connection is good.”
- “warning”: Display a message like “Video and audio might be choppy.”
- “bad”: Display a message like “Your internet connection is bad. Try a different network.”
- “failed”: Display a message like “Test ended in error. Please check your network connection and try again.” The errorMsg and error fields in the results object can be used to provide more specific error information.
- “aborted”: Display a message like “Test aborted.”
Additionally, you can leverage the information provided in the data field, which provides more granular information (e.g., avgRoundTripTime, avgSendPacketLoss, avgAvailableOutgoingBitrate) in order to display these statistics on the pre-call page for more advanced users or for debugging purposes.
call.startCamera().then(() => {  // Or call.preAuth()
  call.testCallQuality().then((results) => {
    switch (results.result) {
      case 'good':
        // Display "Good connection" message
        break;
      case 'warning':
        // Display "Choppy connection possible" message
        break;
      case 'bad':
        // Display "Bad connection" message and suggest network change
        break;
      case 'failed':
        // Display "Test failed" message and error details
        console.error("Test failed:", results.errorMsg, results.error);
        break;
      case 'aborted':
        // Display "Test aborted" message
        break;
    }

    // Optionally display detailed stats:
    console.log("Test data:", results.data);
  });
});
Agora SDK
Agora SDK allows to perform pre-call tests that cover two aspects: equipment quality test and network quality test.
In the equipment quality tests, the application tests the recording and playback devices separately. Such tests consist of getting the desired devices with Agora.getDevices function. Then media tracks for these are created using AgoraRTC.createCameraVideoTrack and AgoraRTC.createMicrophoneAudioTrack methods. Finally, that application verifies that video tracks play correctly and audio tracks volume levels are greater than 0, using CameraVideoTrack.play and MicrophoneAudioTrack.getVolumeLevel methods respectively.
The code below taken from official Agora’s documentation shows the above in action:
// Get all audio and video devices
AgoraRTC.getDevices()
  .then(devices => {
    const audioDevices = devices.filter(function(device){
        return device.kind === "audioinput";
    });
    const videoDevices = devices.filter(function(device){
        return device.kind === "videoinput";
    });

    var selectedMicrophoneId = audioDevices[0].deviceId;
    var selectedCameraId = videoDevices[0].deviceId;
    return Promise.all([
      AgoraRTC.createCameraVideoTrack({ cameraId: selectedCameraId }),
      AgoraRTC.createMicrophoneAudioTrack({ microphoneId: selectedMicrophoneId }),
    ]);
  })
  .then([videoTrack, audioTrack] => {
    videoTrack.play("<ELEMENT_ID_IN_DOM>");
    setInterval(() => {
      const level = audioTrack.getVolumeLevel();
      console.log("local stream audio level", level);
    }, 1000);
  });
The MicrophoneAudioTrack.play method can be used to test audio playback devices.
For network quality tests, the application creates two separated Agora client instances, one for testing uplink and another for downlink. Both clients join an Agora channel, one as a publisher of video and audio tracks, and the other one as a subscriber of such tracks. Then you can listen for the network-quality event on both clients to get the uplink and downlink network status between the local device and Agora server.
Additionally, you can call getLocalAudioStats and getLocalVideoStats methods from uplinkClient to get the uplink statistics, and getRemoteAudioStats and getRemoteVideoStats from downlinkClient to get the downlink statistics.
Check out the below code example taken from official Agora’s documentation:
// Get uplink network quality
uplinkClient.on("network-quality", (quality) => {
  console.log("uplink network quality", quality.uplinkNetworkQuality);
});

// Get downlink network quality
downlinkClient.on("network-quality", (quality) => {
  console.log("downlink network quality", quality.downlinkNetworkQuality);
});

// Get uplink statistics
uplinkVideoStats = uplinkClient.getLocalVideoStats();
// Get downlink statistics
downlinkVideoStats = downlinkClient.getRemoteVideoStats()[<UPLINKCLIENT_UID>];

console.log("uplink video stats", uplinkVideoStats);
console.log("downlink video stats", downlinkVideoStats)
The Value of Proactive Call Testing
Pre-call tests are crucial for delivering a high-quality user experience in real-time communication applications. By proactively identifying and addressing potential issues, developers can significantly reduce user frustration and ensure smoother, more reliable calls.
While implementing these tests can seem complex, various CPaaS providers offer tools and APIs to simplify the process. Whether using Vonage’s network test module, Daily’s call quality APIs, Agora’s dual-client approach, or your own solution, developers can equip their applications with robust pre-call testing capabilities.
This proactive approach not only enhances user satisfaction but also provides support teams with the data they need to diagnose and resolve issues quickly.
Want to ensure a flawless user experience for your real-time communication applications? Implementing robust pre-call tests can make all the difference. At WebRTC.ventures, our team of experts can help you in designing and deploying pre-call test pages that seamlessly integrate with your existing infrastructure. Contact us today to learn how we can help you optimize your application’s performance and user satisfaction. Let’s make it live!


