Background removal and the ability to set custom backgrounds has become a non-negotiable feature in video conferencing applications. A few of my WebRTC.ventures team members have shown how to use Machine Learning to remove backgrounds in video conferencing applications that use Daily, Agora, and Vonage CPaaS providers.
These approaches work well, but rely on an extra <canvas> HTML element to perform video stream manipulation. This can lead to issues when not done properly.
Today, I will discuss an alternative method using the recently released Insertable Streams for MediaStreamTrack API. This new API provides a way to perform such manipulation directly to the stream. To make things simple, I will not focus on a specific CPaaS. Instead, I will explain the concept using raw JavaScript code.
Background Management Using <canvas> (a.k.a. The Traditional Way)
When using Machine Learning for managing background in the traditional way, you would follow these steps:
- For each video frame, an algorithm categorizes every pixel either as background or as a person. This process is known as Semantic Segmentation.
- Then, you use that information to remove background pixels and replace them with a different image (or a blurred version of the same video frame).
- Finally, you draw the person’s pixels on top of it.
Then you would need an intermediary <canvas> element where you draw the new background and the pixels that the Machine Learning model identifies as the person. You’d also need to use something like requestAnimationFrame or setTimeout to update the <canvas> with new video frames.
Finally, you would take the stream out of the <canvas> and send it through the peer connection. The whole process can be seen in a diagram from a previous post below.
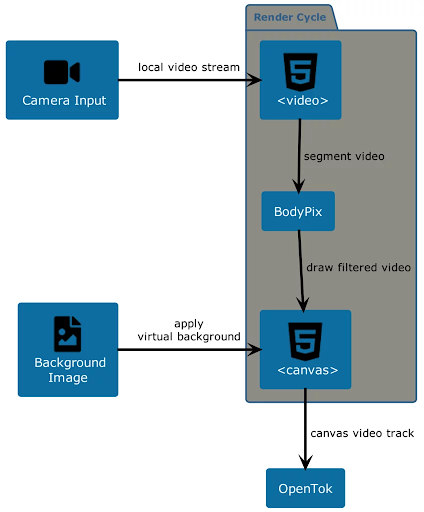
This process can get messy given that the <canvas> element rendering and interaction usually happens in the main execution thread of the web application. When not managed properly, this can affect the performance of the application or lead to issues when the user shares its video stream on multiple browser tabs.
Enter Insertable Streams
Insertable Streams provide a way to manipulate a stream directly. It does this by providing interfaces that can be piped through a transformer function, which in turn creates a new video frame that you use to build the new stream, without any extra user interface element.
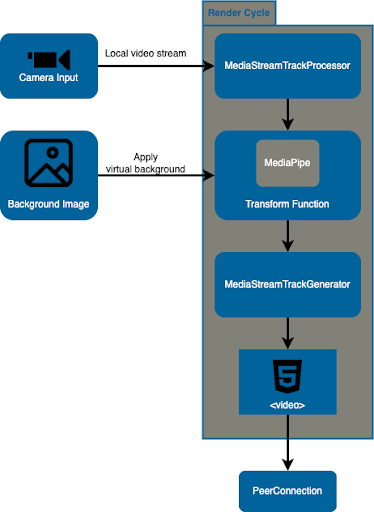
These interfaces are MediaStreamTrackProcessor and MediaStreamTrackGenerator. Both expose a readable and writable property respectively that grant access to a stream’s track.
In this new workflow, you first create a MediaStreamTrackProcessor based on the track you obtained from getUserMedia, and also a MediaStreamTrackGenerator with the kind property set to the same kind as the track you want to manipulate.
Next, you pipe the MediaStreamTrackProcessor to a transformer function where you apply your desired customizations (in our case removing background using a ML library such as MediaPipe and replacing it with a custom background image) and write the result to the MediaStreamTrackGenerator.
Finally, you take the MediaStreamTrackGenerator and use it to create a new media stream that you can add to a video element and send to the other peer. Below you’ll find an updated diagram with this process.
Code Example
Now it’s time to get the ball running! A demo version of this example can be found in its own Github Pages site. The code is also available in Github under the background-removal-insertable-streams repo.
The code is fairly simple. We start with an index.html where we define a <video> HTML element. We also import our main.js file and MediaPipe’s SelfieSegmentation library that we’re using for background removal.
<!-- index.html –->
<html>
  <head>
    <title>
      Background Removal - Insertable Streams
    </title>
    <link rel="stylesheet" type="text/css" href="css/main.css" />
  </head>
  <body>
    <h1>Background Removal - Insertable Streams</h1>
    <video autoplay></video>
    <script src="https://cdn.jsdelivr.net/npm/@mediapipe/selfie_segmentation/selfie_segmentation.js" crossorigin="anonymous"></script>
    <script src="js/main.js"></script>
  </body>
</html>
Now let’s take a look at the <em>main.js</em> file. To make this simpler, we will break it down bit by bit.
First, we get the reference of the video element and the background image we will use. We also define an OffscreenCanvas that will help us with combining the background with the results from the segmentation in a new video frame.
// js/main.js

// the video element
const videoEl = document.querySelector('video');

// the background image
const bgImage = new Image(480, 270);
bgImage.src = 'img/bg.jpg';

// an OffscreenCanvas that combines background and human pixels
const canvas = new OffscreenCanvas(480, 270);
const ctx = canvas.getContext("2d");
Next, we call the getUserMedia function and pass the video track to the background_removal function, which is where all the magic happens.
// js/main.js
…
navigator.mediaDevices.getUserMedia({
  video: { width: 480, height: 270, frameRate: { ideal: 15, max: 30 } },
  audio: false
})
  .then((stream) => {
    /* use the stream */
    background_removal(stream.getVideoTracks()[0]);
  })
  …
The background_removal function is divided into two parts: the MediaPipe part and the Insertable Streams one.
In the MediaPipe part, we initialize the SelfieSegmentation object and configure it by setting the model that it will use and also setting a callback that will run when it finishes with the segmentation process.
// js/main.js
…
function background_removal(videoTrack) {
  // instance of SelfieSegmentation object
  const selfieSegmentation = new SelfieSegmentation({
        locateFile: (file) =>
          `https://cdn.jsdelivr.net/npm/@mediapipe/selfie_segmentation/${file}`,
      });

  // set the model and mode
  selfieSegmentation.setOptions({
    modelSelection: 1,
    selfieMode: true,
  });

  // set the callback function for when it finishes segmenting
  selfieSegmentation.onResults(onResults);
  …
On the Insertable Streams side, we define the MediaStreamTrackProcessor and MediaStreamTrackGenerator objects, and a transform function. This function will receive one video frame at a time and will send it to MediaPipe. Then, it creates a new video frame based on the content of the OffscreenCanvas and queues it in a controller.
// js/main.js
…
function background_removal(videoTrack) {
  …
  // definition of track processor and generator
  const trackProcessor = new MediaStreamTrackProcessor({ track: videoTrack });
  const trackGenerator = new MediaStreamTrackGenerator({ kind: 'video' });

  // transform function
  const transformer = new TransformStream({
    async transform(videoFrame, controller) {
      // we send the video frame to MediaPipe
      videoFrame.width = videoFrame.displayWidth;
      videoFrame.height = videoFrame.displayHeight;
      await selfieSegmentation.send({ image: videoFrame });

      // we create a new videoFrame
      const timestamp = videoFrame.timestamp;
      const newFrame = new VideoFrame(canvas, {timestamp});

      // we close the current videoFrame and queue the new one
      videoFrame.close();
      controller.enqueue(newFrame);
    }
  });

  …
Next, we bundle all together by piping from the processor, passing through the transform function and finishing in the generator, which is then used to create a new MediaStream object.
// js/main.js
…
function background_removal(videoTrack) {
  …

  // we pipe the stream through the transform function
  trackProcessor.readable
    .pipeThrough(transformer)
    .pipeTo(trackGenerator.writable)

  // add the new mediastream to video element
  const processedStream = new MediaStream();
  processedStream.addTrack(trackGenerator);
  videoEl.srcObject = processedStream;
}
And finally, let’s take a look at the onResults function that simply draws the results from segmentation on top of the background image.
// js/main.js
…
function onResults(results) {
ctx.save();
ctx.clearRect(
0,
0,
canvas.width,
canvas.height
);
ctx.drawImage(
results.segmentationMask,
0,
0,
canvas.width,
canvas.height
);
ctx.globalCompositeOperation = "source-out";
const pat = ctx.createPattern(bgImage, "no-repeat");
ctx.fillStyle = pat;
ctx.fillRect(
0,
0,
canvas.width,
canvas.height
);
// Only overwrite missing pixels.
ctx.globalCompositeOperation = "destination-atop";
ctx.drawImage(
results.image,
0,
0,
canvas.width,
canvas.height
);
ctx.restore();
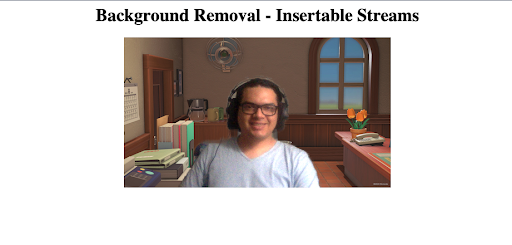
}As a result, when you open the page you’ll see your video stream with a custom background. At this point you’re ready to take the new video stream and send it through a peer connection to your favorite media server, CPaaS provider, or directly to another peer with which you negotiate a connection.
Conclusion
Insertable streams provides a simple and straightforward approach for manipulating media streams by granting developer direct access to these through simple interfaces. This not only enables an easy way to add custom background to a video stream but also any kind of further stream processing such as combining multiple tracks or introducing other graphics elements into it.
If you want to include custom or blur backgrounds functionality into your WebRTC-powered video conferencing application, or build one from scratch, rely on the experts in WebRTC development. Contact us to know more. Let’s make it live!