The recent COVID-19 outbreak has changed the way we consume services. Many fields, such as education, healthcare, and consulting, have had to search for alternative ways to keep business running despite the circumstances. Because of this, WebRTC has become a popular solution because of its ability to eliminate physical boundaries. Today, we’ll take a look at one feature that allows us to reach more audiences than a typical one-to-one or multiparty call: video and audio broadcasting.
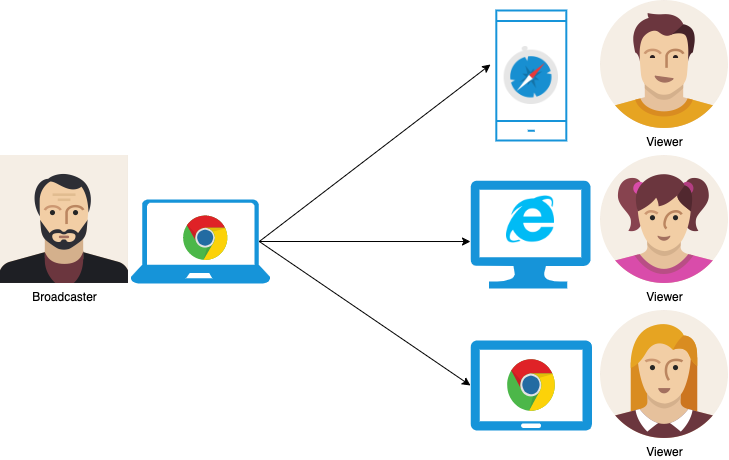
Unlike a traditional call, where the media streams flow from both sides, broadcasting includes one publisher and multiple subscribers. Here’s what this communication flow looks like:

It’s important to note that on a peer-to-peer connection, the subscriber is responsible for maintaining as many peer connections as users are subscribed to the broadcast.
To make things more clear, let’s build a simple broadcasting application. The example code is hosted on Github. If you’d like to follow along, make sure Git is installed on your computer. Then open a terminal window, navigate to the folder where you want to store the code, and run the following command:
git clone --single-branch --branch broadcast-webrtc \
https://github.com/agilityfeat/webrtc-video-conference-tutorial.git
Before getting into code, let’s take a look at the flow we will follow to establish the connection between the participants of the broadcast.

First, a broadcaster joins the room. Then the app gains access to the broadcaster’s media devices and sends a message to the signaling server to register the individual as the broadcaster. This will be the entity that will send his video and audio to all other participants.
When a new participant arrives, the app sends a message to the signaling server to register them as a viewer. Then it notifies the broadcaster so that they can create a new peer connection to send the media streams.
Next, the usual offer, answer, and ice candidate exchange processes begin. This is a crucial step in WebRTC that allows peers to know important information, such as media types and codecs they accept and the IP addresses and ports where they are available, about the other. You can read more about this in our WebRTC signaling blog post.
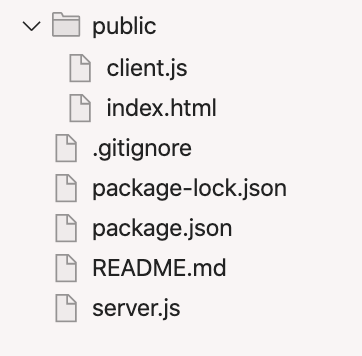
Now let’s look at our example. Open the project in your favorite code editor and we’ll explain the most relevant parts of code. We have the following folder structure:

The main files are explained below:
- public/client.js: This is where the magic happens. This file contains the client side’s JavaScript code, which gains access to the media devices and establishes the connection with the signaling server and the other peers.
- public/index.html: This contains the HTML code for the webpage. It’s a very simple form for joining a “room” or broadcast and a <div> that contains the video element.
- server.js: This contains the signaling server powered by socket.io and serves the static assets under public.
- package.json: This contains the node modules used for this project. These are socket.io and express.
The application looks like this. It shows a form for your name and a room number next to two login buttons, one for joining as broadcaster and another one joining as a watcher. On a real-world application, this should be validated through a signup and login mechanism. For the purposes of this simple project, we are not creating signup and login.

Let’s take a look at how the communication works. First, the broadcaster joins the room by typing their name and room number before clicking “Join as Broadcaster.” In the client, we call the getUserMedia API and then send a message to the server.
client.js starts the communication
btnJoinBroadcaster.onclick = function () {
  if (inputRoomNumber.value === "" || inputName.value === "") {
    alert("Please type a room number and a name");
  } else {
    user = {
      room: inputRoomNumber.value,
      name: inputName.value,
    };

    divSelectRoom.style = "display: none;";
    divConsultingRoom.style = "display: block;";
    broadcasterName.innerText = user.name + " is broadcasting...";

    navigator.mediaDevices
      .getUserMedia(streamConstraints)
      .then(function (stream) {
        videoElement.srcObject = stream;
        socket.emit("register as broadcaster", user.room);
      })
      .catch(function (err) {
        console.log("An error ocurred when accessing media devices", err);
      });
  }
};
The server then registers the user as the broadcaster and creates the room.
server.js registers the broadcaster and creates the room
socket.on("register as broadcaster", function (room) {
    console.log("register as broadcaster for room", room);

    broadcasters[room] = socket.id;

    socket.join(room);
});
When a viewer joins the broadcast, their client.js file notifies the server, which adds them to the room and notifies the broadcaster. Then, the broadcaster’s client creates a new peer connection and prepares an “offer” for the new peer.
Viewer’s client.js notifies the server
btnJoinViewer.onclick = function () {
  if (inputRoomNumber.value === "" || inputName.value === "") {
    alert("Please type a room number and a name");
  } else {
    user = {
      room: inputRoomNumber.value,
      name: inputName.value,
    };

    divSelectRoom.style = "display: none;";
    divConsultingRoom.style = "display: block;";

    socket.emit("register as viewer", user);
  }
};
server.js registers the new viewer
socket.on("register as viewer", function (user) {
    console.log("register as viewer for room", user.room);

    socket.join(user.room);
    user.id = socket.id;

    socket.to(broadcasters[user.room]).emit("new viewer", user);
});
Broadcaster’s client.js creates a peer connection and an offer
socket.on("new viewer", function (viewer) {
  rtcPeerConnections[viewer.id] = new RTCPeerConnection(iceServers);

  const stream = videoElement.srcObject;
  stream
    .getTracks()
    .forEach((track) => rtcPeerConnections[viewer.id].addTrack(track, stream));

  rtcPeerConnections[viewer.id].onicecandidate = (event) => {
    if (event.candidate) {
      console.log("sending ice candidate");
      socket.emit("candidate", viewer.id, {
        type: "candidate",
        label: event.candidate.sdpMLineIndex,
        id: event.candidate.sdpMid,
        candidate: event.candidate.candidate,
      });
    }
  };

  rtcPeerConnections[viewer.id]
    .createOffer()
    .then((sessionDescription) => {
      rtcPeerConnections[viewer.id].setLocalDescription(sessionDescription);
      socket.emit("offer", viewer.id, {
        type: "offer",
        sdp: sessionDescription,
        broadcaster: user,
      });
    })
    .catch((error) => {
      console.log(error);
    });

  let li = document.createElement("li");
  li.innerText = viewer.name + " has joined";
  viewers.appendChild(li);
});
Then, we have the usual offer answer mechanism and ice candidates exchange about which each client processes the messages that the others sent. The server is in charge of delivering these messages.
server.js delivers offer, answer, and candidate messages
socket.on("candidate", function (id, event) {
    socket.to(id).emit("candidate", socket.id, event);
});

socket.on("offer", function (id, event) {
    event.broadcaster.id = socket.id;
    socket.to(id).emit("offer", event.broadcaster, event.sdp);
});

socket.on("answer", function (event) {
    socket.to(broadcasters[event.room]).emit("answer", socket.id, event.sdp);
});
Viewer’s client.js processes the “offer” and creates an “answer”
socket.on("offer", function (broadcaster, sdp) {
  broadcasterName.innerText = broadcaster.name + "is broadcasting...";

  rtcPeerConnections[broadcaster.id] = new RTCPeerConnection(iceServers);

  rtcPeerConnections[broadcaster.id].setRemoteDescription(sdp);

  rtcPeerConnections[broadcaster.id]
    .createAnswer()
    .then((sessionDescription) => {
      rtcPeerConnections[broadcaster.id].setLocalDescription(
        sessionDescription
      );
      socket.emit("answer", {
        type: "answer",
        sdp: sessionDescription,
        room: user.room,
      });
    });

  rtcPeerConnections[broadcaster.id].ontrack = (event) => {
    videoElement.srcObject = event.streams[0];
  };

  rtcPeerConnections[broadcaster.id].onicecandidate = (event) => {
    if (event.candidate) {
      console.log("sending ice candidate");
      socket.emit("candidate", broadcaster.id, {
        type: "candidate",
        label: event.candidate.sdpMLineIndex,
        id: event.candidate.sdpMid,
        candidate: event.candidate.candidate,
      });
    }
  };
});
Broadcaster’s client.js processes the “answer” sent by a viewer
socket.on("answer", function (viewerId, event) {
  rtcPeerConnections[viewerId].setRemoteDescription(
    new RTCSessionDescription(event)
  );
});
Broadcaster and viewer client.js process candidates sent by each other
socket.on("candidate", function (id, event) {
  var candidate = new RTCIceCandidate({
    sdpMLineIndex: event.label,
    candidate: event.candidate,
  });
  rtcPeerConnections[id].addIceCandidate(candidate);
});
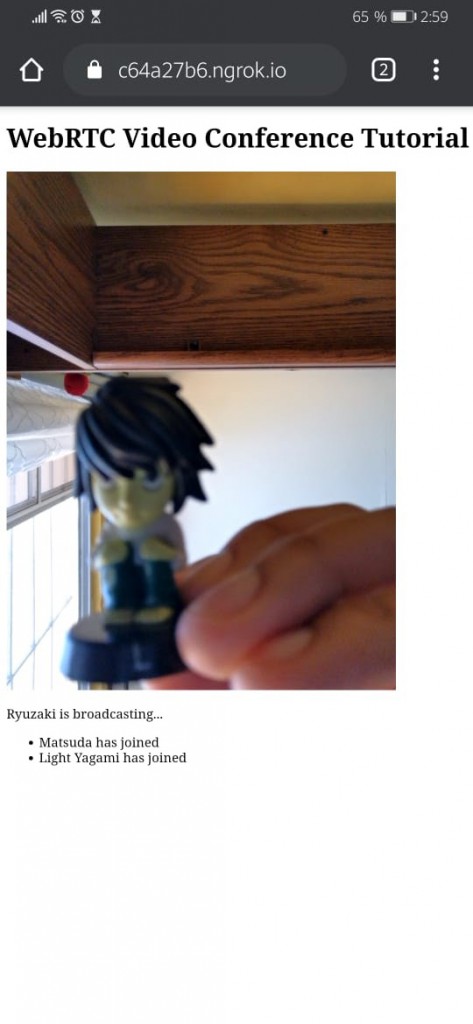
Now it’s time to see our broadcasting application in action! For a better experience, we’ll publish it to the internet using ngrok. Install ngrok and then open two different terminal windows. Next, navigate to the project folder on both windows. Then run the following commands, one on each window:
# terminal window 1
npm install
npm start
# terminal window 2
ngrok http 3000Now, open your app on multiple devices using the URL you received from ngrok. Enter a name. Be sure to use the same room number on all devices.

We’re close to getting Kira!
Conclusion
The inner workings of a broadcasting application are quite simple and easy to understand. However, it’s important to note that in a peer-to-peer connection, the number of supported participants is limited by the broadcaster capacity to maintain a peer connection for each viewer. To overcome this, we can add a media server to manage the connections. We will explore this in Part 2 of this broadcasting series. Stay tuned!


