Interested in learning how to handle audio in WebRTC? Here is a a quick WebRTC audio demo, which will show you how to get access to audio devices, to monitor changes in the stream in real time.
Introduction.
So the big day for that important and fancy video call has finally arrived. You’ve spent a couple of minutes checking that your hair looks good, you don’t have anything in your teeth and you look presentable.
You now open your browser and paste the meeting link. You can see the person on the other “end of the call” is already there, so, excitedly you click the “Join” button… *clear your throat… say “Hello”… you see his mouth is moving but you don’t hear any sound… He appears to say “Hello? Can you hear me?”… but still no sound.
“What’s going on?”
The dreaded “Can-you-hear-me-now” ritual has begun and now precious minutes will be wasted trying to figure out what’s wrong. To make matters worse, the other person doesn’t know too much about the conference application being used and he is not sure if the microphone is muted or if audio is working at all!
Similar to the described situation, there are times when due to several reasons, a bit of troubleshooting is needed. Maybe the network is bad, there is a hardware malfunction or a layer-8 mistake. Whatever the reason may be, as developers we must make sure our applications are as helpful as possible in this kind of situations.
That’s why UX is so important and WebRTC is not the exception. Check out this 2015 talk from Arin Sime at Kranky Geek to read more on the importance of UX in WebRTC.
Now, getting back to the matter of the audio in WebRTC, there are three questions that we must ask ourselves in order to make situations like the one described above, less painful for our users:
- How can I make sure there is incoming audio?
- How can this issue be monitored?
- Is there any standard built-in function or open-source one?
Before answering these questions, let’s take a minute (or more) to review how WebRTC deals with media devices.
Getting User Media.
As you already know, the process for WebRTC consists of three steps:
- The browser get access to media devices (aka. Microphone and Camera).
- A signaling server exchange handshake messages between peers.
- A peer-to-peer connection is established.
We’re going to focus on step one, which is done by the getUserMedia() API. Getting access to media devices is as simple as calling the function as follows:
getUserMedia() returns a Promise and we can add a handler to make our magic with the stream or with the error if something goes wrong. The interesting thing here is how the stream is obtained, which is defined on the constraints variable passed as parameter to the API.
Let’s take a look at how the aforementioned variable looks:
As you can see, we have two variables – one for audio and the other one for video. Each one can have one of two values: a boolean or an object with specific constraints.
Note that a boolean true and an object value are equivalents, and tell the getUserMedia API to attempt to get the specified resource if available, while a boolean false value will tell to not get a media device at all.
This means that something like { video: true, audio: false } would make that getUserMedia get video devices only, no audio. Same thing if instead of true, video value was an object like the one showed on the above example.
Ideally, a WebRTC conference application will want to get access to both devices, audio and video. Of course there are exceptions. For example, an audio-only call application or a video-only that features chat communication, but if you look at the most popular video conference applications you’ll note that they all offer both audio and video.
But what if a user doesn’t have a microphone, or it’s malfunctioning for whatever reason? If we set “audio: true” getUserMedia will try to get that resource and will fail if is not able to get it. In this case, instead of letting the user see the how the API behaves like a 9-year old in a tantrum for not being able to get an audio device, developers must handle the exception appropriately and send a friendly message to user or at least make the application smart enough to know that the audio constraint should be set to false in order to continue.
At this point, you should have a clear understanding of how WebRTC gets access to media devices through the getUserMedia() API and its constraints.
Now let’s get back to the three questions that I mentioned above and let’s apply their answers to make a can-you-hear-me-now ritual less painful.
Answering the Questions.
Ok, so we’re starting a call and we have no audio from the other participant. How can the application help us solve our problem? Let’s go step by step:
How can I make sure there is incoming audio?
Previously, we talked about how getUserMedia() use constraints to know which media devices should get, but we didn’t talk about the resulted stream. A stream has tracks. If a resource was specified as true in the constraints, the stream will have at least one track for it.
The stream provides a method for both types of tracks, the one for audio is the getAudioTracks() that will return an array of all the audio tracks that the stream has. So in order to make sure a user is actually sending audio we could easily evaluate the content of the array, because if something happened and audio constraint was set false then the stream won’t have any audio track and the method would return an empty array. Consider something like this:
In the above code we are evaluating the length of the returned array. If it’s larger than zero it means that there is at least one audio track. For both cases we are calling a custom function addAudioEvent() with a proper message for maybe showing an alert or message to the user about the audio situation.
How can this issue be monitored?
So we know the remote user is sending audio, but we still can’t hear him!!! Perhaps, he accidentally disabled his audio track, which in worldly words is known as “muting or unmuting the microphone”. But how can we be sure?
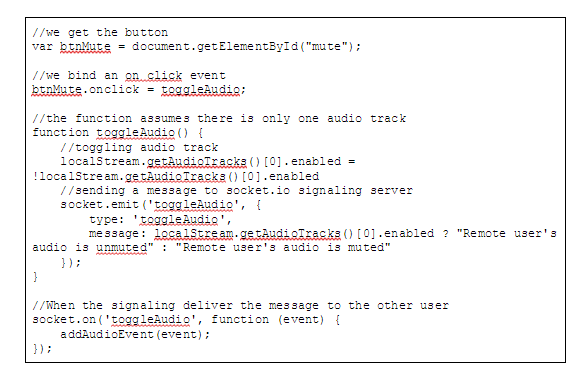
Currently, WebRTC does not offer a onmute or onunmute kind of events, but we can make use of the signaling server to create our own custom event. In that way we can let the other user know when the first one has muted or unmuted his microphone during a call.
By using the getAudioTracks() method we can get the tracks array, each element has an enabled property which when true, means that the audio is unmuted and when false is muted.
Consider the following code assuming there is only one audio track and using socket.io as signaling server:
Is there any standard built-in function or open-source one?
Fortunately all the “goodie” methods we’ve mentioned throughout this post are already bundled in the WebRTC standard, so you don’t need to add anything else. If the browser is WebRTC-compatible you’re good to go!
However, you probably don’t want to build your WebRTC application using the API directly and set up your whole infrastructure by yourself; you probably want to rely on a third party service as Tokbox, Pubnub, Jitsi, etc.
When using third party WebRTC libraries, things might change as each one handles streams and devices differently. Even with that, the principles are the same and there should be a constraints mechanism for accessing media devices and a flag on the stream to deal with mute/unmute events, just be sure to check library’s documentation in order to see how it handles them.
Cool, but you’ve said this was a Demo.
We had to provide you with a lot of background information.
Now, is what you have been waiting for – the WebRTC audio demo!
We’ve prepared a very simple application to show you all the concepts and examples shown here. You’ll need git and nodejs installed, click on their names for more info of how to get them.
Ok, now go and clone the repo using git. If you’re using the command line you can copy-paste the following line:
git clone https://github.com/agilityfeat/webrtc-audio-demo
Now go the webrtc-audio-demo directory and install all the npm dependencies, we’re just using express and socket.io. When you’re done run “npm start” and open the browser on http://localhost:3000/
cd webrtc-audio-demo
npm install
npm start
You should see something like this.
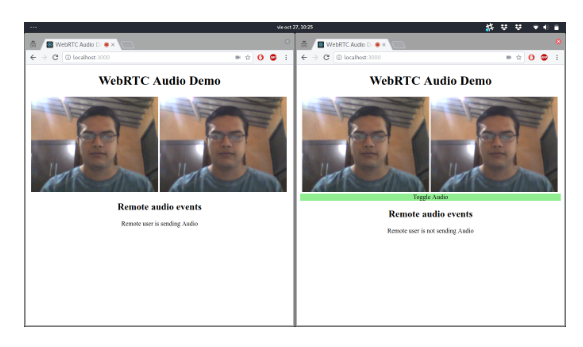
Notice that we have two buttons for calling. Go ahead and initiate a call on which one user will not send any audio and the other one will do. Open two tabs, preferably put them side by side and click “Video only” on one and “Video and Audio” on the other. See the magic happen:
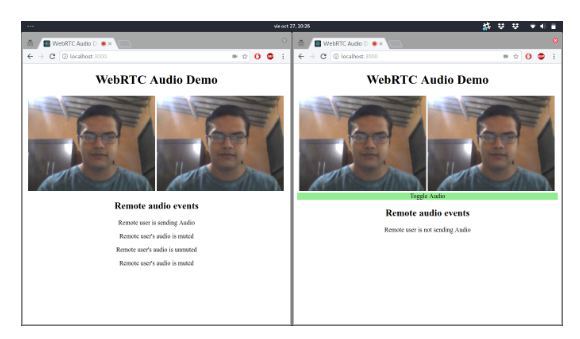
When you click on “Video only” we’re simulating that for any reason audio constraint was set to false, so no audio is going to be send. This will give the other user a friendly message “Remote user is not sending audio”, while if you click “Video and Audio”, it means that both audio and video constraints are true, so the message that the other user receives is “Remote user is sending audio”.
Now mute and unmute a couple of times the one that is sending audio and check what happens on the other side.
Cool, isn’t? Hopefully, it will give you a few ideas on how to make your user’s experience more pleasant even in times of trouble.
Contact us to build or improve your WebRTC app!
Do you need more information on how to have WebRTC work in your web application? Do you need help implementing video and audio chat-based features in your next project? We have an experienced team ready & happy to help you out.


