Real-time applications are everywhere and in many shapes: from typical messaging apps and video conferencing, to live streaming and even online gaming and trading platforms. Use cases span through multiple industries: Education, Healthcare and Customer Service, just to name a few.
WebRTC allows building these web-based and mobile real-time applications. However, as we have mentioned before, building such applications is not an easy task. Communication-Platform-as-a-Service (CPaaS) providers make it easier by allowing development teams to focus on building the application without worrying about the underlying infrastructure.
Over the life of your application, often at the beginning of the journey, using a CPaaS may be the right choice. But as it matures, you may want more control over the communication features or you might need to manage ongoing costs. Depending on how your application was built, changing your mind can become a very difficult task, likely requiring rewriting most of the application components.
In this post, we will show you how to add a CPaaS abstraction layer. This will allow you to incorporate the benefits of a CPaaS provider without making your application dependent on any specific implementation. The code examples here are for Typescript + Nuxt applications, but the concepts are applicable to any kind of web application.
Understanding the CPaaS Abstraction Layer
The abstraction layer works by exposing the functionality offered by a CPaaS provider through a provider-agnostic CallService instance. The web application accesses the methods of this abstraction layer without having to worry about the underlying code, while specific <em>CallClient</em> implementations are the ones that deal with provider-specific code.
This behavior is depicted in the below diagram:
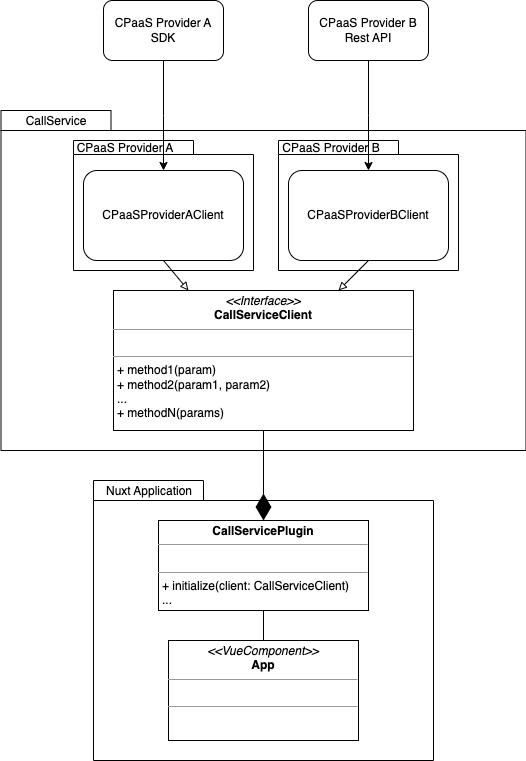
Benefits of the CPaaS Abstraction Layer Architecture
The architecture depicted above will provide the following benefits:
- Vendor-agnostic Approach: The abstraction layer provides flexibility by decoupling the application from any specific CPaaS provider’s implementation details. This allows developers to switch between providers or add support for new ones without having to make significant changes to their codebase.
- Standardized Interface: The abstraction layer exposes a standardized interface or set of functions that encapsulate common features and functionality offered by CPaaS providers. This allows the application logic to rely on a consistent and familiar interface, independently of the diverse approaches of specific features across various CPaaS providers.
- Code Maintainability and Reusability: By abstracting the functionality of CPaaS providers into a separate layer, it improves code maintainability and reusability. Changes or updates required due to provider-specific updates or API changes can be implemented in a single location within the abstraction layer, rather than scattered throughout the application codebase. This promotes cleaner code separation and easier maintenance.
Overview of the CallService Class
Let’s start by taking a look at how to create our CallService class. The first step is to define the features that will be exposed. For this, we can create a base interface to define all the desired functionality.
The exact list of features will depend on the CPaaS provider you’re using and the requirements of your application. Common features include: initialize a session, connect/disconnect to it, destroy it, check if it’s connected, screen sharing, get streams, etc.
Below you’ll find an example with some of these:
export interface CallServiceBase {

  initSession(info: CPaaSProviderInfo): Promise<void>

  screenShareImgPreview: string | null

  connectSession(sessionId: string, token: string): Promise<void>

  disconnectSession(sessionId: string): void

  destroySession(sessionId: string): void

  isSessionConnected(sessionId: string): boolean

  getStreamsForSession(sessionId: string): Stream[] | null

  getStreamForSession(sessionId: string, streamId: string): Stream | null

  subscribeToStream(
    sessionId: string,
    stream: Stream,
    targetElement: HTMLElement,
    fitMode?: FitMode,
    preferredResolution?: Resolution
  ): Promise<Subscriber>

  unsubscribeFromStream(
    sessionId: string,
    stream: Stream,
    subscriber: Subscriber
  ): void

  // More methods can be added here
  ...
}
Later, we can extend this definition for the CallService, where we add a method for initializing the CallClient we will interact with, as follows:
export interface CallServicePlugin extends CallServiceBase {
  initialize(type: VideoCallClient): void
}
Then, let’s create an implementation of the methods defined in the interface. The most important part is to add the CallClient instance as a property. Then, after initialization, leverage methods from the CallClient implementations.
class CallServiceWrapper implements CallServicePlugin {
  // property to store CPaaS CallClient implementation
  private client: CallServiceClient | null = null

  // method to initialize CallClient instance
  initialize(clientType: VideoCallClient) {
    if (this.client) {
      return
    }

    Logger.debug('CallServiceWrapper#initialize', { clientType })

    // If more than one CPaaS provider is supported,
    //  you call the proper implementation here
    if (clientType === VideoCallClient.CPAAS1) {
      this.client = new CPaaSProviderAClient()
    } else {
      this.client = new CPaaSProviderBClient()
    }
  }

  ...
}
Every exposed method references its corresponding method in the CallClient implementation as follows:
class CallServiceWrapper implements CallServicePlugin {
  ...
  initSession(info: CPaaSProviderInfo) {
    Logger.debug('CallServiceWrapper#initSession', { info })
    return this.client?.initSession(info) || Promise.resolve()
  }

  async connectSession(sessionId: string, token: string) {
    await this.client?.connectSession(sessionId, token)
  }

  disconnectSession(sessionId: string) {
    this.client?.disconnectSession(sessionId)
  }
  ...
}
Exploring the CallClient Interface Implementations
Next step is to create the CallClient implementations. Same as before we define an interface to list every supported functionality. Since these are the same as CallService, we can simply extend CallBase with minimal changes:
export interface CallServiceClient extends CallServiceBase {
  publisherState: PublisherState
}
Then, we add specific CPaaS provider code for each required method. For instance, here is an example of a couple of methods for a Vonage Video API CallClient implementation. Note that individual CallClient implementations are required for each supported CPaaS provider or Media Server.
export default class OpenTokClient implements CallServiceClient {
  // specific attributes for this client
  private sessions: { [key: string]: Session } = {}
  private sessionPublisher: Publisher | null = null
  // more attributes
  ...

  // implementation of the initSession method
  initSession({ apiKey, sessionId }: OpenTokSessionInfo): Promise<void> {
    Logger.debug('OpenTokClient#initSession', { sessionId })

    let session = this.sessions[sessionId]
    if (session) {
      return Promise.resolve()
    }

    // Use OpenTok's specific code to init a session
    session = OpenTokSession.initSession(apiKey, sessionId)
    this.sessions[sessionId] = session

    // more specific code here
    ...

    return Promise.resolve()
  }

  // another method from the interface
  connectSession(sessionId: string, token: string): Promise<void> {
    const session = this.sessions[sessionId]
    if (!session) {
      throw new Error('OpenTokClient#connectSession: session not found')
    }

    Logger.debug('OpenTokClient#connectSession', { sessionId })
    return session.connect(token)
  }

  ...
}
While we’re at it, let’s take a look at how another CallClient implementation would look like, this time for the Amazon Chime SDK.
export default class AwsChimeClient implements CallServiceClient {
  // specific attributes for this client
  private sessions: Record<string, ChimeSession> = {}
  sessionPublisher: ChimePublisher | null = null
  // more attributes
  ...

  // implementation of the initSession method
  async initSession(info: AwsChimeSessionInfo) {
    Logger.debug('AwsChimeClient#initSession', { info })

    this.initDeviceController()
    if (!this.awsDeviceController) {
      throw new Error('Unable to get device controller')
    }
    const config = new MeetingSessionConfiguration(info.meetingResponse, info.attendeeResponse)
    const session = new DefaultMeetingSession(config, this.awsLogger, this.awsDeviceController)

    const chimeSession = await ChimeSession.initializeSession(info.sessionId, session)

    this.localUserId = info.localUserId
    this.sessions[info.sessionId] = chimeSession
    this.registerListeners(chimeSession)
    Logger.debug('AwsChimeClient#initSession: Session initialized', { info })
  }

  // the rest of methods implementations
  ...
}
Adding The Abstraction Layer in a Nuxt Application
Now that you have the required files for the abstraction layer, you need to add them to your application. In Nuxt, you can add plugins whose functionality is available from anywhere in the application. This sounds like a good approach for the CallService instance.
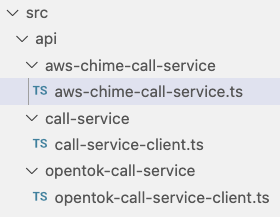
Add the CallService definition and interface under plugins/ and types/ folders respectively as shown below:

You can add the CallClient implementations and interface definition as part of your code. For instance, here is the file hierarchy for the Amazon Chime SDK and Vonage Video API implementations shown before:
Next, make sure you export the CallService class as a plugin, like this:
...
const plugin: Plugin = (ctx, inject) => inject(
  'callService',
  new CallServiceWrapper()
)

export default plugin
Finally, you can start using methods from the CallService plugin in your application. In the code below, you can see that it’s all a matter of accessing such a plugin and calling the appropriate method. The specific implementations can be updated independently from the application code!
<script lang="ts">
@Component
export default class App extends Vue {
    mounted() {
        this.$callService.initSession(process.env.SESSION_ID, process.env.SESSION_TOKEN);
    }
}
</script>
Conclusion
A CPaaS abstraction layer abstracts the functionality provided by CPaaS providers into a separate layer that developers interact with through a standardized interface. This allows developers to add such functionality throughout the application in a vendor-agnostic approach. If at some point the underlying logic needs to be changed, whether by adopting open source tools or switching to a different provider, the application logic is not affected.
If you want to take advantage of the services from a CPaaS provider without vendor-locking your application, or need help migrating from your current one to a different approach, WebRTC.ventures can provide the assistance you need. Contact us today!


