One of the best ways to manage WebRTC media servers for medium to large scale usage is by using cloud-based, on-demand scaling. Amazon Web Services (AWS) offers some of the best tools that can help you to scale your infrastructure demand.
One of the distinguishing features of a cloud-based solution like AWS is that you pay only for the resources you use during your WebRTC sessions. So not only will you reduce costs, you will also increase speed and have the flexibility of changing your configuration with a simple API call.
In this post, we take a look at how you can utilize AWS tools to create a pool of media servers that can be scaled on-demand, based on your application logic and your user load.
We will highlight these AWS services:
Why Is It Difficult to Scale Media Servers?
When it comes to on-demand scaling of media servers, one of the main problems is that each media server needs to be stateful. In other words, handled as a single entity. This makes the process of scaling in and out while using Elastic Load Balancer (ELB) different from what we are used to doing with web applications.
The issue arises because for each WebRTC session/call, a set of media server(s) is selected to handle it. If you were to use a load balancer, as stated before, your traffic will be channeled randomly into each of the servers behind your pool and not necessarily into the server where the session lives.
This can work fine with a fixed number of instances where you may specify routing rules. But as traffic increases, your media server pool will need to increase the number of instances, and also reduce them when it drops. This will make it hard for your load balancer to track which instances to use for a particular session.
Another thing to consider is that users in a particular WebRTC session would need to connect to a given media server and establish a continuous connection until the end of the call or streaming session. This is a hard thing to achieve when using ELB.
How to Scale Media Servers Correctly
Here at WebRTC.ventures, we break down this problem in such a way that will allow you to enjoy AWS instance scaling capabilities and at the same time, also allow you to have control on when to scale up and when to scale down your media server pool based on your application needs. Let’s take a look at a flow that would allow you to achieve this.
First, you will need an AWS account. Once you have your account ready, let’s get started by preparing a few prerequisites as follows:
- Create an AMI image that will be used by your Auto Scaling Group to spin up instances in your media server pool.
Ensure you create your AMI image in the same region you will be deploying your media servers. If you want to deploy to multiple AWS regions, you will have to build AMI images for each of these regions.
One of the tools we recommend for building your AMI images is Packer by HashiCorp. Packer is configurable and can be used in a declarative format. This means that you can add it to your CI/CD pipeline and use variables to configure it for a particular build.
The AMI image you build will need the following:
- Install your media server of choice in the target operating system and configure it according to your needs. The media server installation steps can be found in their respective documentation i.e. for Janus Media Server you can build it from source as documented in the README.
- Configure the media server to be accessible using a webserver and an SSL certificate.
For the web server you may use any option that will work for you but we recommend working with Nginx since it is easy to configure.
This SSL certificate can be a custom certificate that you obtained from a third party or you can generate the certificate using ZeroSSL or Letsencrypt.
One of the tools we use to request a free ZeroSSL or LetsEncrypt is acme.sh or sometimes you may prefer to use certbot or among other tools.
You need to ensure that your certificate is a wildcard certificate of your media server subdomain or the domain that you will use as a Route53 hosted zone. For example if my application domain is example.com and I decide my media server domain will be mediaserver.example.com, then my wildcard certificate for the media server will include both mediaserver.example.com and *.mediaserver.example.com.
- A Lambda Function code that will receive our SNS topic events and process them to obtain information regarding our AutoScaling group.
The lambda function can be written in any language of your choice and will have the following methods/functions that:
- Determine whether an instance is being added or removed from the Autoscaling Group (which we refer to as our media server pool).
- Identify whether a new instance is being added to the Autoscaling Group Warm Pool. This is critical since it will help us create dns records only for active instances.
- Creates Route53 records using the instance metadata. This will create a subdomain with an A record containing our instance IP address data(Here you decide whether to use private IP or public IP depending on your setup). For this to work, you need to have a Route53 hosted zone, check the next requirement.
- Update your application with the new instance records and also to inform it when a server gets terminated. For this you will need a create and delete endpoint to record server details from the Lambda function.
Although optional, Python3 can be used to write your function’s code and with that you can utilize the boto3 library to communicate with AWS API from within your lambda function.
- A Route53 public hosted zone that will be used to manage your media server pool dns records for each server.
You can register a hosted zone based on your domain if it is being managed by Route53.
The other option is to register a subdomain of your domain as a hosted zone and use that if you do not want to transfer your domain from another provider to AWS. You can read more about this here.
Assuming you now have the above prerequisites you can now proceed.
Creating Your Lambda Function
First, create a standard SNS topic that you will later on register with your Lambda Function as a trigger. The same SNS topic will also be used to subscribe to your Autoscaling Group lifecycle events later on.
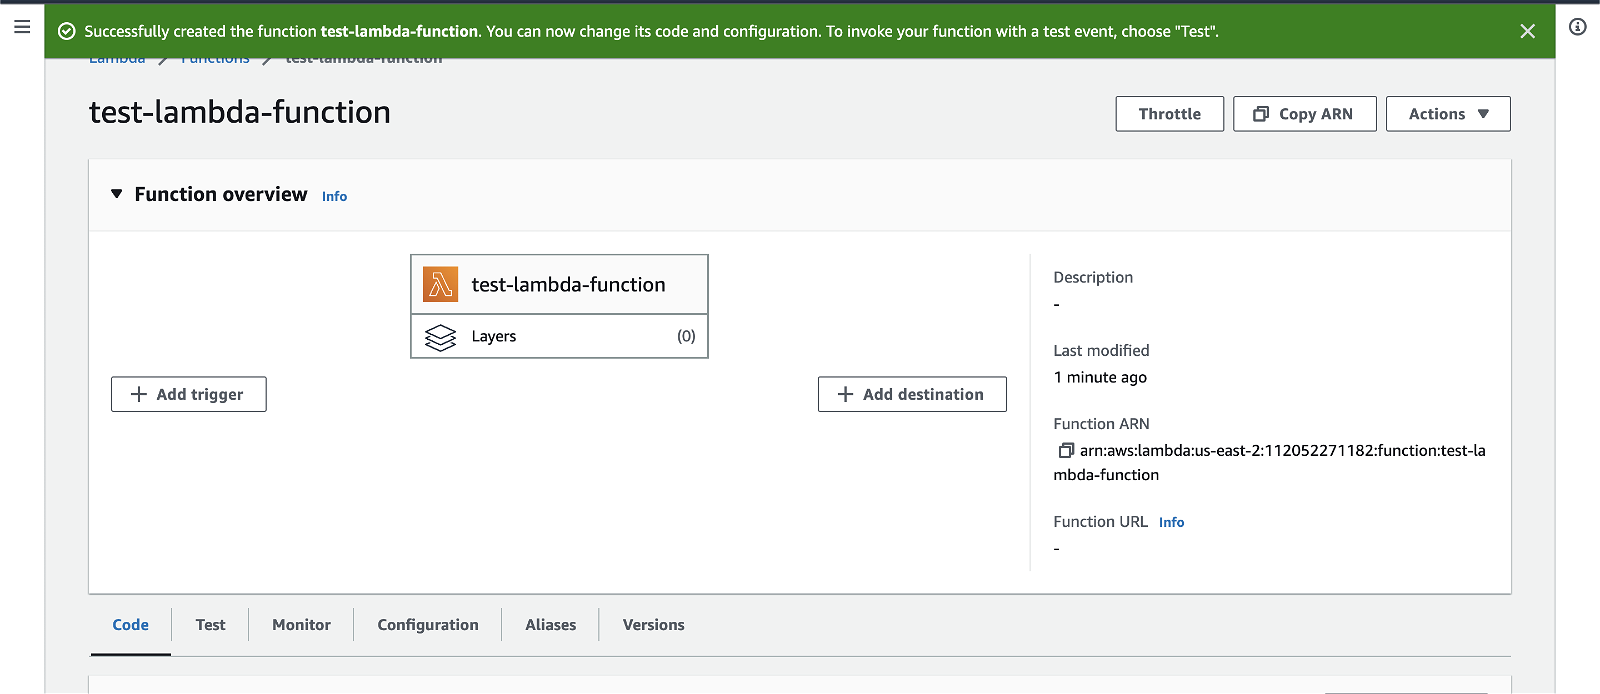
Once you have your SNS topic ready, you can proceed and create your Lambda Function with the “Author from scratch” option. This will allow you to customize the function as you go along.
Select your runtime environment, for example if using Python for the lambda function code, you can select one of the python environments available. Ensure to match the environment version with the one your code can run in. You may modify other configurations including the architecture and the advanced setting.
After you create your Lambda Function, you need to add an SNS topic as its trigger. Use the <<Add trigger>> button then search for the one you created and select it.
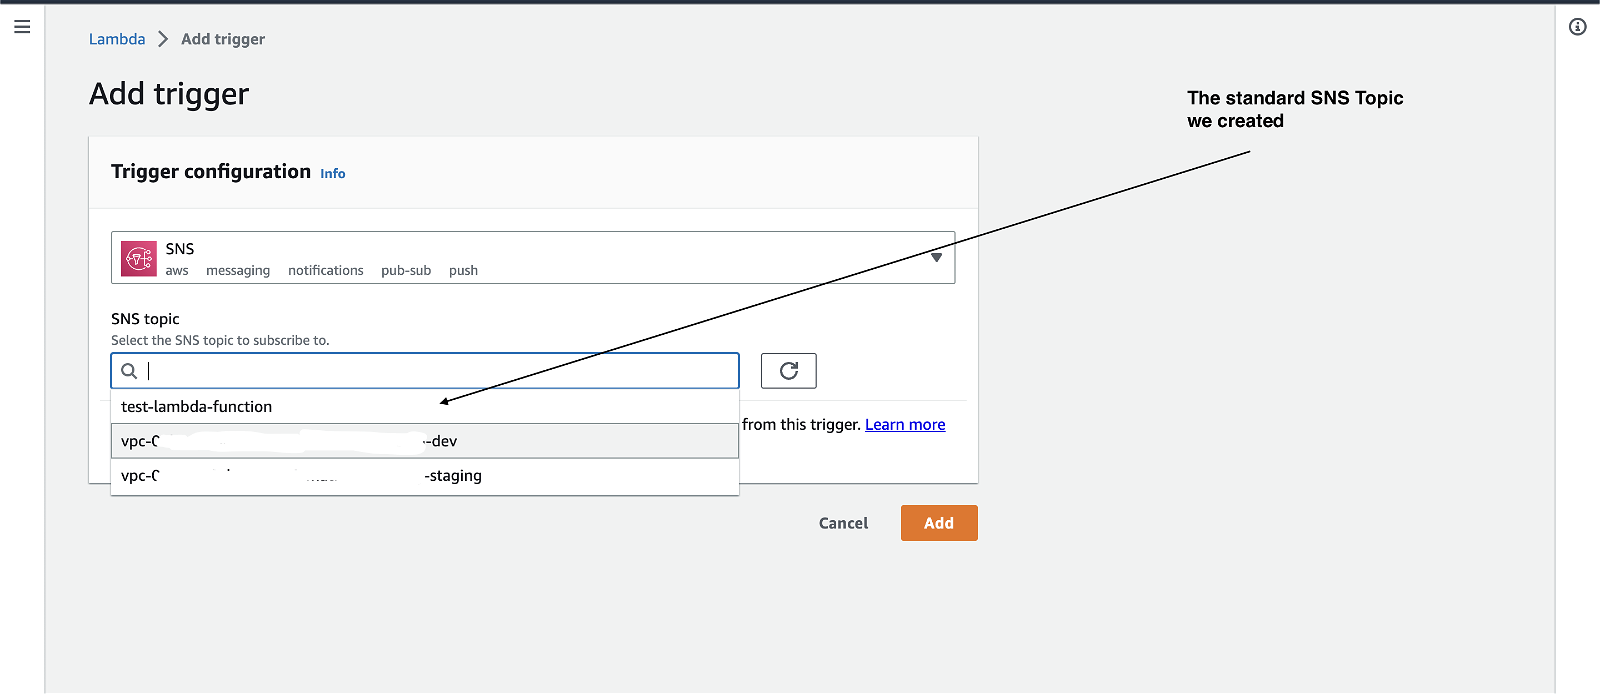
Once you add your SNS topic as a trigger, the Lambda Function will now be able to receive events from it as its trigger and will be able to process these which is what we want.
Note: If you’re using Infrastructure as Code (IaC), you might need to find a way of zipping your Lambda Function and uploading it to an S3 bucket from where you can read it into your lambda function block. With Terraform you may use null_resource or other alternatives to compress your lambda code and any of its packages, upload them to S3 and then use the uploaded archive as the source for the lambda function.
Creating the Media Server Pool
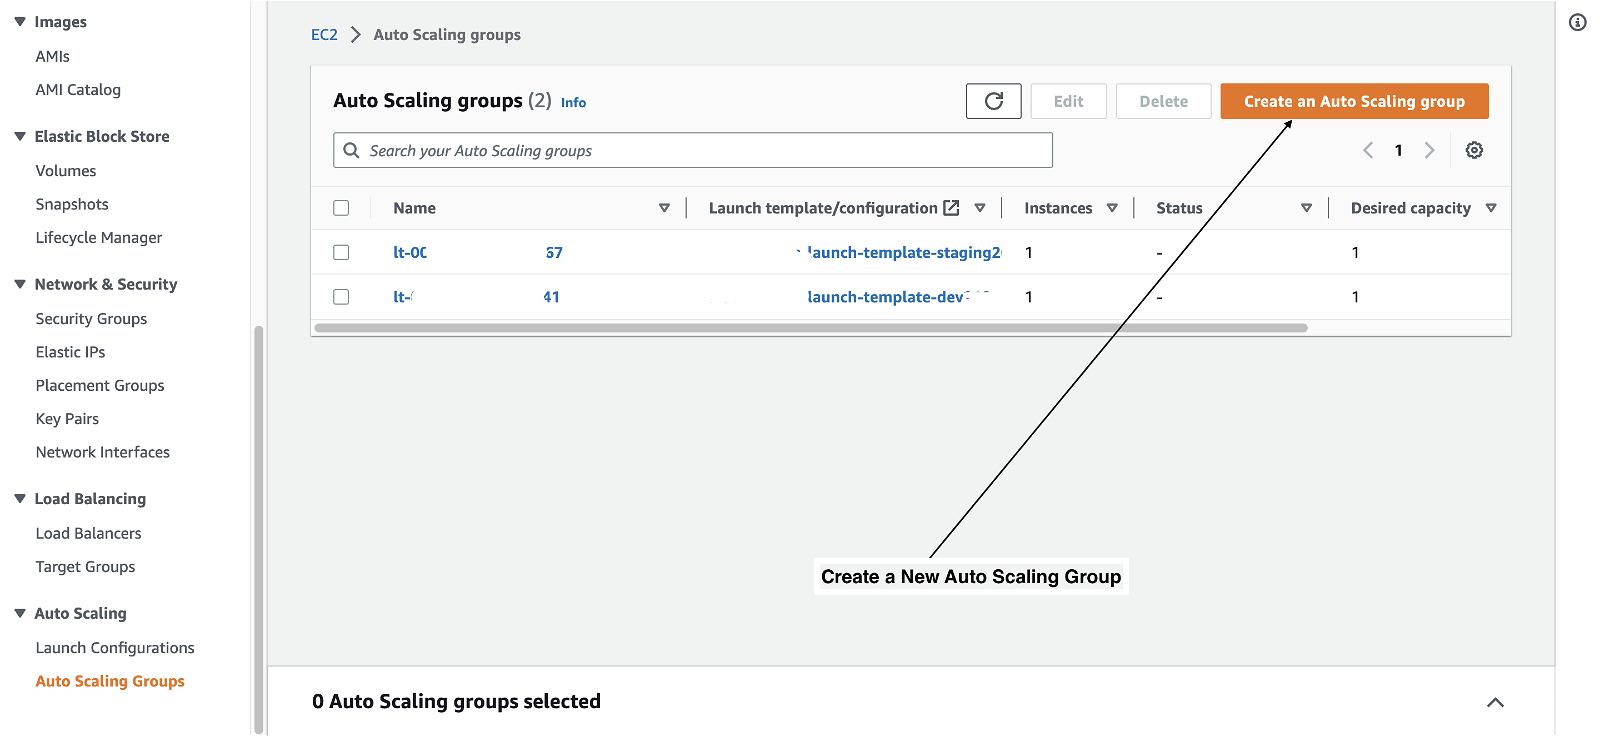
Now that you have your Lambda Function and SNS topic ready, you can proceed to create your server pool. Here you will use the EC2 Dashboard to create an Auto Scaling Group.
The Auto Scaling Group will need a launch template that will make use of our AMI image. This is the AMI image that you created to launch instances.
You have two options, either create a launch-template or click on <<Switch to launch configuration>> to enter the required configuration as shown below.
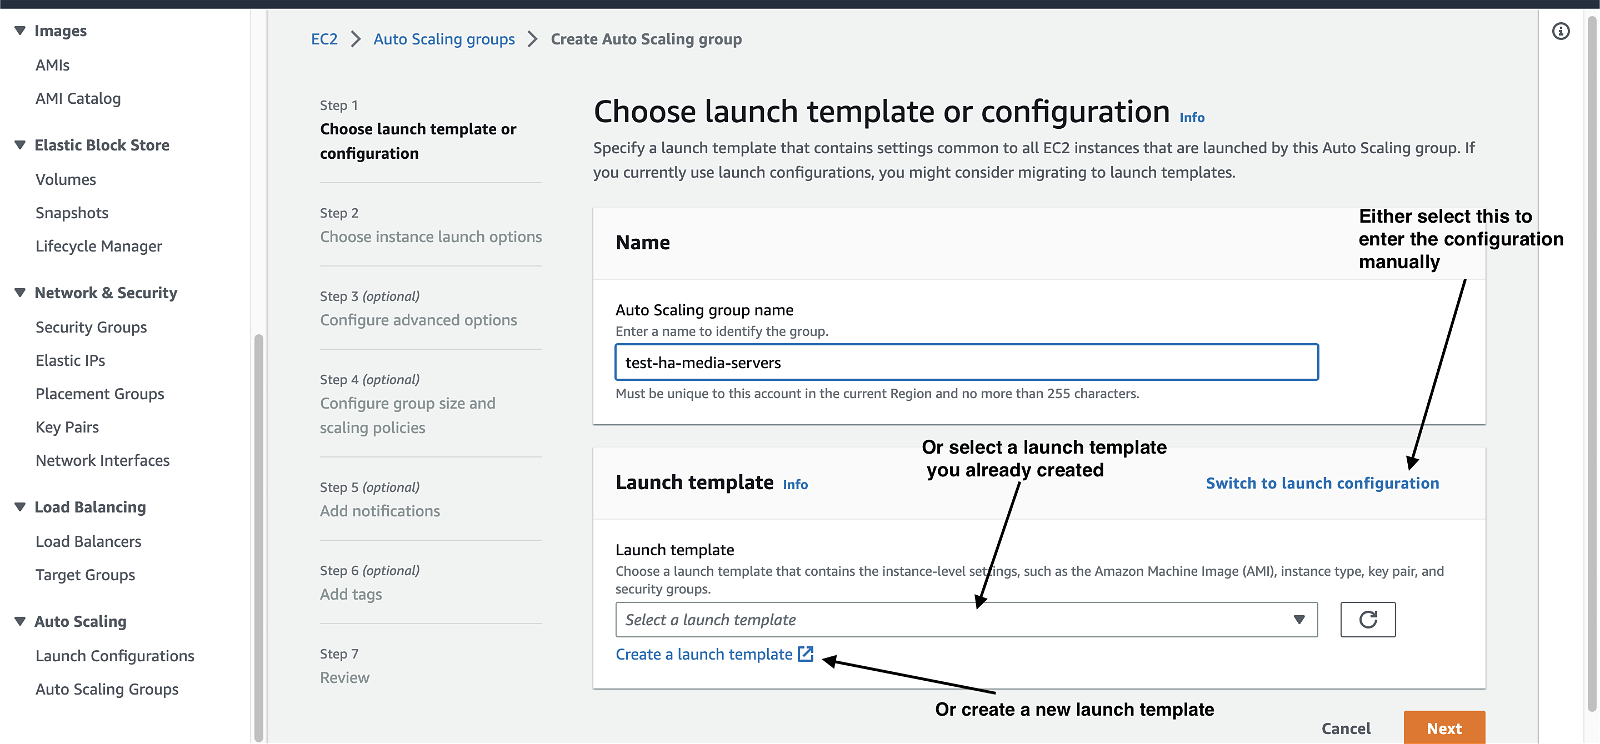
Since at this point you don’t have a launch template, you can proceed and create one by clicking the <<Create a launch template>> link. This will open a new tab where you can fill in the required fields.
The most important section under the Launch Template content is the Application and OS Images (Amazon Machine Image) where you should select My AMIs tab and then select the AMI image you built for your media server.
Remember, the AMI operating system selected is the one that will be used for your instances. In this example we used Ubuntu, but you can use any Linux distribution or Operating System supported by AWS.

Selecting Instance Type
Next, select your instance type. Here is where you decide which instance type and size will be more appropriate for your media server. For example, if you want a single media server to handle 300 participants who may be distributed across different calls or in a single call, then the instance you select should have enough memory and vCPU enough to handle such load.
The best way to properly estimate is to start with a small instance type. Once your application is developed, you can keep changing the instance type during testing until you reach a size that supports your 300 participants per media server. This number is arbitrary for the example. It is important to remember that while testing you can use the AWS CloudWatch Metrics to determine your instance performance. If you can also integrate a third party monitoring tool into your instance setup then it will come in handy during this stage.
Selecting Network Settings
Then, the other key section is the Network settings. This is where you configure your security group rules to open specific ports and restrict other connections.
You can also increase the disk space in case the default disk size of the AMI image is small, for example your AMI might have a 20GB volume, but your media server may need a minimum of 40GB. You can modify this under the Storage (volumes) section.
Under the Advanced settings you can add a userdata script that can be used by the instance to do some configurations during launching.
Fill in the other configurations as you require, then click on <<Create launch template>>.
Once created, you can close the tab and go back to the Auto Scaling group creation page, click on the refresh button to the left of <<Select launch template>> dropdown. This will update the list of available launch templates, select the launch template you created and click <<Next>>.

On the next screen you will select options for launching your instance including the VPC if you have more than one. You may also select the availability zones for your instance, for this example it is recommended you select all the three availability zones to make your media pool more resilient to failure in one availability zone. Once selected click <<Next>> to proceed.
Ensure load balancing option is set as “No load balancer” then click <<Next>>.
Selecting Initial Capacity
In the next section, configure the initial capacity i.e. the desired, minimum and maximum capacities of the autoscaling group. Another relevant setting under this section is to ensure you set the Scaling policies option to None. Since you’ll want your auto scaling group scaling be managed by your application’s logic. Then click <<Next>> to go to the next section.
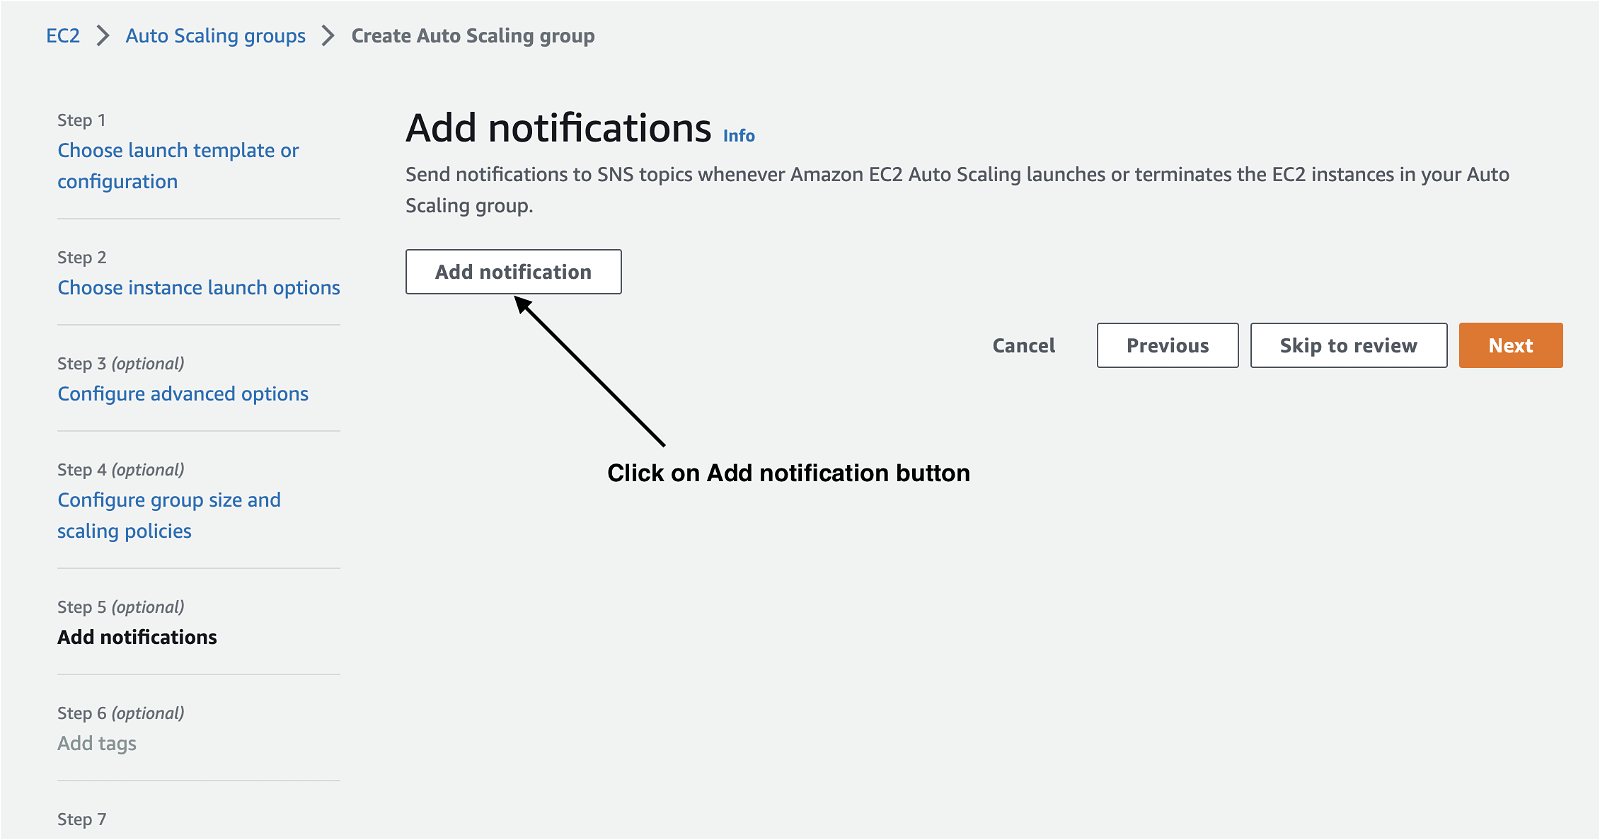
This next section is also important since it will allow you to configure your Auto Scaling Group to be able to send its lifecycle events to the SNS topic. Under the Add Notifications section, click on the <<Add notification>> button which will open a notification configuration section.
On the opened section, click on the field under SNS Topic then search for the SNS Topic you created and linked to your Lambda function above.
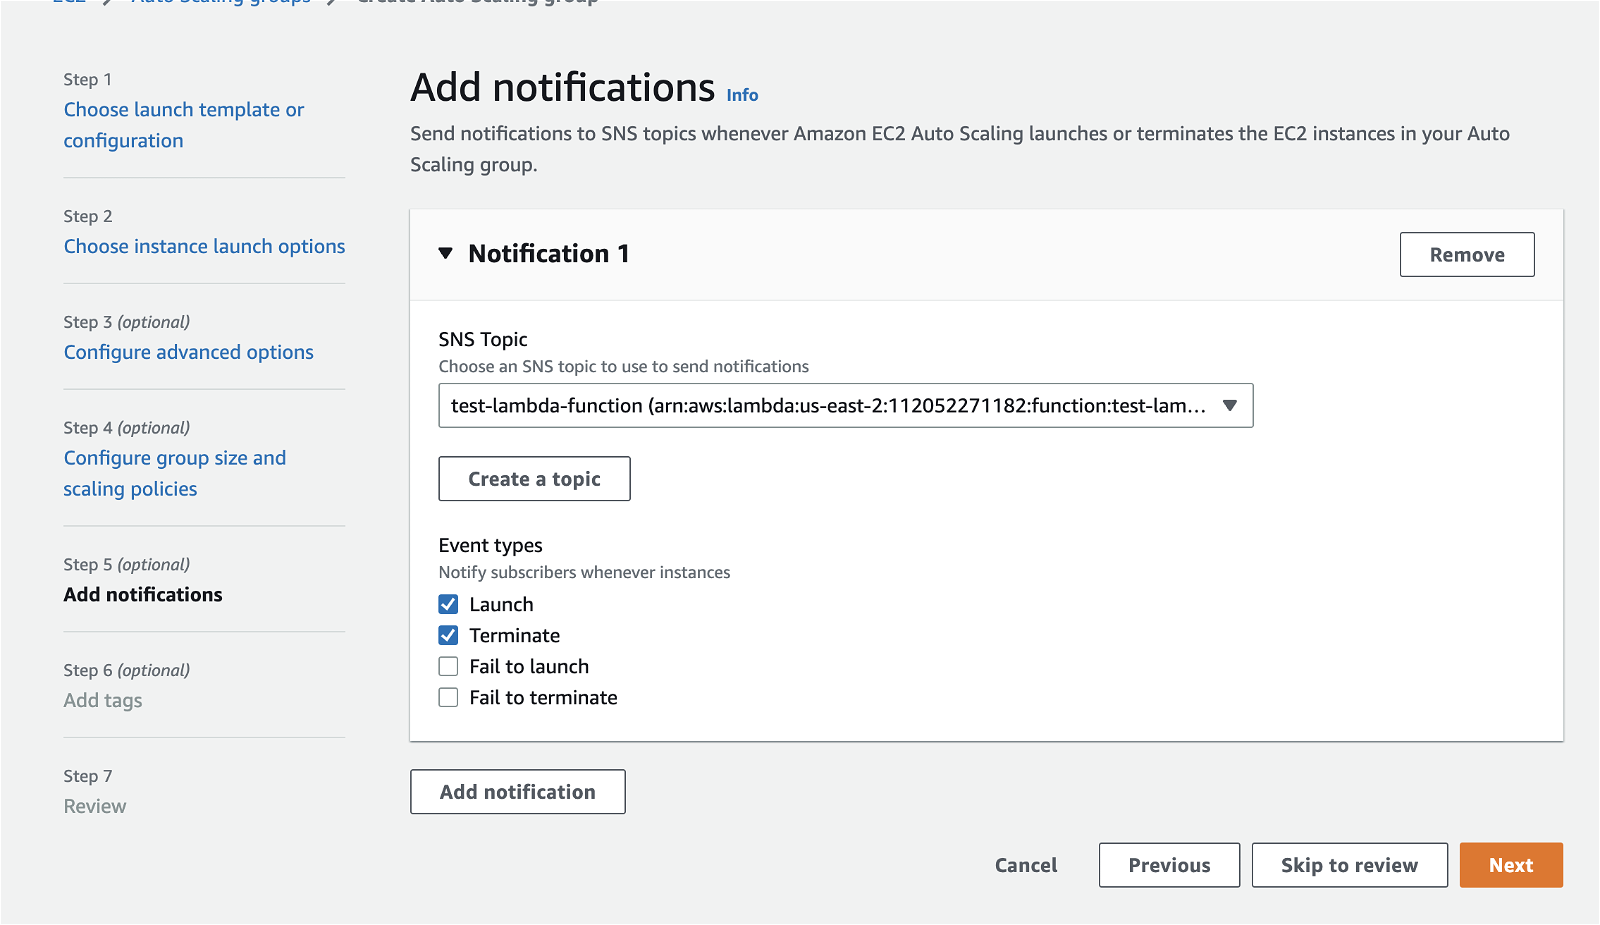
Selecting Notification Events
Once selected, choose your notification events. For this case we will only need two: Launch and Terminate. Unless you included a specific condition and function in your Lambda function to handle the other events you may choose to include them or not.
Click on <<Add notification>> button and click <<Next>> to proceed to the tagging section or you may click on <<Skip to review>> if you do not want to add tags.
Review your settings and click on <<Create Auto Scaling Group>>. This will launch your Auto Scaling Group and add the initial instances the way you defined in the configuration.
Manage Scaling On Demand
Assuming your Auto Scaling Group is ready and linked with your Lambda Function, the last step is to add logic in your application’s backend to manage the group’s scaling in and out. Here you use one of the AWS Software Development Kits (SDKs) to communicate with AWS API.
Once you configure the AWS SDK in your app, you can keep track of which meetings are currently running and which meetings are ended. You may also track how many users are currently online. From this data and any other that you may decide to use, your app can determine if the current usage is almost reaching the threshold for the available media servers. If that is the case, then the API can send a scale up AWS API call to your Auto Scaling Group which will increase the instances. The Lambda Function will receive the create events once each server is instantiated in the Auto Scaling Group. Once the SNS events are processed, the server details will be sent to the backend/application. This will use the endpoint supplied to the Lambda Function.
You will also need to track usage in terms of which meetings have ended, how many users have dropped off among other key data. Here you can use the saved instance details to terminate the instance and scale down your AutoScaling Group.
The above logic will keep balancing the number of instances in use by your application. Your task is to understand at what point does your application detect that it needs more servers and at what point do you know that a server is not being used.
Media Server Pool Startup Time Improvement
Sometimes the server usage may grow quicker than the time it takes the AWS Autoscaling Group to add a new instance. To reduce this time you can use the AWS Auto Scaling Group Warm Pools.
These will prepare a set of instances with your media server configuration and put them in a hibernation/stopped/running state. With this, whenever a new instance is needed it is taken from the warm pool and it will only be started which will drastically reduce the startup time of a new media server.
The warm pool will keep replacing any instances that are taken out to the Auto Scaling Group. Hence if you have a setup requirement that may need too many instances during a spike you can utilize the warm pool to hold that many instances on standby for such peak moments. The good thing is that both the warm pool and the autoscaling group can be modified using the AWS SDK API calls.
Follow the steps below for adding a warm pool to your already created Auto Scaling Group:
- Go to EC2 Dashboard, navigate to <<Auto Scaling Groups>> and click on your media server’s Auto Scaling Group from the list. You can also search for it in case the list is long.
- Click on the <<Instance management>> tab and under the Warm pool section click on the <<Create warm pool>> button.
- Select the warm pool instance state.
- Choose the running state if the need for media servers can not stand the time it takes to start a stopped or hibernated instance. Here you will be charged full for the running instances.
- Choose the hibernated state if the stopped state instance takes too long to load data into memory to keep up with the scale-up wait time required by your application. This applies charges on the resource attached to the hibernated instances.
- Choose the stopped state to save on compute costs and if your application scale-up wait time is not affected by the time it takes to start a stopped instance. Charges only apply to the attached resources.
- Then, define the size of your pool by entering the minimum warm pool instance and the maximum setting. Once done click <<Create>> to add a warm pool to your auto scaling group.
The beauty of using the AWS SDK API is that you can alternate between the above modes depending on the current status of your application or based on the peak and off peak times. For example, if you have a peak time between 11am and 12pm, then you may add logic to your backend/application to change the warm pool state to running. During moderate peak hours you may set the warm pool to a hibernated state and during off peak hours you may set it to a stopped state depending on the kind of user traffic you handle. This flexibility will allow you to save extensively on your on demand instance costs.
Additional Recommendations
Our first recommendation is to orchestrate all these setup steps in a single Infrastructure as Code (Pulumi or Terraform) setup that you can use to deploy your infrastructure at one go. This will simplify all these steps in a single setup that you may release in versions or even for different environments.
Some teams prefer to separate application IaC code from the Infrastructure setup IaC code. Whatever option you choose, using IaC will improve setup, debugging and configuration time required. It will also ensure that once your setup is ready, it would be easier to migrate to any environment, Account or Region on AWS.
With IaC it will also be easier to document your setup and configurations. This will improve infrastructure maintenance and handover time.
Do you need help creating a reliable and dependable cloud deployment strategy for your WebRTC application? Our DevOps team can’t be beat. Contact WebRTC.ventures today!


