In a previous post, we showed you how to perform background removal using the Insertable Streams for MediaTrack API and the VideoFrame interface of the WebCodecs API, as an alternative to HTML Canvas elements. Having just scratched the surface of what a complete live video processing pipeline looks like, today we will expand on this functionality. We will add the ability to manipulate video streams in order to add text and overlay images (even a QR code!) into a broadcasting application.
Stay tuned for future posts where we will explore real-world implementation of these features.
Prerequisites
The code for this application is available on Github. Code along as you read if you like, or go straight to the finished version. You’ll need at least NodeJS 16. (Installation instructions, if needed.)
You can download the code using the git cli tool as shown below. (Installation instructions, if needed.)
# Download code from the repo
git clone https://github.com/WebRTCventures/live-video-processing-demo
cd live-video-processing-demo
# If you plan to code along, switch to code-along branch
git checkout code-along
If you don’t want to install Git, you can also download the code using the zip version available in the repo. If you plan to code along, be sure to download the zip file from the code-along branch.
Once you have downloaded the code, make sure to install all the required dependencies. To do so, open a terminal window, navigate to the project folder and run the npm install command as shown below:
# navigate to project folder
cd route/to/live-video-processing-demo
# install dependencies
npm install
Running The Base Application
First, let’s get familiar with the base peer-to-peer broadcasting application we will work with. This is the same as the one in the code-along branch. To run it, open a terminal application and, from the project folder, run the server.js file using Node, as shown below:
# run the application
node server
Next, open http://localhost:3000/presenter.html in your favorite web browser. Then, open a couple more browser tabs and navigate to http://localhost:3000/viewer.html. You’ll see a user broadcasting his/her video streams and a couple of other users viewing it.
In addition, all users can chat using the controls on the right.

Creating a Live Video Processing Pipeline
Now that you have the application running, we’re ready to create our live video processing pipeline. To do so, let’s create a new file track-utils.js under the public folder. There, add a function that will create a processed video track.
This function will be similar to the one described in our background removal post, with a pair of MediaStreamTrackProcessor and MediaStreamTrackGenerator objects that will be used as the input and output of the pipeline, and also a TransformStream object that will act as the transformer.
This TransformStream object receives a transform function – where all the magic happens – as a parameter along with the video track that will be processed. Finally, we bundle all together and return the MediaStreamTrackGenerator object that contains the processed video track. The code of the function is shown below:
// public/track-utils.js

// function that creates a processed track
// it receives a track and a transform function
function createProcessedTrack({ track, transform }) {
  // create MediaStreamTrackProcessor and MediaStreamTrackGenerator objects
  const trackProcessor = new MediaStreamTrackProcessor({ track });
  const trackGenerator = new MediaStreamTrackGenerator({ kind: track.kind });

  // create the transformer object passing the transform function
  const transformer = new TransformStream({ transform });

  // connecting all together
  trackProcessor.readable
    .pipeThrough(transformer)
    .pipeTo(trackGenerator.writable);

  // returning the resulting track
  return trackGenerator;
}
Now, we need to create a transform function. This function receives two parameters: a video frame and a controller. It processes each video frame, applying the desired manipulations, and then adds it to the controller’s queue to create a new processed track.
The function’s content will be different based on the desired effect, and we aim to have the flexibility to change it dynamically. To simplify this process, we will use a “transform function factory” that will create a custom transform function each time.
Let’s start with a very minimal transform function where we simply pass the current video frame to the controller without any modifications. We will use this one to “clear” any other processing we make.
// public/track-utils.js
...
// our "clean" transform factory
function cleanStream() {
  // it returns the actual transform function
  return function transform(frame, controller) {
    // for now, let's queue the current video frame
    controller.enqueue(frame);
  }
}
The next step is to include this pipeline in the presenter’s view. To do so, start by adding the newly created script on presenter.html. Then, let’s create a variable that stores the selected transform function, and also change the handler for getUserMedia so it processes the video track before adding it to the video element.
The trick is to pass the video track acquired from getUserMedia along with the transform function we get from the transform function factory to our createProcessedTrack. We achieve this by using an anonymous function that calls whatever transform function is stored in transformFn.
The code for this is shown below:
<!-- public/presenter.html -->
...
  <script src="/socket.io/socket.io.js"></script>
  <!-- adding the newly created script -->
  <script src="track-utils.js"></script>
  <script src="main.js"></script>
  <script>
    const localVideo = document.getElementById("localVideo");
    // a variable to store the selected transformation
    let transformFn;

    navigator.mediaDevices
      .getUserMedia({ audio: false, video: true })
      .then((stream) => {
        /* use the stream */
        // create a transform function and assign it to transformFn variable
        transformFn = cleanStream();

        // start the video processing pipeline
        const pTrack = createProcessedTrack({
          track: stream.getVideoTracks()[0],
          transform: (frame, controller) => transformFn(frame, controller)
        });

        // add the processed track to video element in a new stream
        localVideo.srcObject = new MediaStream([pTrack]);
        styleVideos();
        startSignaling('p');
      })
...
Try refreshing the presenter view (or open it once again if you have closed it). While it seems like nothing happens, our video processing pipeline is working behind the scenes!
Adding Text
To make it more interesting, let’s add a way for a presenter to display text announcements over the video. To do so, we will create a new transform function factory that sets up the necessary components and provides the required transform function.
This function will combine the video stream with a moving text overlay, and render the final result in an OffscreenCanvas, which is then used to create a new video frame using WebCodecs API’s VideoFrame interface.
// public/text-utils.js
...
// a customizable transform function factory for adding text
// let's add some default values
function showText({
  text,
  txtInitialX,
  txtColor = 'white',
  txtFontSize = '48px',
  txtFont = 'serif',
  textSpeed = 2,
  bgColor = '#08b9a6',
  bgPadding = 10,
  position = 'top'
}) {
  // an ofscreencanvas for drawing video frame and text
  const canvas = new OffscreenCanvas(1, 1);
  const ctx = canvas.getContext('2d');

  // some values for text size and x position in the canvas
  const intTxtFontSize = parseInt(txtFontSize);
  let x = txtInitialX;

  // the transform function
  return function transform(frame, controller) {
    // set canvas size same as the video frame
    const width = frame.displayWidth;
    const height = frame.displayHeight;
    canvas.width = width;
    canvas.height = height;

    // determine position of the text based on the params
    const bgHeight = intTxtFontSize + bgPadding;
    const bgPositionY = position === 'bottom'
      ? height - (intTxtFontSize + bgPadding + 5)
      : 5;
    const txtPositionY = position === 'bottom'
      ? height - (Math.floor(bgPadding / 2) + 10)
      : 5 + intTxtFontSize;

    // let's draw!
    ctx.clearRect(0, 0, width, height);
    ctx.drawImage(frame, 0, 0, width, height);
    ctx.font = txtFontSize + ' ' + txtFont;
    ctx.fillStyle = bgColor;
    ctx.fillRect(0, bgPositionY, width, bgHeight)
    ctx.fillStyle = txtColor;
    ctx.fillText(text, x, txtPositionY);

    // move the x position of the text
    x -= textSpeed;
    // restart the position after it leaves the screen
    if (x <= (0 - 100 - text.length * 20)) {
      x = width
    }

    // create a new frame based on the content of the canvas
    const newFrame = new VideoFrame(canvas, { timestamp: frame.timestamp });

    // close the current frame
    frame.close();
    // enqueue the new one
    controller.enqueue(newFrame);
  }
}
The next step is to call this new transform function factory from the UI and update the value of the transformFn variable so the pipeline processes the video track accordingly. Additionally, we’ll include an extra text box for users to input their announcements and a button to display them.
While we’re at it, let’s also add a way for the user to clear up the message and get back to the original stream. Or should we say, apply the “clean” transformation we added before.
<!-- public/presenter.html -->
...
<div id="chat" class="chat">
<!-- adding the new UI elements -->
<input id="announcement" type="text" placeholder="Make an announcement..." />
<button id="announcementBtn">Announce</button>
<button id="clsAnnouncementBtn">Clear</button>
...
</div>
...
<script>
...
let transformFn;
// get references from html elements
const announcement = document.getElementById('announcement');
const announcementBtn = document.getElementById('announcementBtn');
const clsAnnouncementBtn = document.getElementById('clsAnnouncementBtn');
...
// an event for adding the announcement
announcementBtn.addEventListener('click', () => {
// update transformFn with transform function from showText factory
// use current video element stream width to calculate initial x position
transformFn = showText({
text: announcement.value,
txtInitialX: localVideo.
srcObject.
getVideoTracks()[0].
getSettings()['width']
});
});
// an event for "cleaning" the stream
clsAnnouncementBtn.addEventListener('click', () => {
transformFn = cleanStream();
announcement.value = '';
});
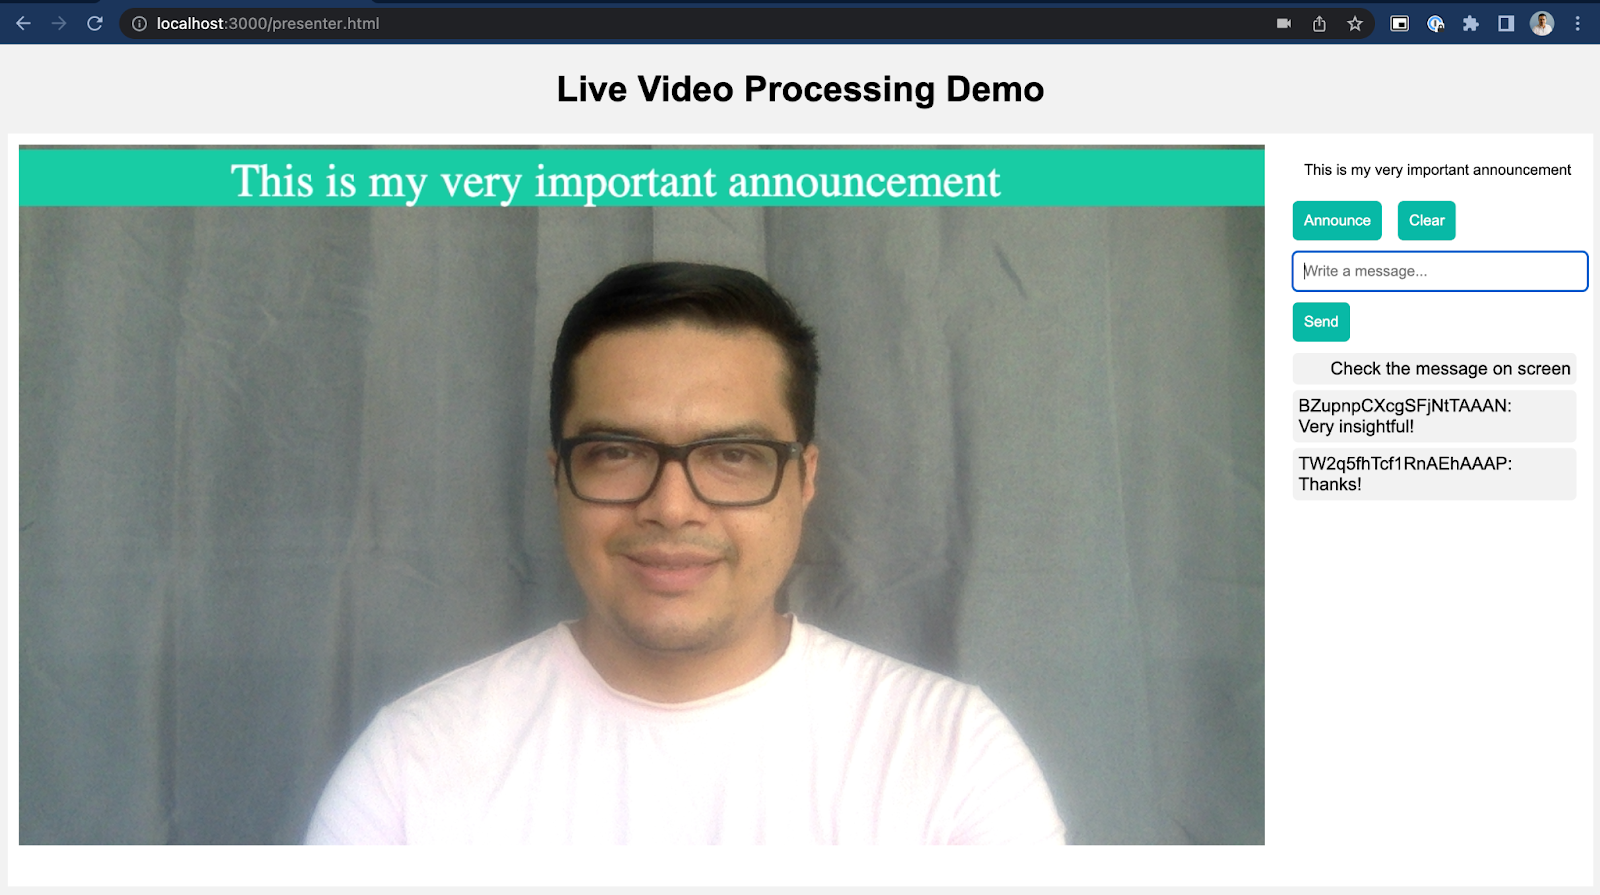
</script>It’s time to see our first two transform functions in action! Open the application once again and now try to send an announcement. You should see something like the image below.
You should also be able to clear the video stream, which is the same as changing to a transform function that doesn’t perform any processing whatsoever.
Adding Overlay Images
Let’s introduce a new feature to our pipeline: the ability to overlay images onto the video stream. To achieve this, we’ll create another transform function factory. Here, we’ll leverage the File API to read an image provided by the user, and then utilize an OffscreenCanvas to combine all the elements.
As before, we will use WebCodecs API’s VideoFrame interface for generating video frames for the processed track.
<!-- public/presenter.html -->
...
<div id="chat" class="chat">
  <!-- adding the new UI elements -->
  <input id="announcement" type="text" placeholder="Make an announcement..." />
  <button id="announcementBtn">Announce</button>
  <button id="clsAnnouncementBtn">Clear</button>
  ...
</div>
...
<script>
  ...
  let transformFn;
  // get references from html elements
  const announcement = document.getElementById('announcement');
  const announcementBtn = document.getElementById('announcementBtn');
  const clsAnnouncementBtn = document.getElementById('clsAnnouncementBtn');

  ...

  // an event for adding the announcement
  announcementBtn.addEventListener('click', () => {
    // update transformFn with transform function from showText factory
    // use current video element stream width to calculate initial x position
    transformFn = showText({
      text: announcement.value,
      txtInitialX: localVideo.
        srcObject.
        getVideoTracks()[0].
        getSettings()['width']
    });
  });

  // an event for "cleaning" the stream
  clsAnnouncementBtn.addEventListener('click', () => {
    transformFn = cleanStream();
    announcement.value = '';
  });
</script>
Next, let’s add an input element where the user can add the image. We will also need an event listener that creates a new transform function after an image has been added.
<!-- public/presenter.html -->
...
<div id="chat" class="chat">
<input type="file" id="image" placeholder="Add an image..." accept="image/*" />
<input id="announcement" type="text" placeholder="Make an announcement..." />
...
<script>
...
const image = document.getElementById('image');
let transformFn;
...
image.addEventListener('change', () => {
transformFn = showImage({image: image.files[0]});
announcement.value = '';
});
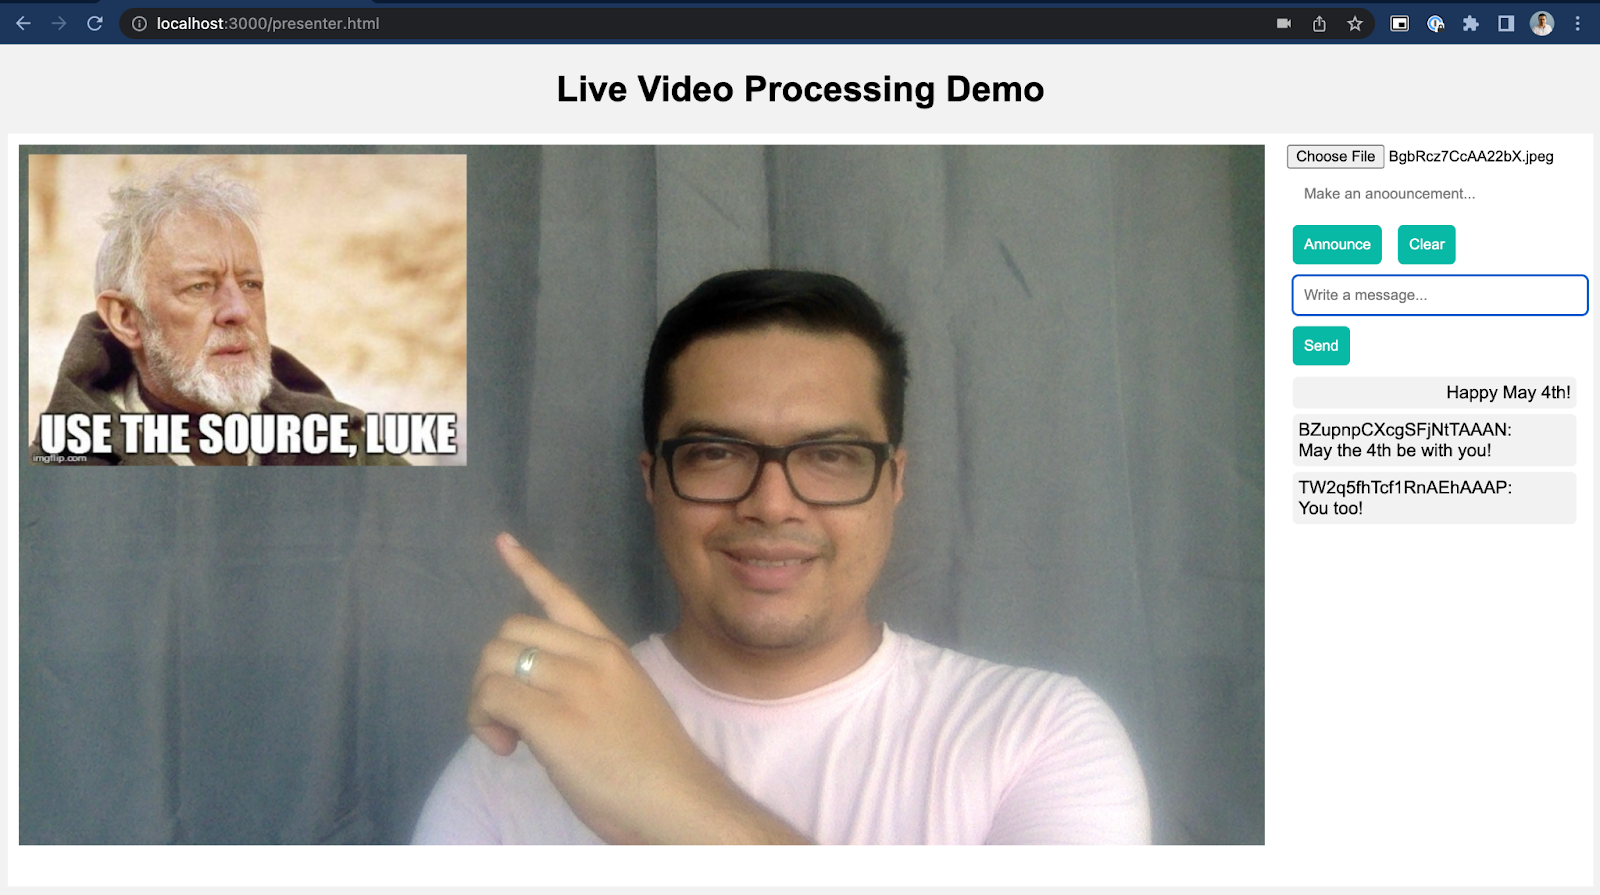
...Open the application once again and try adding an image. You should see something similar to the image below:
Adding QR Codes
This new superpower feels great, doesn’t it? What other kind of live video processing can you think of? What about QR codes? These are a convenient way to share information with others and we can use our pipeline to easily add them to our application.
First, we need to generate a QR code. Let’s add the QRCode.js QR code generator library to the code. This is as simple as adding the following line to the presenter.html file.
<script src="https://cdnjs.cloudflare.com/ajax/libs/qrcodejs/1.0.0/qrcode.min.js">
</script>
Then, let’s create a transform function factory. It will be similar to the one we created for adding images. But instead of reading an image, we will generate a new QR code using the third party library we just added. The code for the transform function factory is shown below:
// public/text-utils.js
...
// a customizable transform function factory for adding QR codes
// let's add some default values
function showQr({
  text,
  qrWidth = 256,
  qrHeight = 256,
  colorDark = '#000000',
  colorLight = '#FFFFFF',
  positionX = 10,
  positionY = 10
}) {
  // a canvas for bundling everything together
  const canvas = new OffscreenCanvas(1, 2);
  const ctx = canvas.getContext('2d');

  // a div element for hosting the QR code
  const qrDiv = document.createElement('div');

  // generating a new QR code on the qrDiv element
  new QRCode(qrDiv, {
    text,
    width: qrWidth,
    height: qrHeight,
    colorDark,
    colorLight
  });

  // the transform function
  return function transform(frame, controller) {
    // setting canvas size same as the video frame
    const width = frame.displayWidth;
    const height = frame.displayHeight;
    canvas.width = width;
    canvas.height = height;

    // drawing the current video frame and QR code
    ctx.clearRect(0, 0, width, height);
    ctx.drawImage(frame, 0, 0, width, height);
    ctx.drawImage(
      qrDiv.querySelector('canvas'),
      positionX,
      positionY,
      qrWidth,
      qrHeight
    );

    // get the current video frame timestamp before closing it
    const timestamp = frame.timestamp;
    // close the current video frame
    frame.close();

    // create a new video frame based on the content of the canvas
    const newFrame = new VideoFrame(canvas, { timestamp });
    // enqueue the new video frame
    controller.enqueue(newFrame);
  }
}
For the UI, let’s reuse the announcement text input and add an additional button for generating a QR code from the content of such input. Finally, let’s add an event listener for this new button to update the selected transformation:
<!-- public/presenter.html -->
...
<input id="announcement" type="text" placeholder="Make an anoouncement..." />
<button id="announcementBtn">Announce</button>
<button id="qrBtn">Make QR</button>
<button id="clsAnnouncementBtn">Clear</button>
...
<script>
  ...
  const qrBtn = document.getElementById('qrBtn');
  let transformFn;
  ...
  qrBtn.addEventListener('click', () => {
    transformFn = showQr({ text: announcement.value });
    image.value = '';
  });
...
Let’s open the application once again and see our video showing a QR code.

Conclusion
The Insertable Streams for MediaStreamTrack and WebCodecs APIs provide an easy and straightforward approach for implementing live video processing pipelines for real-time communication applications. This empowers you to incorporate powerful capabilities like adding text, overlay images, and even QR codes that greatly enhance the value of your application. Keep an eye out for a future post where we’ll explore a real-world implementation of these features. Stay tuned for more exciting updates!
If you’re interested in implementing live video processing on real-time communication applications with WebRTC, you can always leverage the experts on WebRTC applications. Contact us and let’s make it live!


