In a previous post, Why You Need Agent Routing in your WebRTC Application, we defined superior agent routing as pairing users quickly and efficiently with the right customer support agent, one that is able to provide the assistance they need to solve their problem. It’s a game changer for improved user experience. We also mentioned how pairing agent routing with WebRTC allows you to handle this interaction from within your web or native application. No need for external channels or information scattered around through multiple services.
Today, we will show you how to implement a simple agent routing strategy in a web application. The examples are written in Typescript and use the Next.js framework, but the same concepts can be adapted for any web application. In this case the agent routing feature works along with a WebRTC-powered video call, but it’s also applicable to audio-only calls and chat solutions.
Overview of the Agent Routing Solution
A mechanism that routes user requests to the right agent must take into consideration various factors such as agent availability, agent knowledge, customer profile, and previous interactions between the customer and the contact center.
For the simplicity of our purpose today, we will route the request to all agents, so the one with first availability takes the call. In more sophisticated scenarios, you could send the request only to specific agents, ones that have the right technical background or even one that has spoken to that specific customer before.
First, we set up a waiting queue using a PubNub channel. Users that want to speak with an agent send a message to the channel. Agents ‘listen’ for such messages and if one decides to take the call, he/she notifies the channel so that all other users know that the call is taken.
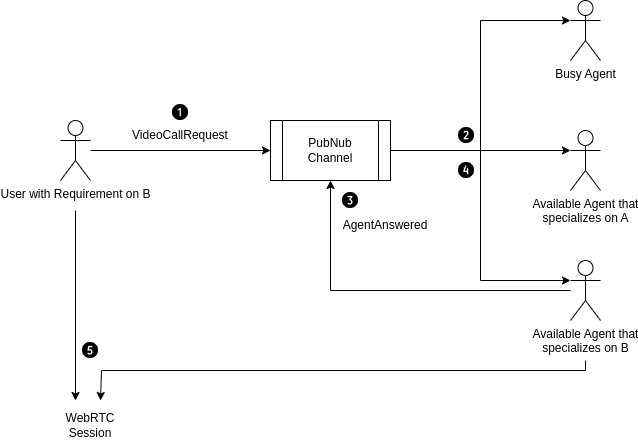
The flow goes like this:
- A customer sends the
VideoCallRequestmessage to the PubNub channel. - The agents get the notification.
- One of the agents takes the call and sends the
AgentAnsweredmessage to the channel. - The rest of agents (and the client, though not shown in the diagram) receives the notification that the call was taken.
- The customer and the agent that took the call join a WebRTC session.
Prerequisites
- This post assumes that you have a running WebRTC application that enables video calls through a ‘/room/{roomId}’ route.
- A PubNub account and a set of PubNub keys configured in your application.
Initiating the Call Process
The first step is to enable users to call an agent. To do this, we send a message to the PubNub channel when the user initiates the call process. We define the parameters of the message, including the channel name and the title of the event, along with any other information relevant for your application such as the roomId for the WebRTC connection and user’s name.
Assuming that a PubNub client is available as pubnub, the identifier of the user as name and the room identifier for the call as roomId, you can write a function as the one below to handle call initiation.
// we use useCallback to make the function more efficient across renders
const handleJoin = useCallback(async () => {
  // validating if a valid name is given
  if (name) {
    // we set the parameters of the message
    const publishPayload = {
      // the channel name
      channel: 'your-channel-name',
      // the actual message
      message: {
        // the title of the event
        title: `VideoCallRequest`,
        // the room name for the WebRTC call
        description: `${roomId}`,
      },
      meta: {
        // we add the user name
        userName: name,
      },
    }
    // we send the message to PubNub
    await pubnub.publish(publishPayload)
  } else {
    alert('Please enter your name')
  }
}, [name, pubnub])
Handling Call Requests
Now that call requests are in place, we must route them to the available agents. To do this, you can add a component to your application that subscribes all available agents to the PubNub channel and listens for new call requests. We will show you the code that you’ll need.
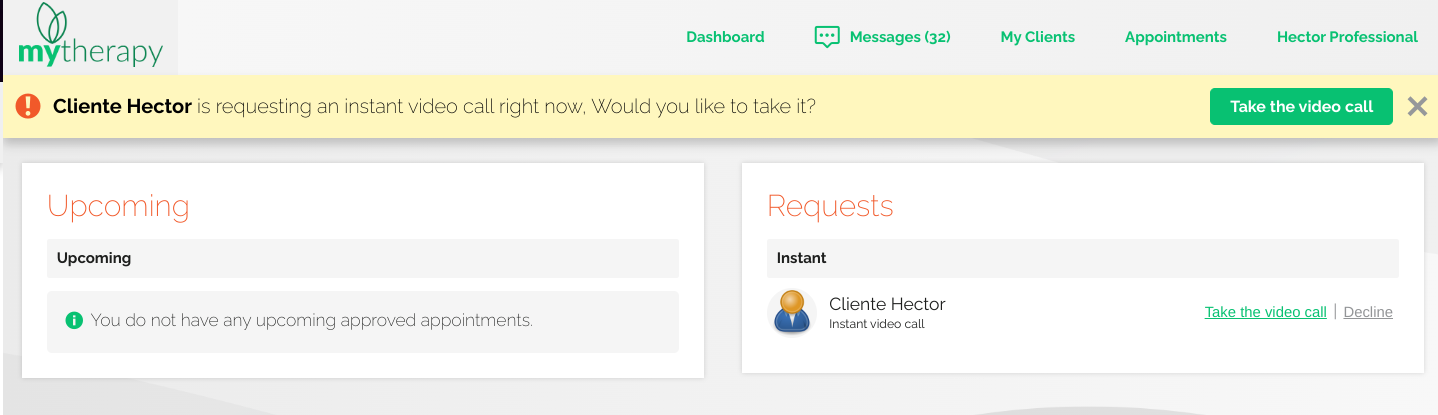
Building a Call Notification Widget
Before listening to call requests we need a way for agents to accept them. Let’s build a notification widget. Here we use a Modal component from the react-bootstrap library, but you can use the approach that best suits your expertise or application.
Our CallNotificationWidget component receives the isOpen and close properties to manage the visibility of the alert. It also receives the name of the user that is requesting, and also the handleAccept function to handle the event of an agent accepting the request.
type Props = {
	isOpen: boolean
	close: () => void
	userName: string
	handleAccept: () => void
}

export const CallNotificationWidget = function CallNotificationWidget({
	isOpen,
	close,
	userName,
	handleAccept,
}: Props) {
  // the code of the component goes here
}
The component consists of a simple modal with a button for accepting the call.
<Modal.Dialog show={isOpen} onHide={close}>
  <Modal.Header>
    <Modal.Title>Incoming Call</Modal.Title>
  </Modal.Header>
  <Modal.Body>
    <p>Incoming Call from {userName}</p>
  </Modal.Body>
  <Modal.Footer>
    <Button variant="primary" onClick={handleAccept}>
      Join Call
    </Button>
  </Modal.Footer>
</Modal.Dialog>
Listening for Call Requests
In the created component, we leverage the useEffect hook to set up a PubNub event listener. We listen for the following messages:
VideoCallRequest: this is the message sent by the user when requesting a call.AgentAnswered: this is the message sent by an agent when accepting a call. We will look into it later in the post.
To support the functionality of the PubNub listeners we also need a couple of useState hooks as follows:
incomingAnswer: to check whether another agent has answered the call.widgetRequestArray: and array of incoming requests.
Additionally, we use a pair of useEffect hooks that trigger on each new render related to changes in the state.
Assuming a PubNub client is available as pubnub, our listener looks like this:
// useState hooks that support functionality of PubNub listener
//   check whether another agent has answered the call
const [incomingAnswer, setIncomingAnswer] = useState<boolean>(false)
//   store the incoming call requests
const [widgetRequestArray, setWidgetRequestArray] = useState([])

// useEffect hooks for changes in the state
useEffect(() => "TBD: We will get back to this later", [incomingAnswer])
useEffect(() => "TBD: We will get back to this later", [widgetRequestArray])

// setting up the listener
useEffect(() => {
  const listenerParams = {
    message(s) {
      switch(s.message.title) {
      	  case 'AgentAnswered'):
          setIncomingAnswer(true)
          break;
        case 'VideoCallRequest':
          setWidgetRequestArray((prevState) => [...prevState, s])
          break;
      }
    }
  }

  pubnub.addListener(listenerParams)
  pubnub.subscribe({['your-channel-name']})

  return () => {
    pubnub.unsubscribe({['your-channel-name']})
    pubnub.removeListener(listenerParams)
  }
}, [])
Showing Call Notifications
Now that we’re listening to events from the PubNub channel and have built a call notification widget, the next step is to actually show such notification when receiving a call request. For this we add some extra useState hooks to store information about the request in the state:
videoRequest: a boolean that indicates that a request has been received.videoRequester: the name of the user that has made the request.videoReqRoom: an identifier of the WebRTC session that will take place.videoReqTime: string representation of the time of the request as registered by PubNub.
Additionally, we need a function that handles the event of an agent answering the call. We will define it now and get back to it later. Recall the useEffect we defined earlier for changes in widgetRequestArray and update the new hooks accordingly.
// new useState hooks for storing information about the request
const [videoRequest, setVideoRequest] = useState<boolean>(false)
const [videoRequester, setVideoRequester] = useState<string>('')
const [videoReqRoom, setVideoReqRoom] = useState('')
const [videoReqTime, setVideoReqTime] = useState<number>()

// a handler function for accepting the call
const handleAccept = () => 'TODO: We will get back to it later'

// the useEffect we defined earlier
useEffect(() => {
  // we get the first element of the array of requests
  const req = widgetRequestArray[0]

  // if a request is available let's look into it
  if (req) {
    // if it's a call request let's show the notification widget
    if (req.message.title === 'VideoCallRequest') {
      // update the state accordingly
      setVideoRequest(true)
      setVideoRequester(req.userMetadata.userName)
      setVideoReqRoom(req.message.description)
      setVideoReqTime(parseInt(req.timetoken, 10))
    }
    // otherwise let's remove the request
    else {
      setWidgetRequestArray((prevState) =>
        prevState.filter((prevItem) => prevItem !== req)
      )
    }
  }
  // if no request is available let's clean the state
  else {
    setVideoRequest(false)
    setVideoRequester('')
    setVideoReqRoom('')
    setVideoReqTime(0)
  }
}, [widgetRequestArray])
Later, we pass the values to our newly created CallNotificationWidget component as follows:
<CallNotificationWidget
  isOpen={videoRequest}
  close={() => setVideoRequest(false)}
  userName={videRequester}
  handleAccept={handleAccept}
/>
Accepting a Call Request
Now, let’s give agents the ability to accept a call request. The process for this is as follows:
- We make sure that the call hasn’t been taken by another agent. To do so, we fetch the messages that match the identifier of the call (in our case, the room identifier) and that are around the same timetoken. If so, we remove it from our list or requests.
- We send a message to the PubNub channel to let the user and other agents know that the call is taken.
- We remove the message from the PubNub channel. Due to how PubNub stores the messages in the queue, we also need to play with the timetoken value here.
- We navigate to the WebRTC call page.
Let’s start by creating a separate function that validates if the call has been taken. For better performance we can use the useCallback hook and list the videoReqRoom value as dependency.
const checkAlreadyAnswered = useCallback(async () => {
  // we set limits around the given timetoken value
  const start = videoReqTime - 5
  const end = videoReqTime + 5

  // fetching messages from PubNub
  const response = await pubnub.fetchMessages({
    channels,
    start,
    end,
    count: 25, // default/max is 25 messages for multiple channels (up to 500)
  })

  // validate if the result matches time and description
  if (response?.channels[channels[0]]) {
    if (
      response?.channels[channels[0]][0]?.message?.description ===
      videoReqRoom
    )
      // if there is a match, it means that the request is still ongoing
      return false
  }

  // if not match, it means someone else already took it
  return true
}, [videoReqRoom])
Now that we have a function that checks if the call has been answered we can complete our previously defined handleAccept function. As before, we take advantage of the useCallback hook and pass videoReqRoom and videoReqTime as dependencies as shown below:
const handleAcceptAnswer = useCallback(async () => {
  // 1. Check if the call was already answered
  const answered = await checkAlreadyAnswered()

  // if the call is taken, remove it from the array
  if (answered) {
    setWidgetRequestArray((prevState) =>
      prevState.filter(
        (item, index) => item.message.description !== videoReqRoom
      )
    )

    return
  }

  // 2. Notify everyone that the agent is taking the call
  const publishPayload = {
    channel: 'widget-guest-channel',
    message: {
      title: 'AgentAnswered',
      description: `${videoReqRoom}`,
    },
  }
  await pubnub.publish(publishPayload)

  // 3. Removes the message from the channel
  const start = videoReqTime + 10
  await pubnub.deleteMessages({
    channel: channels[0],
    start,
  })

  // 4. Navigating to video call page
  router.push(`/rooms/${videoReqRoom}`)
}, [videoReqRoom, videoReqTime])
Reacting to An Agent Answering a Call Request
An agent is now able to take a call. Next, we need the user and other agents to do something about it. In our example, routing the user to the video call page and removing the request from each agent local array does the trick. Just be sure to adapt this to the logic of your application.
On the agent side, we are already listening for the AgentAnswered event and based on that we are updating the incomingAnswer value so let’s get back to the useEffect hook we previously defined:
useEffect(() => {
  if (incomingAnswer) {
    setWidgetRequestArray((prevState) =>
      prevState.filter(
        (prevItem) => prevItem.message.description !== videoReqRoom
      )
    )

    setIncomingAnswer(false)
  }
}, [incomingAnswer])
On the user side, we add a PubNub listener that routes the user to the video call page when the AgentAnswered event is received. Same as we did for agents, we perform this in a useEffect hook with the pubnub client listed as dependency.
useEffect(() => {
  const listenerParams = {
    message(s) {

      if (s.message.title === 'AgentAnswered') {
        if (s.message.description === roomNameRef.current) {
          router.push(`/rooms/${roomNameRef.current}/`)
        }
      }
    },
  }

  pubnub.addListener(listenerParams)
  pubnub.subscribe({ channels: ['widget-guest-channel'] })
  return () => {
    pubnub.unsubscribe({ channels: ['widget-guest-channel'] })
    pubnub.removeListener(listenerParams)
  }
}, [pubnub])
Now the users can call all agents and the one that is available can take the call.
We’re ready to connect your customers with the “right” agent!
Agent routing greatly enhances the experience of the users of your application by allowing them to be paired with the right agent. In our example, we showed you how to implement an agent routing mechanism that sends a request to all available agents through a PubNub channel.
If you’re looking into adding more sophisticated agent routing mechanisms to your real-time communication application, WebRTC.ventures has the expertise. Contact us to learn more about our services. Let’s make it live!