The combination of WebRTC and Artificial Intelligence (AI) is enhancing customer service activities in contact centers across a wide range of industries.
Hello, everyone. This is Fahad from WebRTC.ventures and I am back again to share my exciting WebRTC adventures! This time, I took my Vonage ship to the Symbl.ai universe to explore conversational intelligence. I developed a Customer Representative Application to prove how real time conversational insights can improve customer experience for airlines.
Let’s take a glimpse of this journey together!
The Mission
My goal was to first connect customers with an airline agent through the Vonage Video APIs. Then, to process the audio stream of both the customer and the airline-agent using Symbl.ai to gather real-time insights like sentiment analysis, question insights, transcripts, etc.
Finally, agents would see their call report screen after the call ended and send details (e.g. booking information) via message to the customer through Vonage SMS APIs.
I took my Vonage ship from the Next.JS station and set my final destination to the Symbl.ai universe.
The application architecture looked like this:
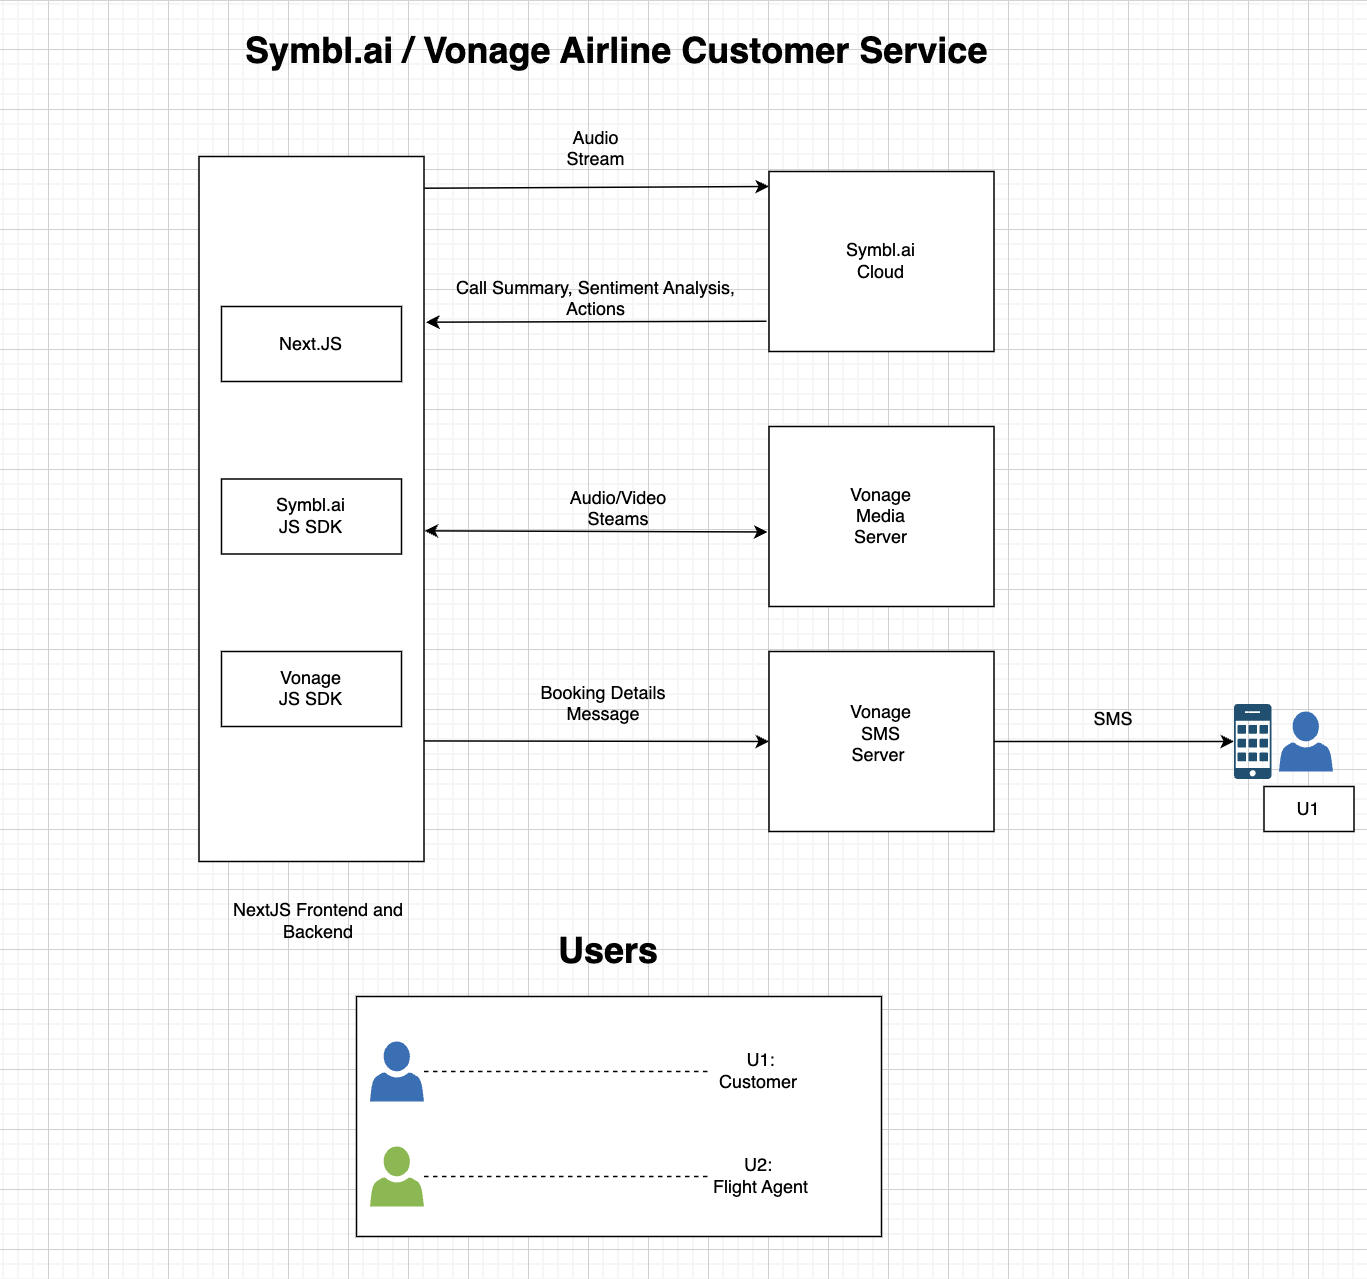
Architecture Diagram: Vonage and Symbl.ai Airline Service Application
Implementing Call Room Using Vonage
Using Vonage SDKs for video communication on the web is a fun and seamless experience. The quick start tutorial helps you to quickly spin up your web application.
You use Vonage’s server SDK to generate sessions and access tokens that clients will use to access the Vonage infrastructure based on your application requirements. This is shown in the code example below:
import opentok from '@libs/opentok';


// Generate Session Id

opentok.createSession(sessionOptions, (error, session) => {
  console.log(session.sessionId) // Generated Session Id
  onSuccessCallback(sessionId);
});

// Generate Session Access Token
const token = opentok.generateToken(sessionId);
The next step is to initialize and connect with the session using sessionId and access token on the client side. Once done, we can subscribe or publish streams and listen to different session events as well.
// Initialize Client Session using sessionId
const sessionId = await fetchSessionId();
const session = OT.initializeSession(ACCESS_TOKEN, sessionId);

// Subscribe to Remote Stream
session.on('streamCreated', event => {
   session.subscribe(event.stream, 'subscriber', OPTIONS);
});

// Connect Session and Publish Local MediaStream
const stream = getLocalMediaStream();
const publisher = OT.initPublisher('publisher', PUBLISH_OPTIONS);
session.connect(ACCESS_TOKEN, (error) => {
  if(!errror) {
    session.publish(publisher);
  }
})
I quickly created two room screens. One for the customer view and a second for the airline agent to connect with each other.
The customer view shows their own published video and airline agent’s subscribed video. The agent screen has some advanced options, as well. This will make their work more productive and thus improve the customer experience. We will talk more about this later.
Here’s a quick peek of what the both screens initially looked:


Now my Vonage spaceship is ready and fully fueled to explore the Symbl.ai universe!
Exploring the Symbl.ai Playground
Once I created an account on Symbl.ai, I headed over to the playground to experiment with different conversational intelligence features.
First, I played around with a conversation example from the Streaming API, as this is what I needed for my application. There is a sample script that you can read from and record your own audio to see how it actually works.
I noticed, after trying a few times, that it takes a little bit of time before you actually get conversation results. If you are speaking in a natural flow and you stop for a second, Symbl.ai understands that you may have finished your sentence. That is when you start seeing results.
Once I knew what I needed for my application and how I could improve the experience for my customers in a real-time conversation, it was time to read the docs and see how this can be implemented on my web application.

Understanding Symbl.ai
Symbl.ai works in three steps.
First, you have to generate an authentication token for accessing the Symbl.ai APIs.
Once that’s done, you can start processing the audio for conversational intelligence. This can be accomplished in multiple ways.
- Async APIs: They can be used for pre-recorded audio / text files.
- Streaming APIs: They provide conversation intelligence for real-time audio using websockets.
- Telephony API: They process audio from telephony SIP or PSTN interfaces.
Once the Audio API starts processing, you can use conversational intelligence APIs to fetch insights.
Implementing Symbl.ai
I chose WebSDK in order to use the Streaming API. As from the docs example, things like creating a websocket connection and fetching and sending audio streams were handled by the SDK. I only needed to call Symbl.ai’s createConnection and startProcessing SDK methods.
const connection = await symbl.createConnection();

await connection.startProcessing({
  insightTypes: ["question", "action_item"],
  config: {
    encoding: "OPUS"
   },
   speaker: {
   userId: "agnet@airwebrtc.com",
   name: "Fahad"
   }
});
Once I had implemented WebSDK, I noticed that I wasn’t getting live sentiment results with each message processed. Luckily, I found a sentiment analysis tutorial that connects using the websocket URL without the SDK and fetched sentiment analysis results.
const symblSocket = new WebSocket(SOCKET_URL);


const processSymblStream = () => {
  // fetch Stream Buffer
  const streamBuffer = fetchStreamBuffer();
  symblSocket.send(symblSocketBuffer);
 }

symblSocket.onOpen = () => {
  // end local audio stream through socket
  processSymblStream();
  symblSocket.send(REQUEST_MESSAGE);
}

symblSocket.onMessage = (event) => {
  displayTranscriptAndSentiments(event);
}
For this, I followed a similar approach. Once both the user and the airline agent connect, I would send their streams to Symbl.ai using my custom websocket connection. The customer didn’t have to do much apart from sending the stream and closing the connection when needed.
On the other hand, agents also listened to different websocket message events in order to fetch and display live sentiment results, question insights, etc. With question insights displayed, agents could remember all the questions their customers have asked them and are able to promptly reply to make sure the customer has the best experience.
The chat transcript screen will show the live transcript to improve the conversation and will also display sentiments. It shows three different sentiments: neutral, negative, and positive. Based on the sentiment, an agent can take appropriate steps to improve the customer experience.
Some advancements had been made since the tutorial was created. I didn’t have to manually call the get message API on each message received from the web socket or by setting up an interval. Instead, I could just listen to the message data containing message_response as the type through the websocket. In fact, it was much faster than setting up an interval or calling the API on each message.
My agent screen was now ready! I was able to create a solution using AI that will allow customer service agents to provide the best experience, in my case for airline customers.

Agent Call Summary / Action Insights
The only thing left was to create a call summary / action screen for the agent. Once a call is finished, a full call report can be seen and appropriate action can be taken by the agent.
Using Symbl.ai, I displayed customer question insights and chat transcript similar to the previous agent screen. The API responses were different from the websocket responses to fetch transcript with sentiments. I had to format the data in order to display them correctly.
Another important section was send SMS section to send different messages to the customer. Vonage SMS API helped me to quickly implement this feature. I created a NextJS serverless API to send SMS to the customers and connected it with the frontend.
import {Vonage} from '@vonage/server-sdk';

const vonage = new Vonage({apiKey, apiSecret});

await vonage.sms.send({to, from, message})
This is how the final call end screen looked for the agent:

Conclusion
The future is full of WebRTC and Artificial Intelligence (AI)! I hope you enjoyed learning how to create this application. Please reach out to our experienced team at WebRTC.ventures if you want to empower your contact center’s customer service with WebRTC and AI.


