We see more and more that participants in a video conference want to hide the view behind them. To make it fun, they can use a virtual background. Having this option in an application will improve the user experience, so let’s see how you can remove the background and replace it with a custom image using Daily React Hooks and MediaPipe libraries.
About MediaPipe and Daily
MediaPipe offers out of the box solutions to use Machine Learning (ML) technology with live and streaming media. In this particular case, we are going to use MediaPipe Selfie Segmentation, which segments the prominent humans in the scene. It can run in real-time on both smartphones and laptops. The intended use cases include selfie effects and video conferencing where the person is close (< 2m) to the camera.
Daily is a WebRTC-based CPaaS that allows you to add live video and audio to any product. As we mentioned in an earlier post, you can start with the Daily Prebuilt user interface or create custom layouts with their client SDKs. Daily React Hooks is a helper library for handling common patterns when building custom Daily applications using React. You can see Daily’s demo on how to use the library here.
Prerequisites
For this demo, we’ll use CustomLobbyDailyReactHooks. If you have GIT installed, you can run the command below to clone it locally. You can also click the “Download ZIP” button under code in the repository:
git clone https://github.com/agilityfeat/CustomLobbyDailyReactHooks.gitOnce you have the code downloaded, install the dependencies running the following command:
cd CustomLobbyDailyReactHooks
npm install
The rest of this post will build on top of that code in order to add a custom background to the participant. If you’d like to see the full code we use in this demo, we have posted it in our repository here.
Setting up Media Pipe
We are going to use @mediapipe/selfie_segmentation for the background removal. The first step is to install this package using the following command:
npm install @mediapipe/selfie_segmentationOnce we have installed the package, we are going to be able to use it! You just need to import it using the following line of code as we will see later:
import { SelfieSegmentation } from "@mediapipe/selfie_segmentation";Use MediaPipe to remove the background and send the results to Daily call
In order to remove the background and send the results to Daily, we are going to modify the Call.js file following the next steps.
Importing Resources
We need to import MediaPipe Selfie Segmentation using the line of code above and after importing this, we are going to be able to use the SelfieSegmentation library. The next step we need to do is to import useRef from React, since we are going to need to reference some DOM elements.
// src/components/Call/Call.js
// import SelfieSegmentation from MediaPipe
import { SelfieSegmentation } from "@mediapipe/selfie_segmentation";
import React, {
 useState,
 useCallback,
 useMemo,
 useEffect,
 useRef, // import useRef
} from "react";
The last import is the background that we are going to use. You can use any image you want. Just make sure to resize it to 480×270 so it fits the video size. In this example, we are going to use the following background:

Store the image in the same folder as the Call component and import it as shown below:
import backImage from "./HD-wallpaper-star-wars-space-x-wing.jpeg";Declaring Constants and Variables
We are going to declare a new state variable, showCustomVideo, to know if the user selected to show the custom background or not, the initial value will be false. We also define a new property customVideo that we will use later.
// src/components/Call/Call.js
// import SelfieSegmentation from MediaPipe
import { SelfieSegmentation } from "@mediapipe/selfie_segmentation";
import React, {
 useState,
 useCallback,
 useMemo,
 useEffect,
 useRef, // import useRef
} from "react";
As I told you above, we are going to use references to some DOM elements and also for the new state variable. Let’s declare these:
// src/components/Call/Call.js
…
export default function Call({ customVideo}) {

 …
 const { waitingParticipants } = useWaitingParticipants();
 // new refs here
 const inputVideoRef = useRef();
 const canvasRef = useRef();
 const contextRef = useRef();
 const customVideoRef = useRef(showCustomVideo);
Let me explain the usage of each one:
inputVideoRef: will be used to send the current video of the participant to media pipe so we can remove the background.canvasRef: we are going to use a canvas to show the results from Media Pipe.contextRef: this will be a reference for the context of the canvas that we are going to use.customVideoRef: we need to know the latest value ofshowCustomVideostate variable in the listener used to be receiving the results from Media Pipe.
Creating Hooks
Now we have all the constants we need for Call.js, so we can start building the code. The next step will be to create some hooks, all of these should be declared after the constants declarations:
First:
export default function Call({ customVideo}) {
…
useEffect(() => {
   customVideoRef.current = customVideo;
   setShowCustomVideo(customVideo);
 }, [customVideo])
This hook will help us to have the latest value of customVideo variable in our showCustomVideo state variable and customVideoRef reference.
Second:
export default function Call({ customVideo}) {
…
useEffect(() => {
   const selfieSegmentation = new SelfieSegmentation({
     locateFile: (file) =>
       `https://cdn.jsdelivr.net/npm/@mediapipe/selfie_segmentation/${file}`,
   });
   if (showCustomVideo) {
     selfieSegmentation.reset();
     contextRef.current = canvasRef.current.getContext("2d");
     const videoElement = document.getElementsByClassName("input_video")[0];
     let animationFrame;
     selfieSegmentation.setOptions({
       modelSelection: 1,
       selfieMode: true,
     });
     selfieSegmentation.onResults(onResults);

     const sendToMediaPipe = async () => {
       await selfieSegmentation.send({ image: videoElement });
       animationFrame = requestAnimationFrame(sendToMediaPipe);
       if (!customVideoRef.current) {
         cancelAnimationFrame(animationFrame);
       }
     };
     const startStreaming = async () => {
       const stream = await navigator.mediaDevices.getUserMedia({
         video: true,
       });
       videoElement.srcObject = stream;
       sendToMediaPipe();
       const canvas = document.querySelector("canvas");
       const streamCanvas = canvas.captureStream();
       try {
         await callObject.startCustomTrack({
           track: streamCanvas.getVideoTracks()[0],
           trackName: "background",
         });
       } catch (e) {
         console.log(e);
       }
     };
     startStreaming();
   } else {
     const stopCustom = async () => {
       await callObject.stopCustomTrack("background");
     };
     selfieSegmentation.reset();
     selfieSegmentation.close();
     stopCustom();
   }
 }, [showCustomVideo, callObject]);
Let me explain this one, step by step:
- We are going to create a new Media Pipe Selfie Segmentation instance specifying where the file to be analyzed is going to be stored, in this case we are going to use a public cdn used for Media Pipe example.
const selfieSegmentation = new SelfieSegmentation({
     locateFile: (file) =>
       `https://cdn.jsdelivr.net/npm/@mediapipe/selfie_segmentation/${file}`,
});- If the user has selected to show the custom video (showCustomVideo is equal to true), we are going to reset if something has been set to our instance of Media Pipe Selfie Segmentation
selfieSegmentation.reset();Set up some variables and constants that we are going to use:
contextRef.current = canvasRef.current.getContext("2d");
const videoElement = document.getElementsByClassName("input_video")[0];
let animationFrame;videoElement: current video of the participant without the custom background.animationFrame: store the current animation frame being animated.contextRef.current: setup current context of the canvas with the results.
Set the options for our instance of Media Pipe Selfie Segmentation
selfieSegmentation.setOptions({
       modelSelection: 1,
       selfieMode: true,
});modelSelection: we can use general model(0) or landscape model(1), in this case we are going to use landscape model.selfieMode: if you want to use selfieMode or not, in this case we are going to use it.
Note: You can see all the options you can use here.
Specify with is going to be the call back function to manage the results:
selfieSegmentation.onResults(onResults);Declare sendToMediaPipe function:
const sendToMediaPipe = async () => {
       await selfieSegmentation.send({ image: videoElement });
       animationFrame = requestAnimationFrame(sendToMediaPipe);
       if (!customVideoRef.current) {
         cancelAnimationFrame(animationFrame);
       }
     };
In this function, we are going to send the current video of the participant to Media Pipe and we are going to loop it with requestAnimationFrame. If the user has declined to use the custom background, we are going to cancel the loop with cancelAnimationFrame function, using the current animation frame.
Declare startStreaming function:
const startStreaming = async () => {
       const stream = await navigator.mediaDevices.getUserMedia({
         video: true,
       });
       videoElement.srcObject = stream;
       sendToMediaPipe();
       const canvas = document.querySelector("canvas");
       const streamCanvas = canvas.captureStream();
       try {
         await callObject.startCustomTrack({
           track: streamCanvas.getVideoTracks()[0],
           trackName: "background",
         });
       } catch (e) {
         console.log(e);
       }
     };
In this function we are going to get the current User Media and use it in videoElement to start sending this to Media Pipe. After that we are going to convert the image from the canvas (This canvas will have the result from Media Pipe) into a video track, so we can have the result in a track and we can set it to participant Daily Media Tracks.
The last step is to call startStreaming, so we can begin with all the process when the user chose to show the custom background:
startStreaming();- If the user has chose to not show the custom background, we need to stop sending the media stream to Daily with the custom background, for this we are going to use
stopCustomfunction:
const stopCustom = async () => {
       await callObject.stopCustomTrack("background");
     };
And also we are going to reset and close selfieSegmentation instance:
selfieSegmentation.reset();
selfieSegmentation.close();
Processing Results from Media Pipe
We are going to use a canvas to show the results from Media Pipe, the following call back function will be used to do this:
// src/components/Call/Call.js
…
export default function Call({ customVideo}) {
…
const onResults = (results) => {
   contextRef.current.save();
   contextRef.current.clearRect(
     0,
     0,
     canvasRef.current.width,
     canvasRef.current.height
   );
   contextRef.current.drawImage(
     results.segmentationMask,
     0,
     0,
     canvasRef.current.width,
     canvasRef.current.height
   );

   contextRef.current.globalCompositeOperation = "source-out";
   const img = document.getElementById("background");
   const pat = contextRef.current.createPattern(img, "no-repeat");
   contextRef.current.fillStyle = pat;
   contextRef.current.fillRect(
     0,
     0,
     canvasRef.current.width,
     canvasRef.current.height
   );

   // Only overwrite missing pixels.
   contextRef.current.globalCompositeOperation = "destination-atop"
First, we clear the current image of the canvas:
contextRef.current.save();
   contextRef.current.clearRect(
     0,
     0,
     canvasRef.current.width,
     canvasRef.current.height
   );
Then, we draw the image with the results from Media Pipe:
contextRef.current.drawImage(
     results.segmentationMask,
     0,
     0,
     canvasRef.current.width,
     canvasRef.current.height
   );
After that, we use the custom background as the background of the canvas:
contextRef.current.globalCompositeOperation = "source-out";
   const img = document.getElementById("background");
   const pat = contextRef.current.createPattern(img, "no-repeat");
   contextRef.current.fillStyle = pat;
   contextRef.current.fillRect(
     0,
     0,
     canvasRef.current.width,
     canvasRef.current.height
   );
Finally, we only overwrite the pixels needed:
contextRef.current.globalCompositeOperation = "destination-atop";
   contextRef.current.drawImage(
     results.image,
     0,
     0,
     canvasRef.current.width,
     canvasRef.current.height
   );

   contextRef.current.restore();
Now this function will be showing the results from Media Pipe in the canvas.
Update UI components
We need to know what to show to the local participant. If the participant selected to use the custom video, we are going to show the canvas. If not, we are going to show the normal video tile from Daily:
// src/components/Call/Call.js
…
const renderCallScreen = () => {
  return (
    <>
      …
      {localParticipant && (
           <>
             {!showCustomVideo ? (
               <Tile
                 id={localParticipant.session_id}
                 isLocal
                 isAlone={isAlone}
                 videoElement={inputVideoRef}
                 customVideo={customVideo}
               />
             ) : (
               <>
                 <canvas
                   className="output_canvas"
                   width="480px"
                   height="270px"
                   ref={canvasRef}
                   style={customVideo ? {} : { display: "none" }}
                 ></canvas>
                 <video
                   className="input_video"
                   autoPlay
                   style={{
                     display: "none",
                     position: "absolute",
                     top: 0,
                     left: 0,
                     right: 0,
                     bottom: 0,
                   }}
                 ></video>
               </>
             )}
           </>
         )}
In the code above, you can see that there is a video element being declared with the canvas. This video element is being used to catch the current user video stream so it can be the input for Media Pipe. If you look closely, this is the reason why the display css property is set to none — since we are only showing the results and not the input video to the participant.
Finally, we are going to add the custom image, so we can use it as reference for the canvas background:
 // src/components/Call/Call.js
...
const renderCallScreen = () => {
  return (
    <>
      ...
          ))}
           </>
 ) : null}
      </div>
      <div style={{ display: "none" }}>
        <img
          id="background"
          src={backImage}
          alt="background"
          width="720px"
          height="405px"
        />
      </div>
    </>
Show custom video to other participants in the call
We need to update the TileVideo.js file in order to show the custom video of the participant to the other participants in the call. We are going to do this following these steps:
- Import
useParticipantto gather participants information:
// src/components/TileVideo/TileVideo.js
import { memo, useEffect, useRef } from "react";
// import useParticipant
import { useParticipant } from "@daily-co/daily-react-hooks";- Declare a participant constant to have all the information of the participant being showed using his id:
// src/components/TileVideo/TileVideo.js
…
const TileVideo = memo(function ({ id, isScreenShare }) {
 // we add the participant here
 const participant = useParticipant(id);
 const videoTrack = useMediaTrack(id, isScreenShare ? "screenVideo" : "video");
…- Modify current hook to check if the participant has custom tracks to show it instead of the normal track
// src/components/TileVideo/TileVideo.js
…
useEffect(() => {
   const video = videoElement.current;
   if (!participant?.tracks?.background?.persistentTrack) {
     if (!video || !videoTrack?.persistentTrack) return;
     /*  The track is ready to be played. We can show video of the participant in the UI.*/
     video.srcObject = new MediaStream([videoTrack?.persistentTrack]);
   } else {
     video.srcObject = new MediaStream([
       participant?.tracks?.background?.persistentTrack,
     ]);
   }
 }, [videoTrack?.persistentTrack, participant?.tracks?.background?.persistentTrack]);
Add the option to the participant to select to use the custom background
We need to add a new state variable to handle this. We add it in App.js file:
// src/App.js
 …
 export default function App() {
  …
  const [localUserName, setLocalUserName] = useState("");
  // we add the new state variable here
  const [customVideo, setCustomVideo] = useState(false);
The customVideo initial value will be false until the participant chose to use the custom background.
We are going to use this value in the <em>Call</em> element and this will be set up in the Tray element, so we are going to modify these elements:
// src/App.js
…
const renderApp = () => {
 …
 if (showCall) {
     return (
       <DailyProvider callObject={callObject}>
         <Call customVideo={customVideo} />
         <Tray
           leaveCall={startLeavingCall}
           customVideo={customVideo}
           setCustomVideo={setCustomVideo}
         />
       </DailyProvider>
     );
   }
The next step is to modify the Tray.js file to add the option to set the customVideo state variable. First, we are going to add it to its props:
// src/components/Tray/Tray.js
…
export default function Tray({ leaveCall, customVideo, setCustomVideo }) {
Finally, we are going to add a new option in the tray component to set this variable:
<button onClick={() => setCustomVideo(!customVideo)}>
           <Background />
           {customVideo ? "Normal Video" : "Custom background"}
         </button>
       </div>
       <div className="leave">
         <button onClick={handleLeaveCall}>
           <Leave /> Leave call
         </button>
Now the participant is able to choose if the custom background should be used.
Lastly, make sure you’ve set your Daily API key as REACT_APP_DAILY_API_KEY environment variable and then you can run the application like this:
npm start
Note: Background component can be found in the source code of the project under Icons directory in index.js file.
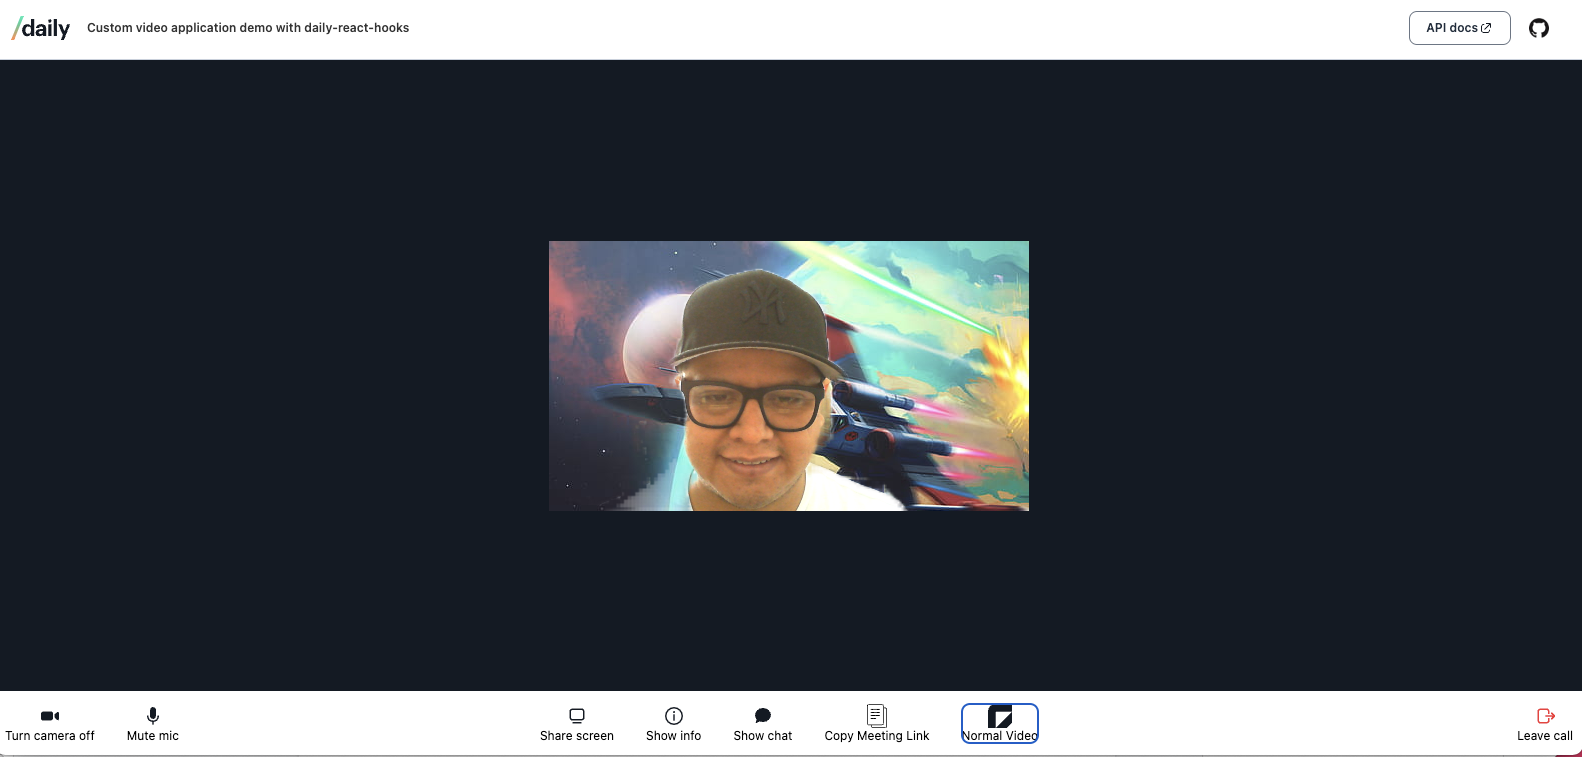
There you have it, our custom background is ready!
When a participant chooses the custom background, it should look like this:
For this blog post, we used a canvas to show the results from MediaPipe. You can also use insertable streams to do this. Stay tuned for a future blog post on this topic.
As a custom development firm specializing in live video applications, our team at WebRTC.ventures has deep experience using video APIs like Daily to build unique video experiences for our clients’ applications. If you would like a custom Daily live video application built or want to insert real-time features into any application, WebRTC.ventures can help! Contact us today.