This tutorial will be how to build a video conference application with WebRTC & Tokbox. We will cover how to build a video conference application by using a Communication-Platform-as-a-Service (CPaaS) solution, this means that we will focus only on coding our application and not on the infrastructure on which rely.
We will use Tokbox as the CPaaS solution.
So before we begin, go ahead and create an account if you don’t already have one.
Tokbox provides a free trial which will be enough to do this tutorial and get familiar with the technology.
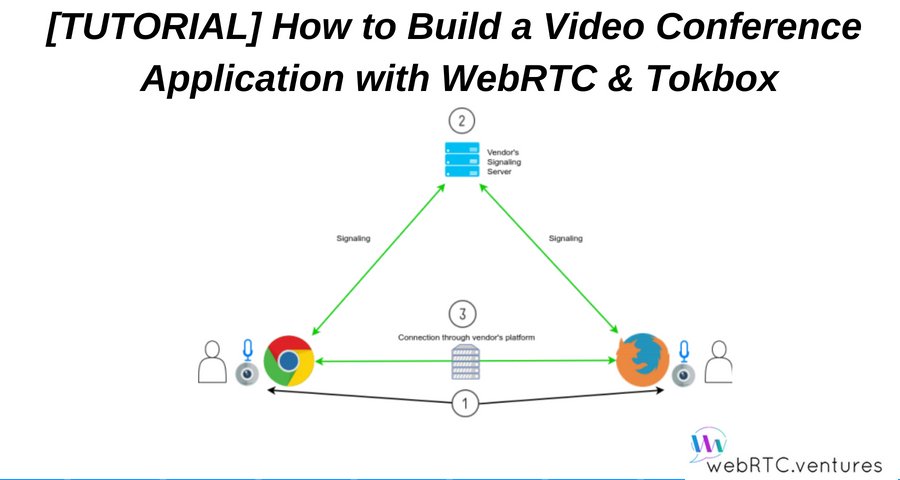
Before moving forward though, let’s recall our slightly modified three-step flow for enabling communication using webRTC.

1. The browser get access to the media devices (camera and microphone).
2. Each peer exchange information about itself with all other peers through a signaling process managed by the CPaaS vendor.
3. After information exchange, peers can connect each other through the vendor’s platform and the communication begins.
As you can see, servers are still there: Signaling, STUN, TURN and media server are all there, only that this time they’re part of a service offered by a third party vendor.
The Application
Our application will consist of a room selection screen, on which the user will type the room name to which he wants to join, and a call screen, where he will be able to see the video of all the participants.
As usual, the code for this tutorial is available as a public repository on Github, you can clone it to your computer or follow along with us to build it from scratch.
We’re using Javascript as programming language and Node.JS as runtime engine so you’ll need to install node if you don’t have it yet.
So let’s begin by creating a folder anywhere you want, this will be our project folder.
Then create another one inside called public.
Now using the command line, navigate to the project folder and type the following commands to install the required dependencies. An internet connection is required to download the libraries.
![]()
Now, let’s create a simple html file with two divs: selectRoom and videos. The first one will show a screen to type a room name for the call and the other is where the actual call takes place. Inside the videos div, we will create another pair of divs: publisher and subscribers, those are going be used by tokbox to append the video elements of each call participant. We will also add the opentok library and our client.js script before the <body> closing tag.
Using your favorite text editor, create a new file and paste the code below, then save it in the public folder from your project as index.html


Now we need to create the client’s side javascript file.
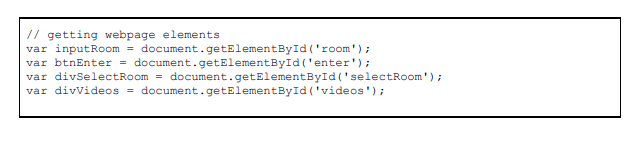
We will begin the client.js file by getting references to webpage elements and declaring some variables, among these are apiKey, sessionId and token variables, which are used by the opentok library to connect with the tokbox platform in order to initiate or join to a call. We also declare a variable to store the room name and our Node.JS server URL.
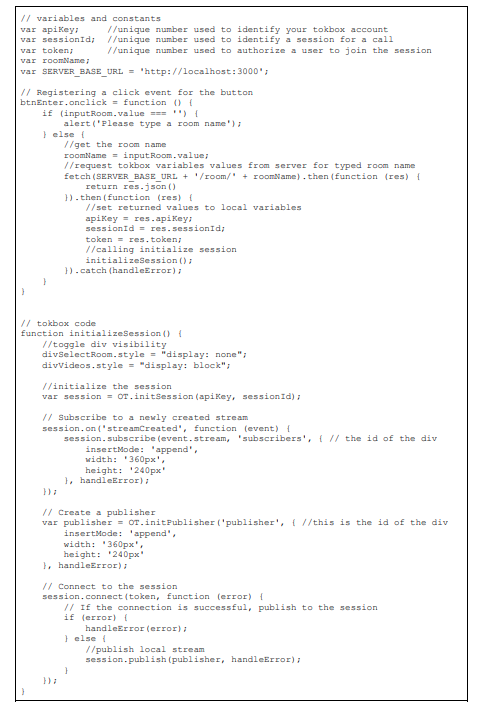
Continuing with our client.js file, when the user clicks the Go button to initiate the call we use the fetch function to make a request to a route defined on our server. The server returns a JSON response with the values for the three tokbox variables. After we set these values we call the initializeSession function.
The initializeSession function is where all the magic happens, first we toggle the visibility of the divs and then we join to a Tokbox session, defined by the sessionId variable. Think of a session as a room, therefore all participants needs to be in the same session to be able to talk each other.
Next we set a handler for the ‘streamCreated’ event, this event will be received each time a new participant joins the session, and in the callback of the handler we subscribe the session to a stream. In Tokbox, the term subscribe refers to the ability to receive video and audio from other users.
The function continues by creating a publisher. A publisher is a type of object that allow us to publish or send our own video and audio to the session. Finally we connect to the session and then we send our publisher object.
Now, using your favorite text editor, create the client.js file and save it on your project folder, under public.

At the moment, behind the scenes, the opentok library has gotten access to the media devices, so step one is done.
![]()
Also as more users arrive to the session, the tokbox platform is coordinating the communication between them, so a signaling process is running transparently. This means that Tokbox has completed step 2 on our behalf.

So before creating the third step of our flow, let’s create our server.
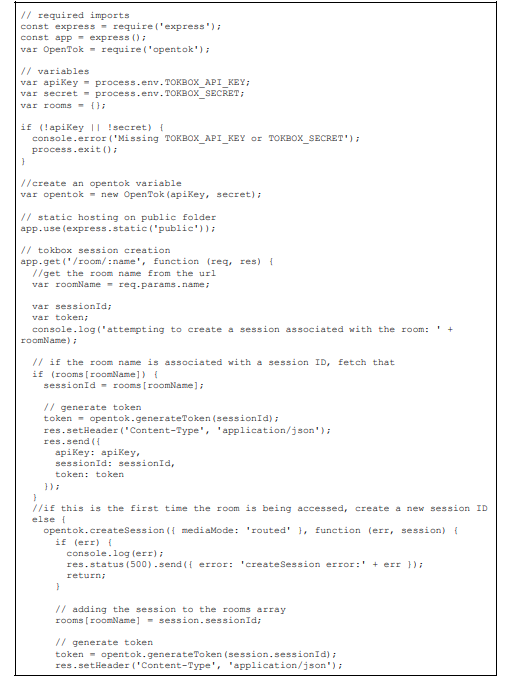
This time there will be no signaling here, just pure express and node code. The server code begins by adding all the required imports. Then we set three variables: apiKey, secret and rooms. The value for the first two is provided by Tokbox when you create an account, be sure to store them in a safe place, we will add these using environment variables later. The rooms variable will serve as a store for tokbox sessions.
Next we create an opentok object and define the express routes. We end the file with the app listener on port 3000.
Our server is in charge of two things: serving the client files and generate the values for the client side tokbox variables, the latter is done on the /room/:name route.
We said before that for a group of users be able to talk each other, they need to be in the same session or room, right? So how do we make this possible? When the user types a room name and clicks the Go button, the client.js file makes a request to the server, remember?
Well, in this request, the server receives a room name.
When the server gets the room name, it first makes sure that the room doesn’t exist so it take a look on its rooms variable. If the session exists there, then it just create a token and returns a response with the three values: sessionId got from the rooms array, the apiKey provided by environment variables and the newly created token, which is a type of access code for a user be able to join a call.
If there is no entry with that name on the rooms array, then the server creates one and stores it in the aforementioned variable, from there it does the same procedure described above. When the client gets the three variables it can connect directly with the tokbox platform to initiate or join to the call. Create the server.js file and paste the code below

So up until now, the step three is also done.
![]()
Now it’s time to run the application, but before, be sure to set your environment variables. On Unix/Linux systems this is done by writing on the command line:
![]()
Now, on the same terminal screen, navigate to the project folder and type the following command:
![]()
Then using Google Chrome or Mozilla Firefox, open http://localhost:3000 on three or more separated tabs, type the same room name on all tabs and click Go!
Great, isn’t? Now you’ve created a video conference application without having to worry about setting the infrastructure, which is managed by a CPaaS vendor.
Want to leave it to the experts?
If you are ready to chat about how you can incorporate a video conference app into your business? We have an experienced team ready & happy to help you out. Contact us today.


