
Using Kurento media server provides extra value to a WebRTC video call. In addition to the common features that every media server brings such as multi-party calls, media transcoding and recording, this open source webRTC media server adds others advanced multimedia capabilities: augmented reality, computer vision, broadcasting, mixing, and more.
Combining these amazing features with Asterisk will result in a powerful solution that connects a IP-phone with a webRTC compatible browser, enhancing SIP communications with features such as face detection, other kinds of filters or transcoding for reaching yet a wider range of IP-phones.
We’d like to thank to Rafael Antonio Viscarra and Carlos Fernando Vásquez for doing the integration work and participating on this blog post.
The source code of this project can be cloned from the GitHub repository
Why did we choose Asterisk?
Asterisk is basically a SIP router that connects two voice over IP phones. There are other Asterisk like projects but the main advantage of Asterisk is the huge feature set It has. It can do many things for you: provides voice mail box, call queueing, call recording, email integration and many more.
One of the greatest advantages of working on Asterisk are the Dialplan and the availability to make use of the SIP in most platforms. The Dialplan is an ordered collection of actions executed when somebody calls an extension. It provides the ability to redirect the user’s call, provides information or even gets information from the caller.
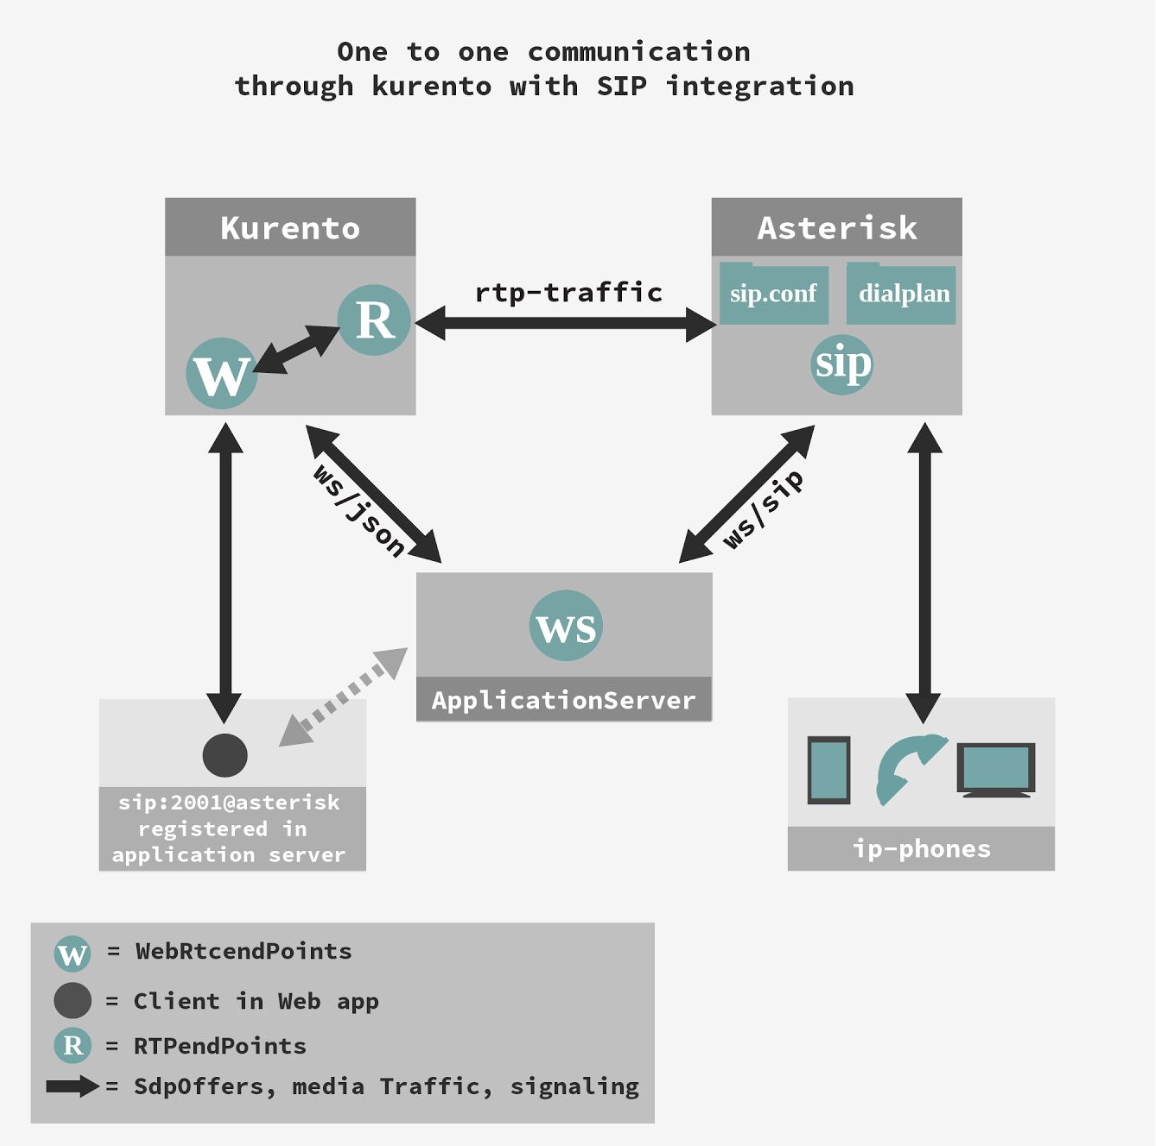
Given that extensions are programmable, combine this with webRTC and you would have clients all around the world who are able to get in contact by just having a webRTC compatible browser and clicking a button. Kurento Media Server and Asterisk make a powerful couple.
Planning the integration
It is deemed possible for the media coming out of Asterisk to be intercepted by a Kurento server via RTP endpoints and served to a browser client using webRTC and vice-versa, meaning that Kurento could send that multimedia from a webRTC endpoint back to Asterisk via RTP.
Kurento is also able to expand upon the media transmission done by Asterisk and SIP, since Asterisk doesn’t have media transcoding Kurento is extremely useful in that regard, so a model was designed that would provide the desired integration.
Installing and setting up Asterisk
Step 1: Download Asterisk
Since RTP and SIP over websocket support was necessary, the earliest Asterisk version we could try was Asterisk 11.0.0 in which websocket functionality was introduced, but since we wanted compatibility with the VP8 video codec and the OPUS audio codec we settled for the newest version available: Asterisk 14.
You can download Asterisk from the Asterisk’s official download section or by command line:
$ wget http://downloads.asterisk.org/pub/telephony/asterisk/asterisk-14-current.tar.gz
Step 2: Download and install needed packages
To compile Asterisk you will need some packages specially build-essential.
$ sudo apt-get install build-essential wget libssl-dev libncurses5-dev libnewt-dev libxml2-dev linux-headers-$(uname -r) libsqlite3-dev libjansson-dev uuid-devget
Step 3: Compile and Install
Extract and start the compilation of the source code as follows:
$ tar zxfv asterisk-14-current.tar.gz
$ cd asterisk-14.2.1/
/asterisk-14.2.1$ ./configure
The configure script will check if you have all the dependencies installed in your environment needed for the compilation. If any package is missing, this script will let you know so you just have to install those missing packages.
After this step, we want to configure the Asterisk server enabling all the codecs that we need. Using the latest version of Asterisk should come with VP8 and OPUS enabled by default, but it is worth to check it before you start the compilation.
So in order to check that you have both codecs enabled you need to run the Asterisk Module and Build Option Selection typing in the command line the following:
/asterisk-14.2.1$ ./configure
If you already have VP8 and OPUS enabled you don’t need to change anything.
Finally we just need to compile and install the source as follows:
/asterisk-14.2.1$ make
And then:
/asterisk-14.2.1$ make install
At this point you should have Asterisk installed.
Step 4: Setup the extensions
You can think of an extension as if it is a phone number. An example of an extension could be “3000”.
In Asterisk you can configure what actions will be taken when somebody calls to the number “3000”, and also you can configure the profile of that extension. So, the extensions also needed to be configured.
For this experiment we added different kinds of extensions to our config file. There needed to be several kinds of extensions as some would work with webRTC and others were meant for using with an IP-phone.
In the file /etc/asterisk/sip.conf you can specify the settings for an extension.
The code below is the extension settings for both Kurento and IP-phone that we defined for our use case.
Yet another configuration file was needed: /etc/asterisk/extensions.conf
This file defines what is Asterisk to do depending on various circumstances. We started with the basics, providing actions to hear feedback if a connection was successfully made or being able to call between our own extensions.
This configuration below ensures that if ‘1000’ is dialed, it’s going to be answered by an automated message. And that dials to 2000-2004 and 3000-3004 will connect the call.
Installing Kurento
If you have never heard about Kurento before, we highly recommend reading these articles from the official web site:
- Introducing Kurento: It covers the principles of Kurento.
- Kurento Media Server Installation: Will guide you on the installation steps.
- Node.js – Hello world: A nice Hello world example based on node.js.
It’s important to take into account that you have to provide STUN or TURN servers in order to achieve NAT traversal.
Testing
After the setup was done, we needed a library preferably in Javascript which would allow us to register as a SIP user into asterisk from the browser and interact with Asterisk.
So we focused at first on a library called sipml.js that provides means to implement SIP based video and audio agents on javascript.
It also had a demo site which used webRTC to communicate with the Asterisk server and allowed us to test our configurations on the Asterisk server side.
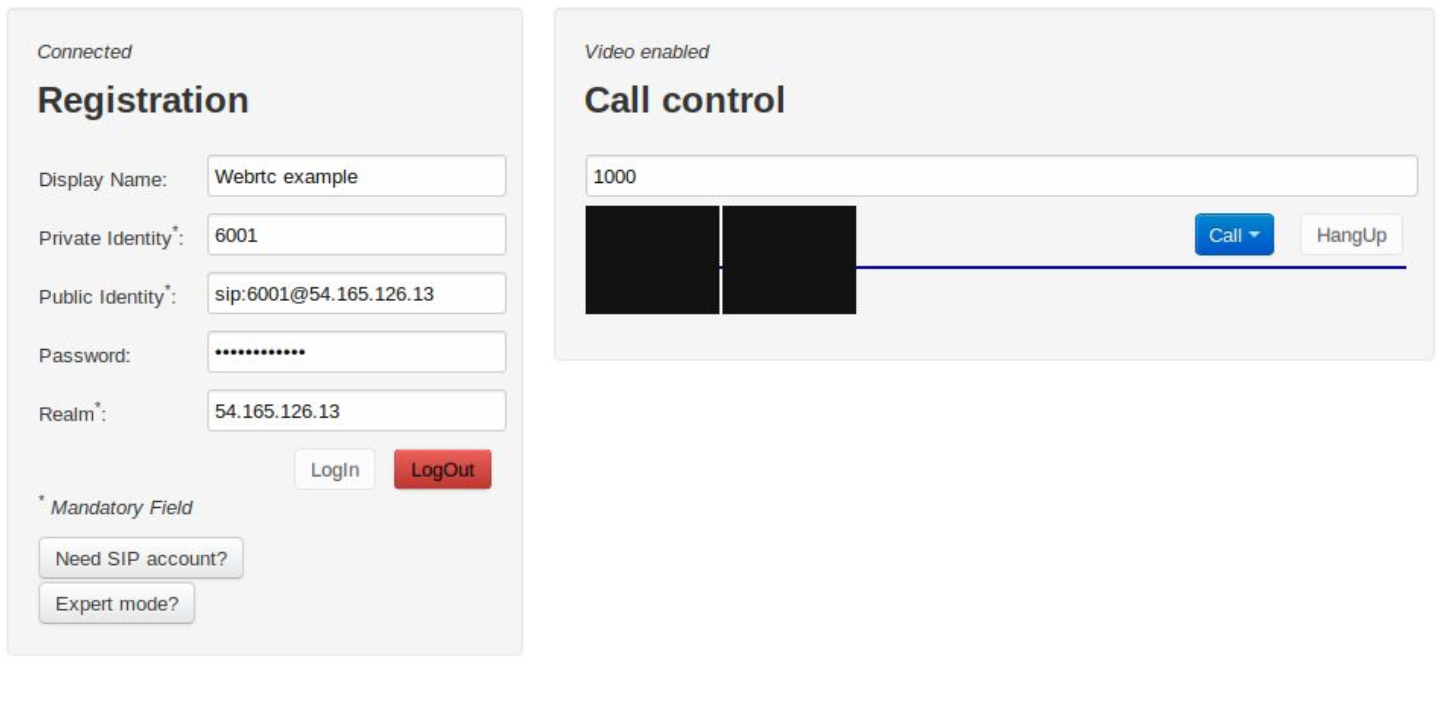
We dived into the documentation to see if it was the best option to use in our app server, but soon discovered that there were other libraries that offered integration with SIP signaling and were far more friendly and easy to implement, such as sip.js.
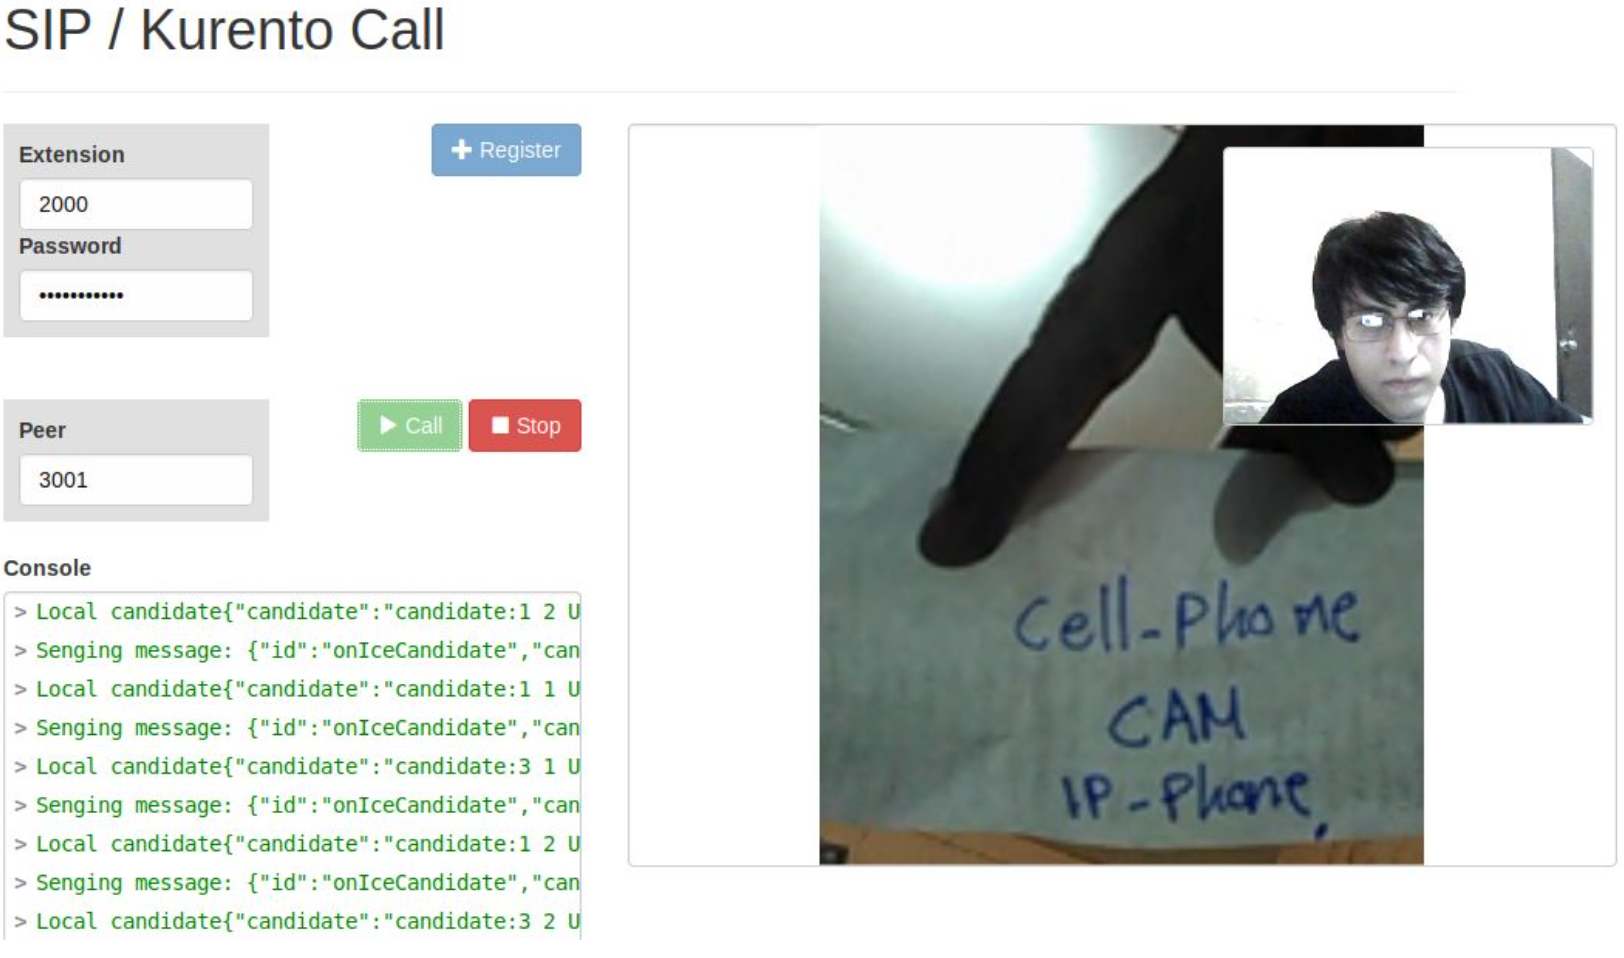
After this, we made use of RTPendpoints, webRTCendpoints and sip.js to put together a web app that would allow us to register on an Asterisk extension and call other extensions, whether they are on an IP-phone or in another web-client. You can view and clone the source code from our repository.
In this way, we were able to connect a call to a cell phone using SIP compliant software in this particular case an android application called Zoiper which allows to use an Android device as an IP-phone.
The media that gets to the cellphone has already been re-transmitted by our Kurento instance.
Our team at WebRTC.ventures can integrate telephony into your WebRTC application, or WebRTC into your call center – just contact us!
We have deep expertise in many communication technologies, such as WebRTC for video communications, web and mobile application design and development, and VOIP/Telephony APIs such as Voxbone and Twilio. We would love to help you with your next WebRTC/telephony app!


