
With NLX.ai, you can create surprisingly complex conversational intelligence bots. The Conversations By NLX SaaS platform uses Generative AI and Large Language Models to turn customer interactions into personalized self-service experiences that can be tracked and analyzed. You can create these bots with no code and easily connect them to multiple channels in your application.
In this post, we are going to show you how to create a reservation bot using NLX. We will set up our bot, configure its intents, design conversational flows in the canvas, and deploy it. We will highlight the different types of nodes that empower the bot’s capabilities.
Our sample use case will be to help diners choose a restaurant and make a reservation, but its functionality is useful across many industries.
Reservation Flow
First, let’s plan the functionalities our restaurant reservation bot will perform. The flow will go as follows:
- The bot shows a greeting message
- The bot shows a list of cities where reservations can be made
- After city selection, the bot shows a list of cuisines
- After cuisine selection, the bot shows a list of restaurants
- After restaurant selection, the user chooses the number of people, date, and time
- A final message says the booking has been confirmed and includes all of the inputs/booking details
Prerequisites
An account is required to access the NLX dashboard. Contact the NLX team to get one.
After an account is created and we sign in to the main dashboard, follow the steps below to set up your bot.
Step 1: Create a New Bot
Click on the ”Add bot” button in the Bots screen.

We’ll name the bot, Restaurant Bot. Click “Save”.

Step 2: Create a Communication Channel
Channels are modes through which users can connect with the bot for communication. The default channel is API channel, and that’s the one we are going to add to our bot.
With the API channel, you can either use REST APIs or NLX’s official Chat SDK to connect with the bot and start communication. There are various other channels to choose from, like Amazon Connect, Alexa, Messenger, and Slack.
In the Channels tab, select the API channel and click “Create Channel”. There are multiple options in the form. For now, let’s keep the default options. Click on the “Create Channel” button.

Step 3: Create An Intent
Intents represent the purpose or objective of the user. A bot may have multiple intents. Each will handle a particular problem and provide a conversational intelligence solution to the user.
Since this is a simple conversational bot, we will add just a single intent: to make a reservation.
In the “Intents” screen at the left, click “Add Intent”, input RestaurantReservation as its name, and click “Save”.
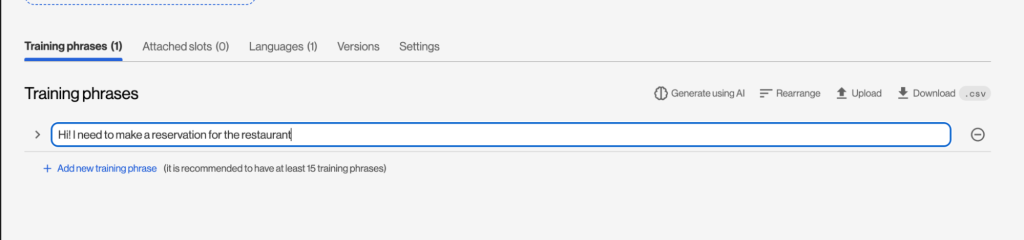
Step 4: Add Training Phrases
Training phrases are possible inputs a user might enter to solve their needs. Natural Language Processing (NLP) matches user input with the training phrases and redirects them to a specific intent.
It is recommended to add at least 15 training phrases related to each intent. Can’t think of any? Click “Generate Using AI” and you’ll get some help!
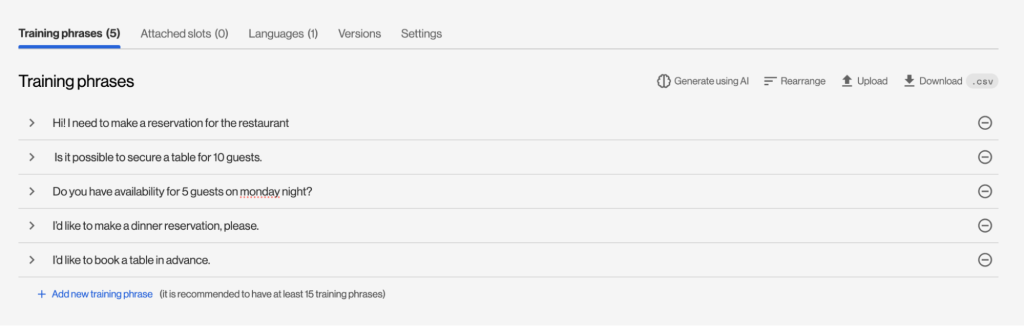
For the purpose of this tutorial, we will use just 5 training phrases for our RestaurantReservation intent.
- Hi! I need to make a reservation for the restaurant.
- Is it possible to secure a table for 10 guests?
- Do you have availability for 5 guests on Monday night?
- I’d like to make a dinner reservation, please.
- I’d like to book a table in advance.
Add each one and click “Add new training phrase” to move onto the next.
This is how the list of 5 training phrases will look after adding them. When you’re done, click “Save”.
Step 5: Attach Intents
Now that we have set up a basic configuration for our intent and added our training questions, it’s time to attach it to the bot.
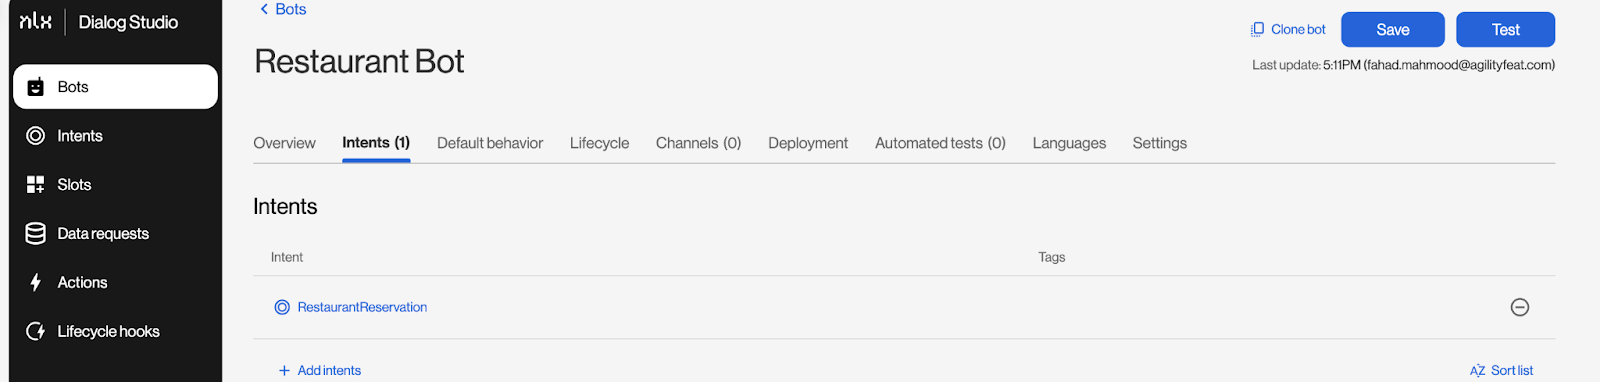
Click on the Intents tab inside Restaurant Bot, then “Add Intents”. From the dropdown menu, choose the RestaurantReservation intent and add it to the bot.
Once the intent is added to the bot, we can see it in the Intents tab. Click “Save” to save the changes.
Step 6: Building Conversation Flows using Conversation Canvas
It’s time to start designing conversations! Let’s see how we do that.
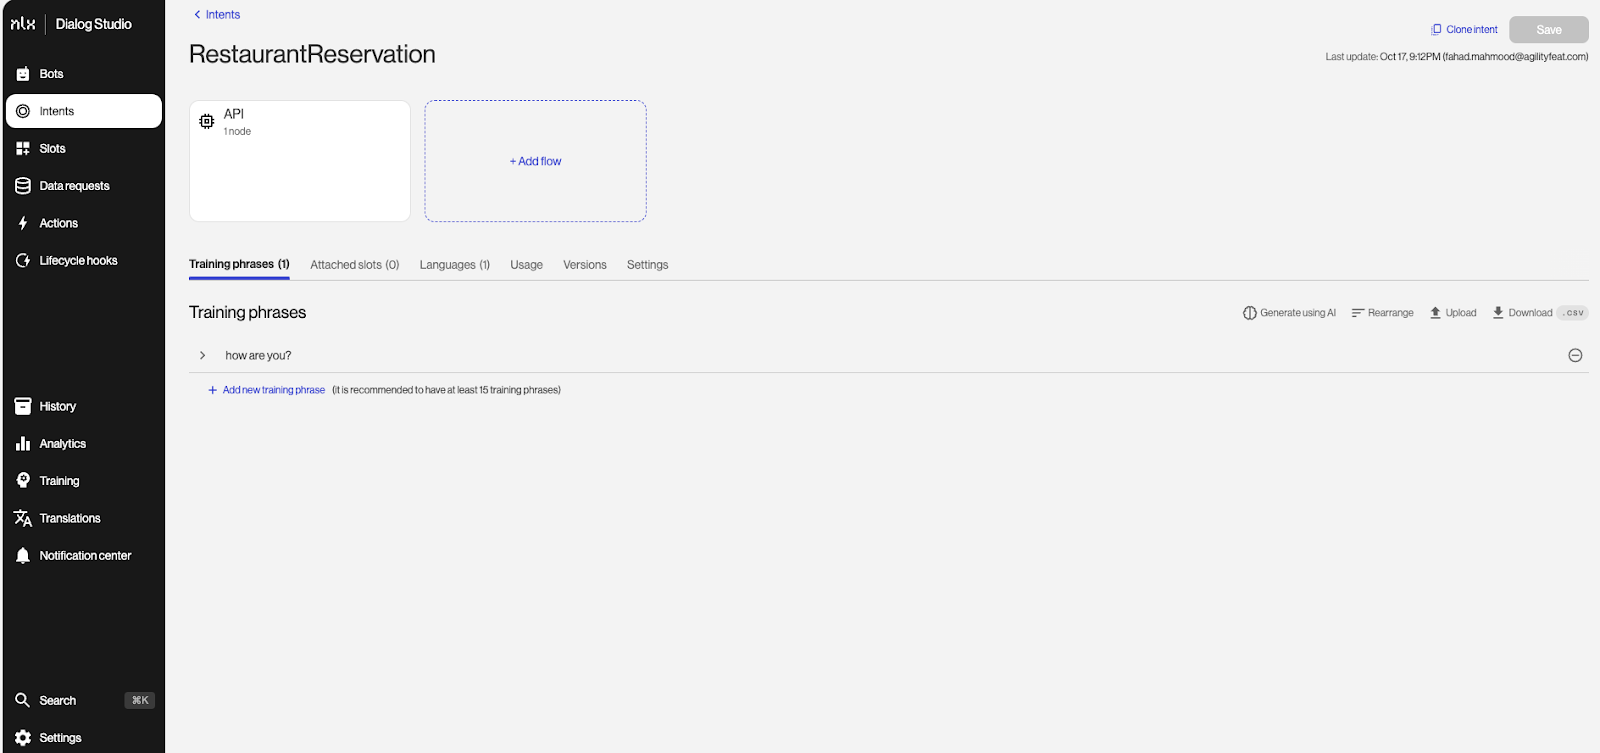
Exploring Canvas Builder
On top of the RestaurantReservation intent, we see an “+ Add flow” button. On clicking, we can see a “Create new flow” popup, and the “API” channel selected by default in the “Primary channel” dropdown. We will keep the default configuration and click on the “Create flow” button to add the flow.
Clicking the “API” channel card opens the Conversation Canvas. The canvas has three modes: Build, Test and Analyze. It defaults to “Build”, which is exactly what we need right now.
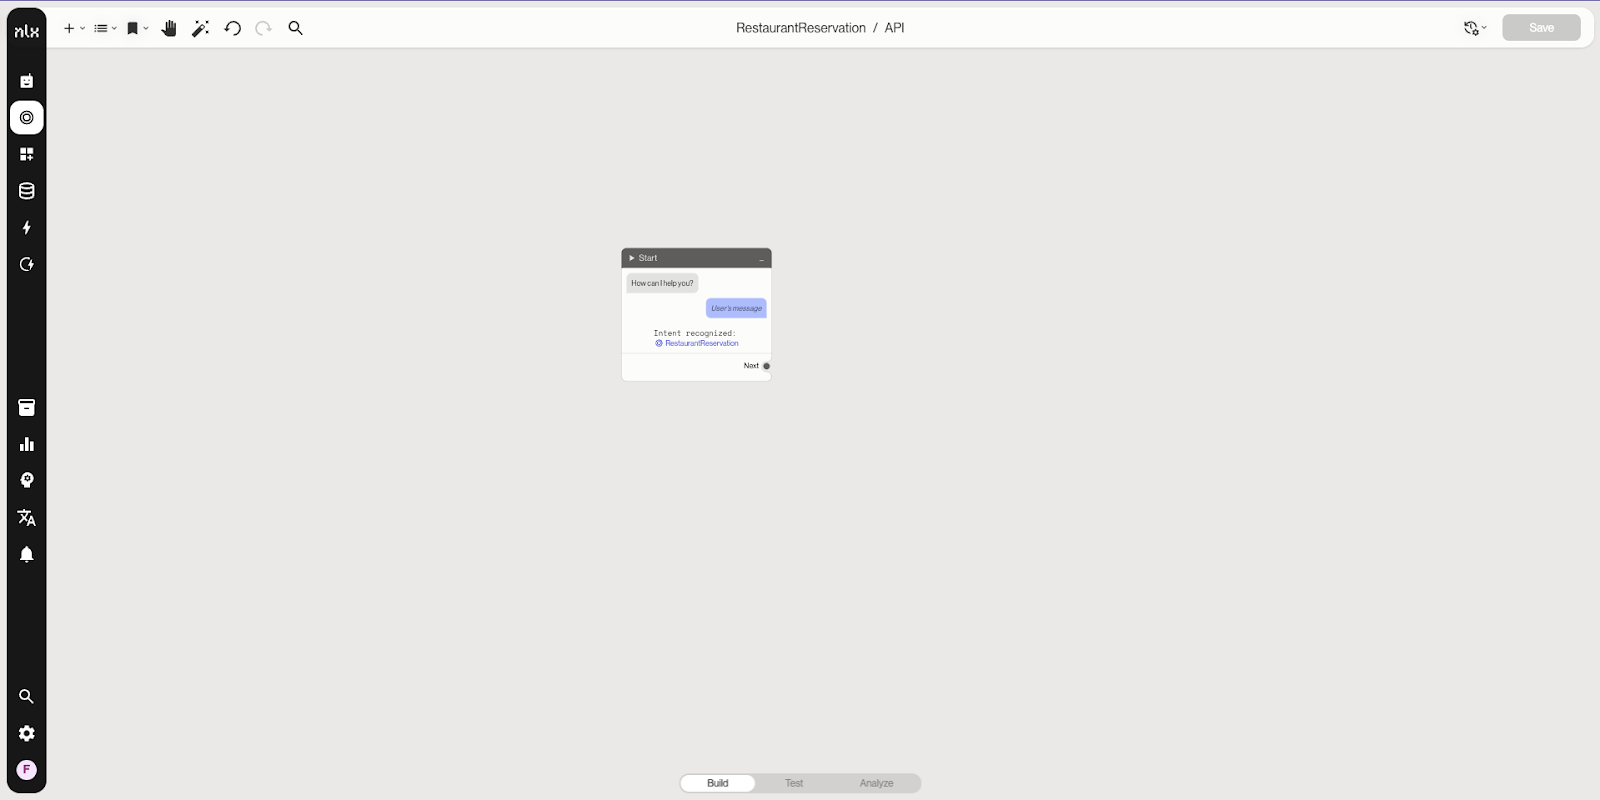
The default “Start” node indicates the beginning of a conversation. The default message, “How can we help you?” is displayed to the user whenever this intent is triggered by the Bot. The “Start” Node can be attached to any other type of node available in the canvas.
On top, we see a “Canvas toolset” which allows us to perform multiple actions like creating multiple pages, adding different types of nodes, undo, redo, etc. We will discuss this more while designing our conversation.
Nodes: The Essential Building Blocks of Conversation
A node represents a point where information is exchanged, questions are asked, or responses are provided in a conversation. In the NLX Dialog Studio, there is a node type for every action you may want to take: 9 in total. You can see the list, along with the purpose and expected outcome for each, in the NLX Dialog Studio documentation.
Let’s add a new node by clicking on the “+” icon from the Canvas toolset. A dropdown will appear with the list of nodes that we can add to our canvas. Select the “Basic” node and attach it to our “Start” node by click-and-dragging from the dot next to “Next” to the new node.
Let’s set a greeting message by clicking “Add Message”: “Hi. This is Mark, an AI-powered restaurant reservation bot. I will help you in making a restaurant reservation.”
After completing this step and clicking “Save”, your canvas will look like this:

Setting Up Data Slots And Using User Choice Nodes
Data Slots are an effective way to define fixed user choice values. From the left sidebar, click on the “Slots” tab (![]() ), then “Add Slot”, and type “CitySelection” as the slot name. In the values section, click on “Add new value” and add a fixed list of cities.
), then “Add Slot”, and type “CitySelection” as the slot name. In the values section, click on “Add new value” and add a fixed list of cities.
- New York City
- London
- Paris
- Tokyo
- Karachi
At this stage, our “CitySelection” slot will look like this:

It’s time to click “Save” and attach our slot to the RestaurantReservation intent so it can be used in the Conversation Canvas.
In the RestaurantReservation intent screen, you will see an “Attached slots” button on the Edit Tabset. At the moment, there are no slots attached to our intent. Click on “Attach new slot” and type “RestaurantCitySelection” and then select our custom “CitySelection” slot from the slot dropdown. Then, click “Save”.
With the data slot attached to our intent, we can use it with different types of nodes.
Same as before, we will add a new node to the conversation canvas. This time, we will choose “User Choice” instead of “Basic”.
In the node configuration, select “RestaurantCitySelection” from the dropdown with “Assign” label, then enable the “Show choices” toggle. In the “Bot messages” section at the bottom of node configuration, add a message: “Which city are you looking to dine in?”
At this stage, our conversation canvas will look like this:

Now it’s time to ask about the type of cuisine our diners are in the mood to eat. Again, create a custom slot with the name “RestaurantCuisines” And the following values:
- French
- Italian
- Indian
- Arabian
- Japanese
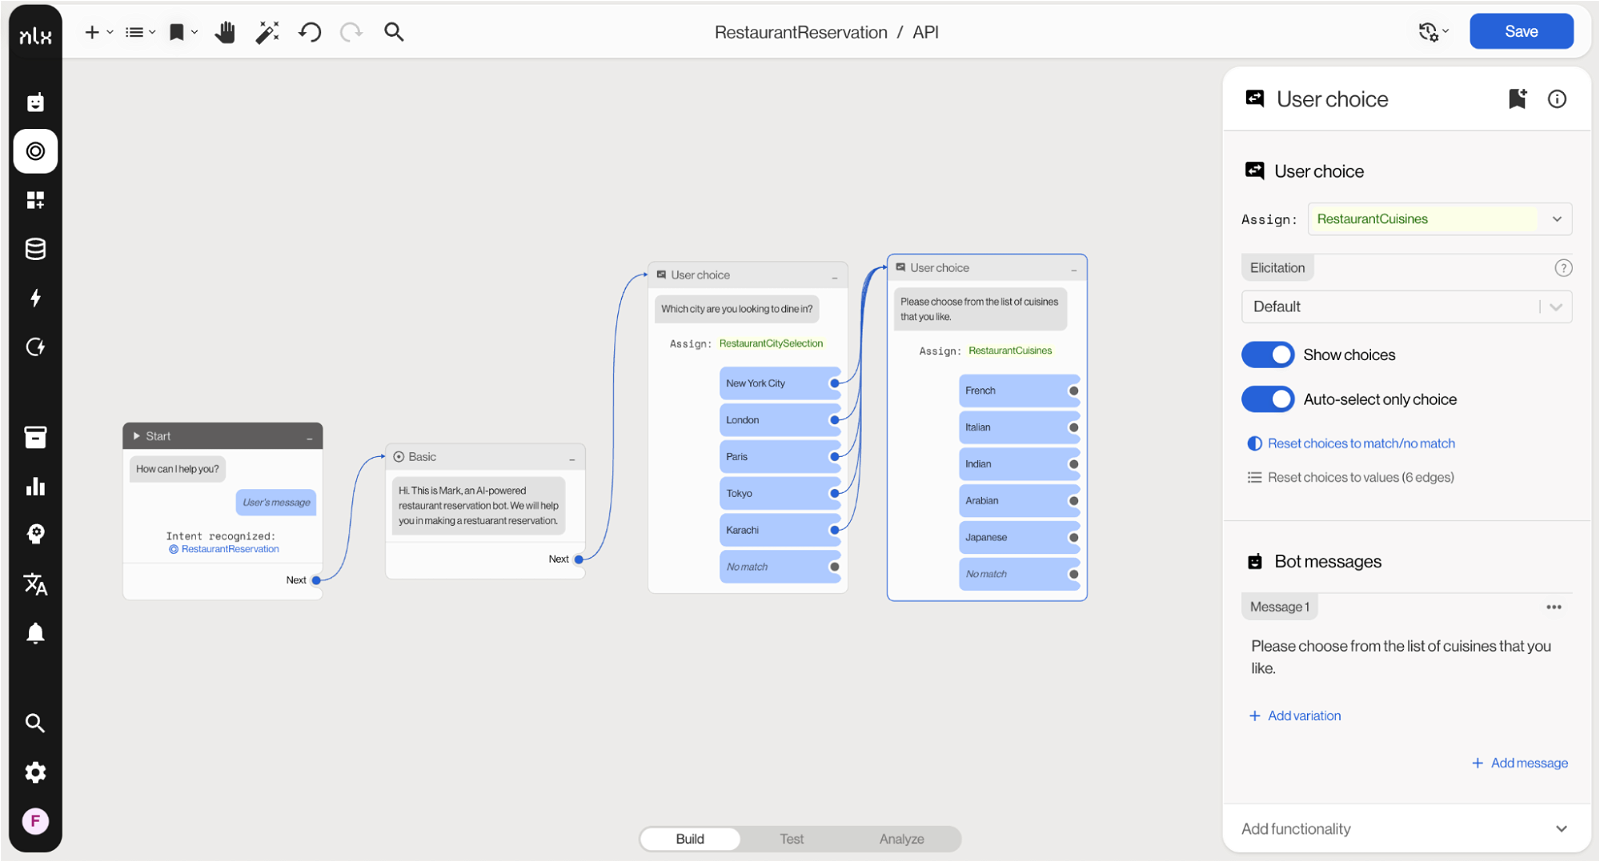
Attach this slot in our intent and add another “User Choice” node in the Conversation Canvas with the following message: “Please choose from the list of cuisines that you like.” Be sure to connect all the options from the previous “User Choice” node to the new one.
Our conversation canvas now looks like this:
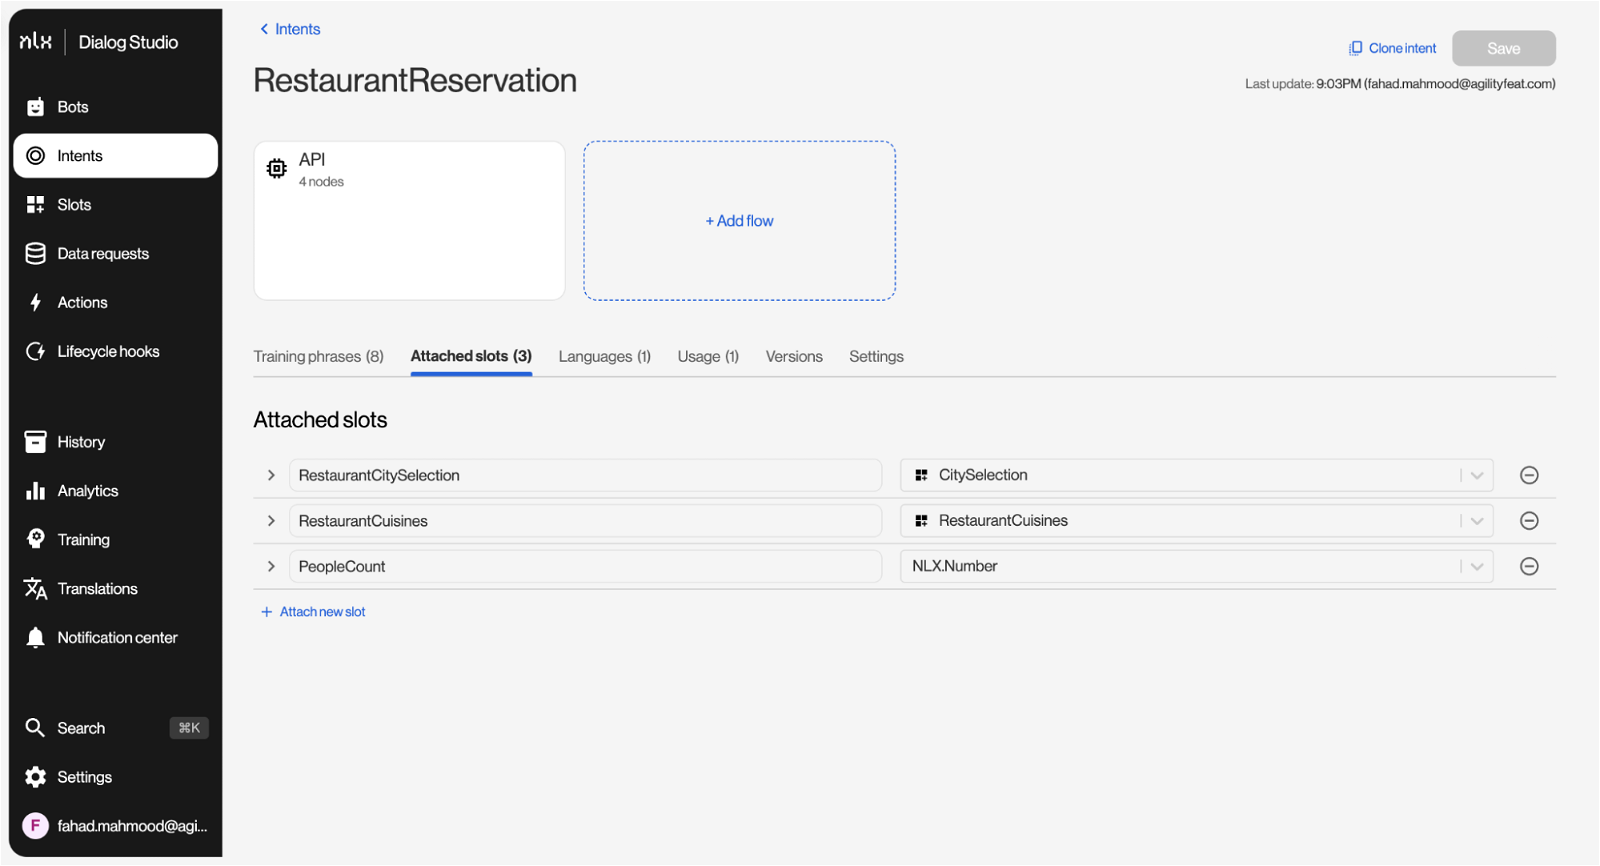
Let’s create another data slot to know the number of diners. This time, we don’t create a custom data slot. Instead, we go back to the “Attached slots” tab from the intent, attach a new slot with the name “PeopleCount” and “NLX.Number” from the dropdown as the Data Slot type.
The “Attached slots” tab will look like this:
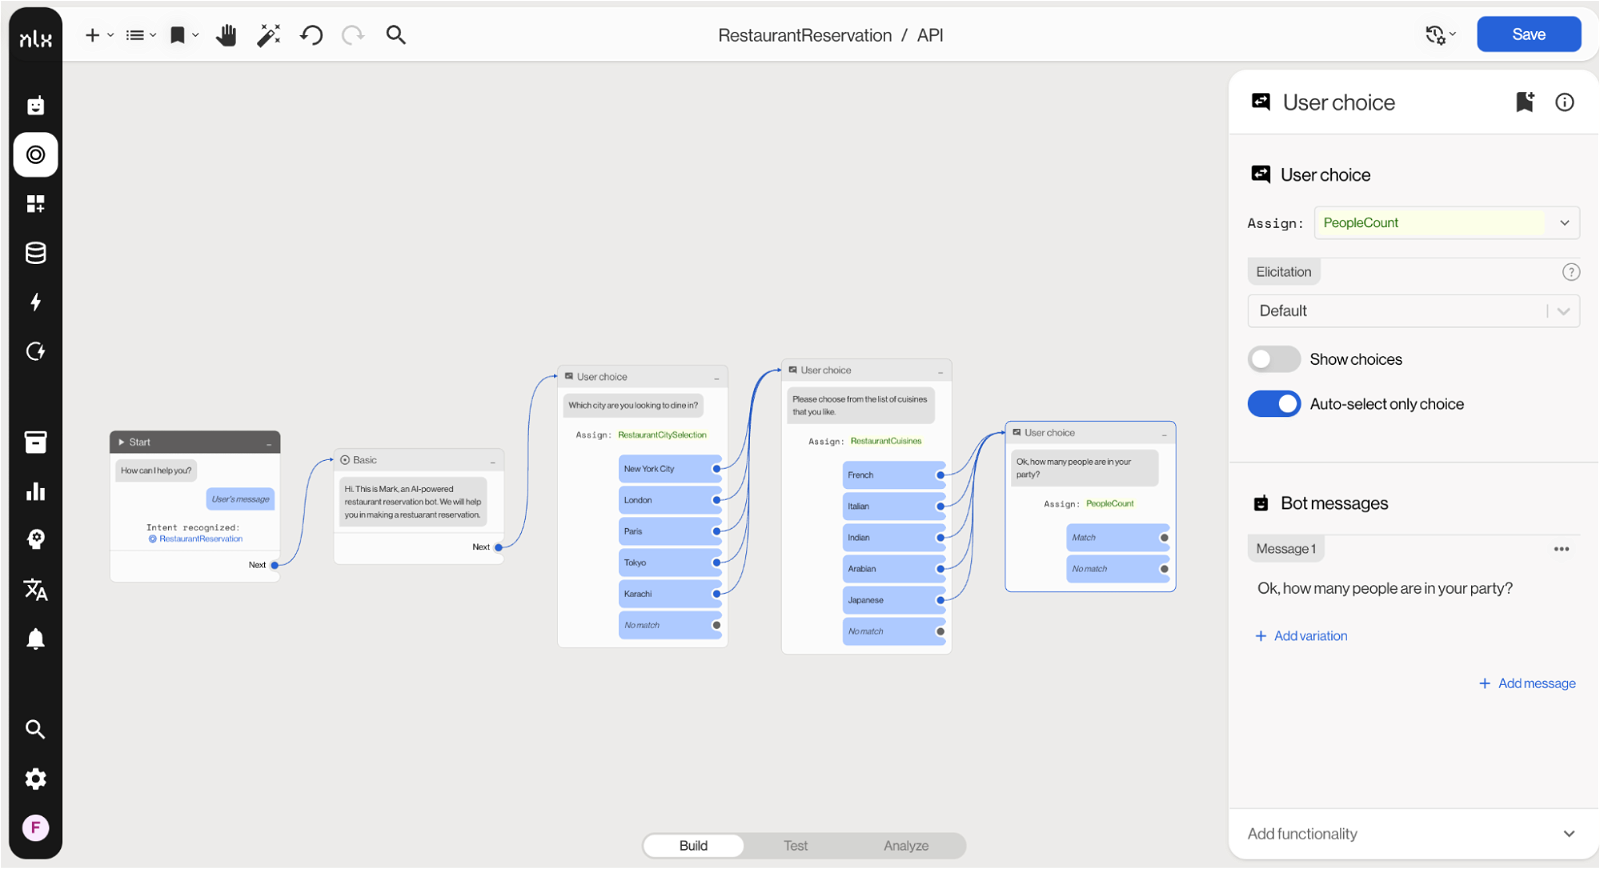
Let’s add another “User Choice” node. This time, turn off the “Show choices” toggle. In the dropdown with the “Assign” label, select the “PeopleCount” data slot. In the node message section, add the message, “Ok, how many people are in your party?”
Let’s quickly attach two more data slots with the names “DateSelection” and “TimeSelection” and set their types as “NLX.Date” and “NLX.Time”, respectively.
Add another “User Choice” node with the message: “A few more to go. What date would you prefer for the reservation?” and assign the “DateSelection” slot.
Similarly, add “What time will suit you for the reservation?” and assign the “TimeSelection” data slot.
I think we have set up enough nodes to collect all the information we need from the customer. Two more scenarios before our bot is ready to be deployed and tested!
Handling No Match Choices and Resetting User State
You may have noticed that in each “User Choice” node, we’ve only connected success scenarios, i.e. where there is a match of the user choice to the options. There is also a “No match” choice in each of these nodes, which are not connected with any other node.
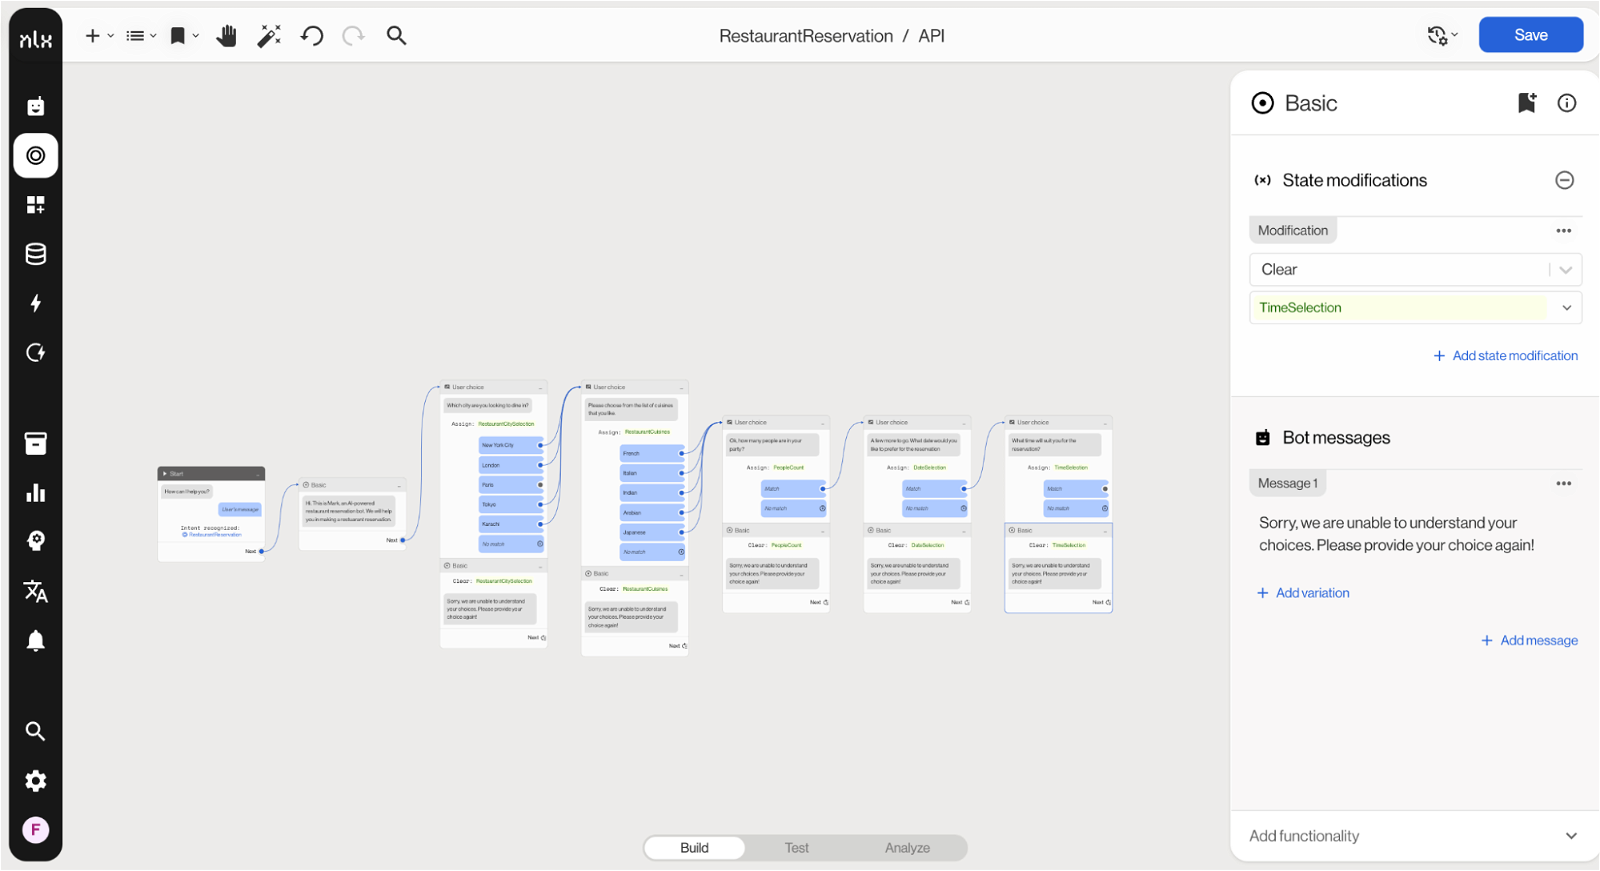
Let’s create a “Basic” node with the purpose of asking the user to provide another input if there is no match. We have to make sure that we clear the previous input before redirecting the user back to the “User Choice” node. We can do this using the node’s “State Modification” functionality.
First, we add a basic node to the canvas and add a bot message, “Sorry, we are unable to understand your choices. Please provide your choice again!”
At the bottom of the node, click on “Add functionality” in the dropdown and select “State Modifications”. Now, we have added a state modification functionality to the node as well. To clear the previous user choice, select “Clear” from the “Modification” dropdown and then select “RestaurantCitySelection” as the slot to clear its previous value.
Now, from the “No Match” choice in the “User Choice” node which allows customers to select different cities, we will connect the “No Match” connector with the newly created “Basic” node with clear slot functionality. This will then be connected back to the city selection ”User Choice” node to take the input from the customer again.
We are going to repeat the same procedure of attaching “Basic” nodes with “Clear” state modification functionality to the “User Choice” nodes with data slots “RestaurantCuisines”, “PeopleCount”, “DateSelection”, and “Time Selection”.
After completing this step, our conversation canvas looks like this:
Reservation Confirmation Message
It’s time to show a reservation confirmation message. We also want to show the users inputs that the bot has collected from the customer. We attach a “Basic” node in our conversation canvas and connect it with the last “User Choice” node. Then we add multiple messages to this node. The first message is: “Thank you for being patient with me. I’ve made the following restaurant reservation for you!”
In the second message, we want to show all of the information that was selected by the customer. We add data slot inputs by adding “{}” brackets inside a bot message and writing the data slot name.
“1- You have made a reservation in {RestaurantCitySelection} with {PeopleCount} people.”
“2- We are expecting you on {DateSelection} at {TimeSelection}.”
Finally: “Thank you for making a reservation with me. Have a nice day!”
Our conversation canvas is now complete and looks like this:

Hooray! We completed designing conversations flow in the conversation canvas. It’s time to deploy and test the bot.
Step 7: Deploying The Bot
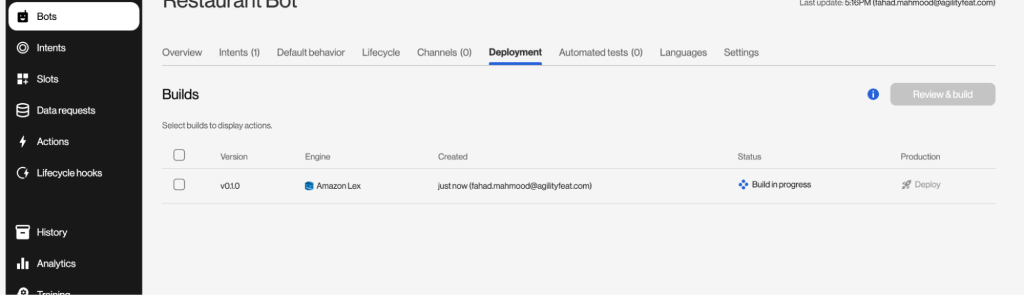
Open the Deployment tab in the “RestaurantBot” screen. Since it’s our first time deploying the bot, we will see a “Create your first build” button. Click on it, set the version name, select an NLP engine like Amazon Lex, and finally click on “Create Build”.
It might take a few minutes before the build is deployed and ready for use. You will see the “Build in progress” status.
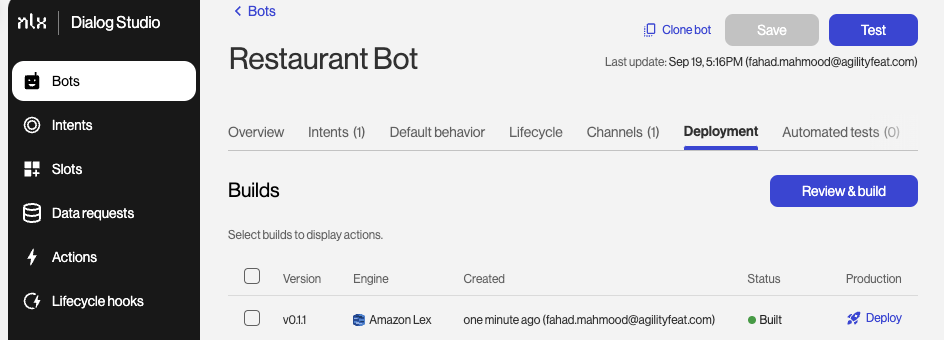
Once it is ready, it will change to “Built” status. Click “Deploy” under Production to deploy the bot and then “Create deployment”.
Let’s Eat!
To test this bot, head over to the Conversation Canvas and click on the “Test” tab at the bottom of the page. Here’s a demo:
The simple drag and drop components of the NLX Dialog Studio come together quite easily to configure our bot and create complex conversational flows.
Are you ready to integrate a Conversational AI Bot into your WebRTC application? Contact the expert AI integration experts at WebRTC.ventures today!


