
In this blog post, we will provide a tutorial on how to build a video conference application using webRTC.
We will not complicate it too much, it will be a simple one-to-one video conference application using nothing more than the WebRTC APIs and a few other libraries to build a custom signaling server.
Let’s first make a quick recapitulation of facts before we get started.
To do so let’s check the following diagram of webRTC communication process.
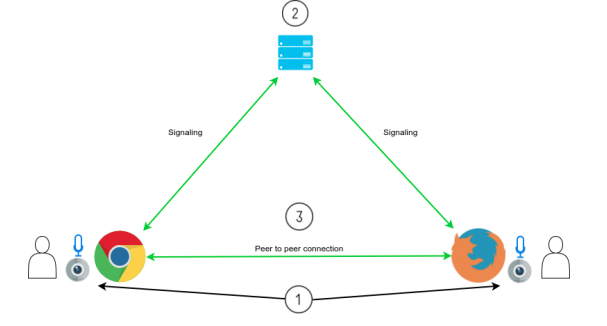
The process for enabling communication on WebRTC can be seen as a three step flow:
- The browser gets access to the media devices (camera and microphone0.
- Each peer exchanges information about itself with all other peers through a signaling process.
- After signaling, peers can connect directly and the communication begins.
To make all this possible, a signaling server is needed for information exchange. Also a pair of STUN/TURN servers are required to achieve NAT traversal and relay media if direct communication is not possible.
Ok, no without further ado, let us turn to the matter in hand: The Application.
The Application.
As we have said before, we will build a simple one-to-one video conference application. It will have a “rooms” functionality, where each “room” will host a different call.
The first thing a user will see is a screen to type a room number, which can be whatever he wants, then when another user wants to join him he should type the same room number for the call to begin.
The code for this tutorial is available as a public repository on Github, you can clone it to your computer or follow along with us to build it from scratch.
We’re using Javascript as programming language and Node.JS as runtime engine so you to install node if you don’t have it yet.
So let’s begin by creating a folder anywhere you want, this will be our project folder. Then create another one inside called public. Now using the command line, navigate to the project folder and paste the following commands to install the required dependencies. An internet connection it required to download the libraries.
npm init -y
npm install -S express@4.15.4 socket.io@2.0.3
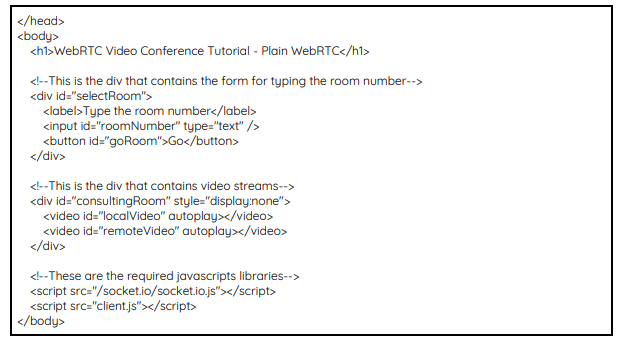
Now lets create a simple html file. It will contain two div elements, one for typing the room number, and another div for showing the video streams. The file will also contain script tags for the socket.io client library and another file that we will create later.
Using you favorite text editor, create a new file, paste the code below and save it in your project folder, inside public as index.html.

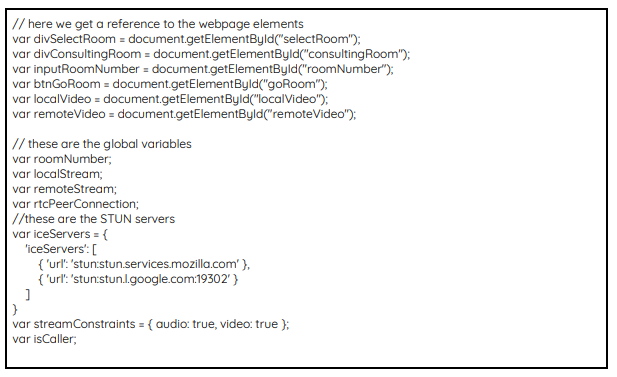
Great. The next step is to create a client side javascript file. In this file we will get a reference of the webpage elements as the divs, the input text where the user types the room number, the button the user clicks, etc. And then we’ll declare some global variable to store thing like the room number, the local and remote video and audio streams, the peer connection object and the TURN/STUN servers used.
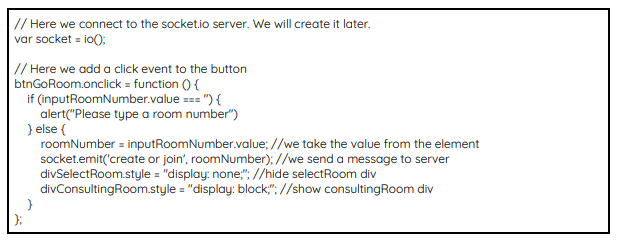
We’re also going to connect to socket.io server and we will add a click event to the button in which we’ll send a ‘create or join’ message to the server. Paste the code below on a new file and save it as client.js. in the public folder.
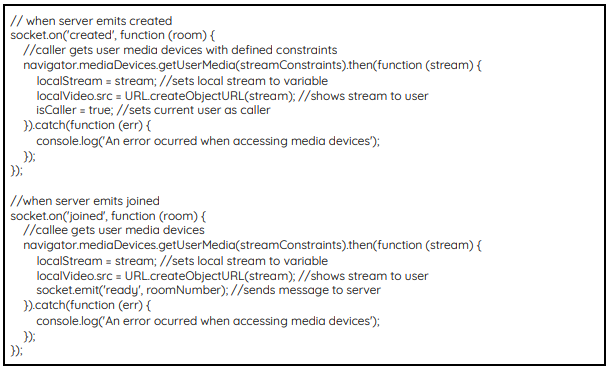
After sending the initial message to the server we need to wait for the responses, so we are going to set up some event handlers in the same client.js file.
When the first participant joins the call, the server creates a new room and then emits a ‘joined’ event to him. Then the same process is repeated in the second participant side: the browser gets access to the media devices, stores the stream on a variable and shows the video on the screen, but another action is taking, a ‘ready’ message is sent to the server. Add the code below to the bottom of client.js file.
Up until now the first step is done.
The server receives the ‘ready’ message and notifies the first participant by also sending him the same message. Here begins the exchange of information process known as Signaling so we need to add the correspondent handlers to our client.js file.
When the first participant receives the ‘ready’ message, its callback creates an RTCPeerConnection object, sets object’s onicecandidate and onaddstream listeners to the onIceCandidate and onAddStream functions respectively, we will review these functions later. Finally it adds the local stream to the peer connection object. After that it prepares an Offer, which will be stored locally and then sent to the server by the setLocalAndOffer function.
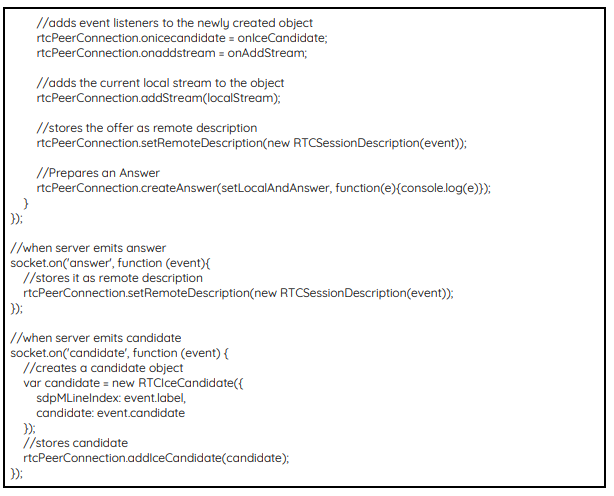
The server relays the offer to the second participant which in turn does the same process on the ‘offer’ callback: it creates its own peer connection object and sets its event listeners, it then stores the offer and prepares an Answer that will be stored locally and then sent to the server by the setLocalAndAnswer function.
Similar to the offer, the server will relay the answer to the first participant who will store it. While all this is happening, both peers are exchanging ice candidates by sending ‘candidate’ messages to the server which in turn relays them to the other client. The ice candidates are added to each client’s peer connection object. Add the code below to the bottom of client.js file

Second step is done.
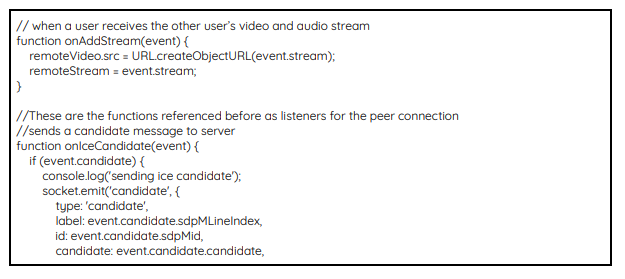
When everything is ready, each peer receives the remote stream, then the onAddStream function will show it on the screen. Below are the remaining functions of out client.js file.

And now our three-step flow is complete.
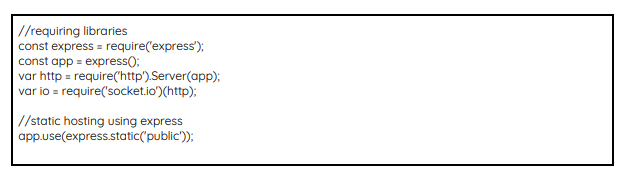
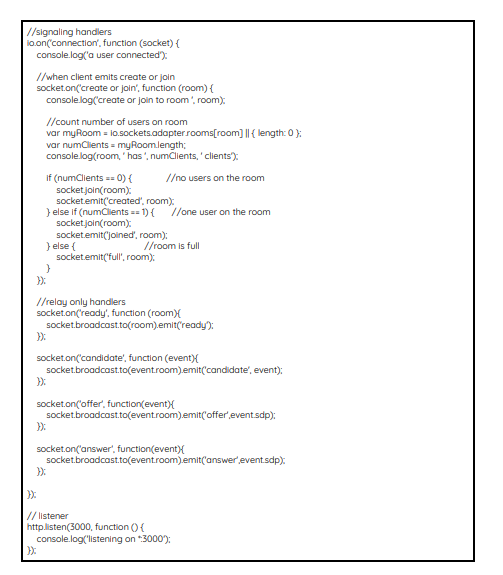
However we still haven’t complete our server. We begin by requiring the needed libraries and setting static hosting on the public folder to serve the client files.
Then we will define the signaling handlers using socket.io. First we’ll have the ‘create or join’ event, which count the number of clients in the room. If there are no users it means that the client is the first peer, so a ‘created; even is sent to him. If there is already one participant in the room then the client is added to the room and a ‘joined’ event is sent to him. If there are already two users in the room then it is considered full, so no more clients are added.
The subsequent events work as relays only, sending the same message received to the other client in the room. Create a new file, paste the code below and save it on the project folders as server.js.
Now that we have all required files, we are ready to test our application. On the command line, navigate to the project folder and type the following command:
node server.js
Then using Google Chrome or Mozilla Firefox, open this link on two separate tabs, make sure you type the same room number on both and clock Go.
Cool isn’t it?
We have created our first video conference application.
Want to leave it to the experts?
If you are ready to chat about how you can incorporate a video conference app into your business? We have an experienced team ready & happy to help you out. Contact us today.


